DevOps开发构建部署方案
重要通知
掌握开发环境与线上环境的一系列辅助工具链,不仅能够大幅度提高开发效率,同时增强团队协作尤其重要,而且在代码质量、线上健壮性等问题非常依赖工具链的构建。
注意事项
CI/CD:持续集成Continuous Integration(CI)和持续交付Continuous Delivery(CD)。
Lerna:monorepo管理工具
Lerna是用于管理具有多个包的 JavaScript 项目的工具,可以优化使用 git 和 npm 管理多包存储库的工作流程,用于管理和发布来自同一存储库的多个 JavaScript/TypeScript 包。
- 官网:https://lerna.js.org
- 中文文档:https://www.lernajs.cn/
- GitHub:https://github.com/lerna/lerna
- monorepo:https://monorepo.tools/
安装配置
> 初始化:npx lerna@latest init
> 可视化:npx nx graph
> 构建所有项目:npx lerna run build
> 测试所有:npx lerna run test
> lerna publish
> lerna version
> lerna bootstrap
> lerna list
> lerna changed
> lerna diff
> lerna exec
> lerna run
> lerna init
> lerna add
> lerna clean
> lerna import
> lerna link
> lerna create
> lerna info
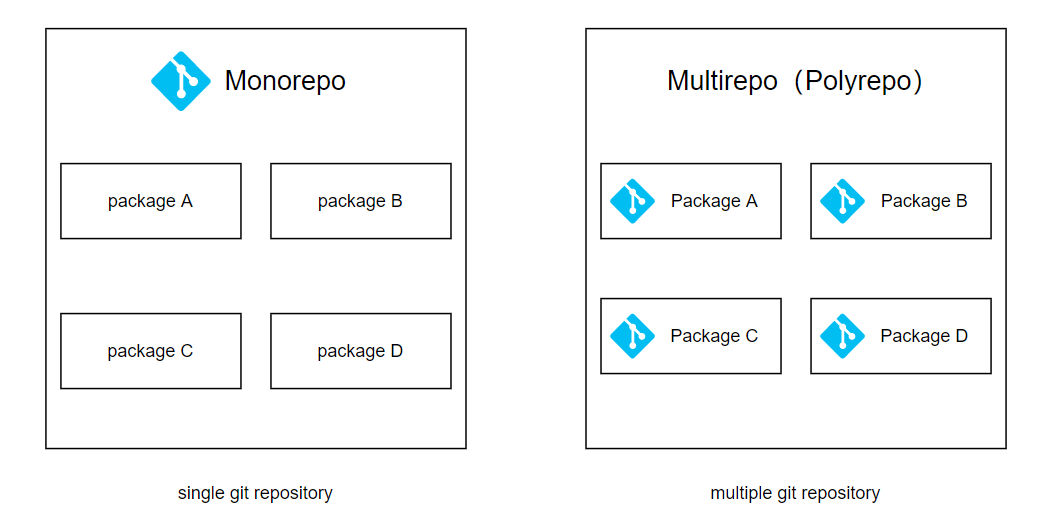
- multirepo:使用多个 Git 仓库分别管理项目的每一个 模块/包/功能/应用。
- monorepo:使用一个 Git 仓库管理项目相关的多个 模块/包/功能/应用。
重要通知
Babel、React、Angular、Ember、Meteor、Jest 和许多其他项目在一个存储库中开发他们所有的包。
- Lerna组织目录
LernaList
  package.json
  packages
    packageA
      src
      package.json
    packageA
      src
      package.json
    ...
- Lerna集成Nx
Nx:monorepo管理工具
Nx 是一个智能、快速和可扩展的构建系统,具有一流的 monorepo 支持和强大集成的下一代构建系统。
GitHub:https://github.com/nrwl/nx
https://github.com/DhivinX/nx-nestjs-vue/blob/master/nx.json
https://github.com/nabeel-shakeel/react-vue-microfrontend/blob/main/apps/dashboard/project.json
https://github.com/samatechtw/nx-vue3-vite/blob/main/nx.json
https://github.com/OlkaB/nx-vue/blob/main/apps/org/project.json
https://github.com/diogopaulino/nx-vue/blob/main/nx.json
https://github.com/hashptl/vue-nx-boilerplate/blob/main/nx.json
https://github.com/manuelgeek/nx-vite-infra/blob/main/nx.json
功能价值
通过此方案,对现有前端工程可实现如下效果,最终使整体构建时间稳定控制在 2分钟 以内。
- 未变更模块 0秒闪存构建
- 变更模块 按需编译
- 多模块 并行构建,Nx支持"并行任务调度"和"跨机器分布式构建"
- CI环境 缓存持久化
任务调度机制
- 并行化和任务依赖:Nx 自动项目之间的关联关系
- 仅运行更改的内容
- 缓存
- 分布式任务执行
本地缓存
在nx.json中进行配置
{
  "targetDefaults": {
    "build": {
      "cache": true
    },
    "test": {
      "cache": true
    }
  }
}
远程缓存:启用远程缓存
Nx 附带了一个建立在 Nx Cloud 之上的托管远程缓存解决方案。
npx nx@latest connect
分布式缓存
增量构建原理
性能验证指标
-------------------------------------------------------------------
场景 传统构建 Nx 优化后 加速比
-------------------------------------------------------------------
全量构建 (冷启动) 8-10 min 4 min 50%
增量构建 (修改工具库) 6 min 45 s 88%
CI 流水线 (缓存命中) 7 min 90 s 79%
-------------------------------------------------------------------
安装配置(所有操作前提)
# 全局安装 Nx: Mac
npm add --global nx

yarn global add nx
基础指令
# 构建整个工作空间(全量)
nx run-many --target=build --all

# 并行构建所有模块(无视依赖顺序)
npx nx run-many --target=build --all --parallel=3


# 构建受影响的项目(增量构建) | 仅运行受影响项目
nx affected --target=build


# 并行构建(最大并行数=CPU核心数)
nx affected --target=build --parallel --max-parallel=8


# 仅构建受影响的模块(对比 git 差异)
nx affected:build --base=origin/master --parallel=4


# 为单个项目运行任务
nx build my-app
nx test my-lib


# 为多个项目运行任务
nx run-many -t test --parallel=5


# 查看交互式图形
nx graph

# 查看所有项目的列表
nx show projects   # @nx-debug/fujinhuo    [workspace_name]/[application_name]

# 查看交互式项目详细视图
nx show project <project-name>

# 使用 Nx 运行任务,例如nx run-many -t build
nx run-many -t <target>


# 1. 验证依赖图
npx nx graph --file=graph.html

# 2. 清除缓存测试增量构建
nx reset && nx build module_1

# 3. 远程缓存模拟
NX_CLOUD_TOKEN=<token> nx build module_1


nx reset  # 清除无效缓存


# 使用Nx生成器创建库

# 生成库 module_1
nx g @nx/vue:lib module_1 --importPath="@your-project/module_1" --buildable=true
# 生成工具库 utils
nx g @nx/js:lib utils --importPath="@your-project/utils" --buildable=true

# 将 src/components/module_1、src/views/module_1 下的代码移动到 libs/module_1/src/lib 下
# 将 src/utils 下的代码移动到 libs/utils/src/lib 下
Nx Core
Nx CLI
# 全局安装
yarn global add nx | npm add --global nx


# 更新 Nx
nx migrate latest
Nx Plugin:Nx 插件
nx add @nx/vue
基础目录参考示例
├─ packages
├─ apps # [比选] 应用程序
│ ├─ module_1
│ │ ├─ public
│ │ ├─ src
│ │ │ ├─ api
│ │ │ ├─ router
│ │ │ └─ views
│ │ ├─ tsconfig.json
│ │ ├─ vite.config.ts
│ │ ├─ project.json # Nx项目配置
│ │ └─ Readme.md
│ ├─ module_2
│ └─ module_3
├─ libs # 共享库
│ ├─ core
│ ├─ components
│ └─ utils
├─ widgets
├─ dist # 构建打包目录
├─ nx.json # [比选] Nx工作区配置
├─ pnpm-workspace.yaml
├─ vite.base.config.js
├─ tsconfig.base.json
├─ tsconfig.json
├─ .nxignore
└─ package.json
/tsconfig.base.json
{
  "compilerOptions": {
    "composite": true,
    "declarationMap": true,
    "emitDeclarationOnly": true,
    "importHelpers": true,
    "isolatedModules": true,
    "lib": ["es2022"],
    "module": "esnext",
    "moduleResolution": "bundler",
    "noEmitOnError": true,
    "noFallthroughCasesInSwitch": true,
    "noImplicitOverride": true,
    "noImplicitReturns": true,
    "noUnusedLocals": true,
    "skipLibCheck": true,
    "strict": true,
    "target": "es2022",
    "customConditions": ["development"]
  }
}
/tsconfig.json
{
  "extends": "./tsconfig.base.json",
  "compileOnSave": false,
  "files": [],
  "references": [
    {
      "path": "./apps/module_1"
    }
  ]
}
/apps/module_1/tsconfig.json
{
  "extends": "../../tsconfig.base.json",
  "files": [],
  "include": [],
  "references": [
    {
      "path": "./tsconfig.app.json"
    },
    {
      "path": "./tsconfig.spec.json"
    }
  ]
}
/package.json
{
  "name": "nx-vite-infra",
  "version": "0.0.0",
  "license": "MIT",
  "private": true,
  "scripts": {
    "frontend-vue:dev": "nx run frontend-vue:preview",
    "frontend-vue:build": "nx run frontend-vue:build",
    "lint": "nx run-many --target=lint --all --parallel",
    "test": "nx run-many --target=test --all --parallel",
    "build": "nx run-many --target=build --all --parallel",
    "storybook:serve": "nx run ui-kit-vue:storybook",
    "storybook:build": "nx run ui-kit-vue:build",
    "prepare": "husky install",


    "dev": "nx serve app", // 启动开发服务器
    "build": "nx build app", // 构建应用
    "preview": "nx preview app", // 预览生产构建
    "test": "nx test app", // 运行测试
    "lint": "nx lint app", // 运行lint
    "nx:graph": "nx graph" // 可视化项目依赖图(非常有用)
    // 可以添加更多命令,如 nx run-many -t build (构建所有项目)
  },
  "private": true,
  "devDependencies": {
    // Nx 相关依赖通常会在 nx init 时自动添加,如:
    "nx": "~20.0.0", // 请使用最新稳定版本
    "@nx/vite": "~20.0.0", // Vite 插件
    "@nx/vue": "~20.0.0" // Vue 插件
    // ... 其他工作区级别 devDependencies


    "@babel/core": "^7.20.12",
    "@eslint/eslintrc": "^3.1.0",
    "@eslint/js": "~8.57.0",
    "@nrwl/eslint-plugin-nx": "^19.7.2",
    "@nrwl/jest": "19.7.2",
    "@nrwl/js": "19.7.2",
    "@nrwl/linter": "19.7.2",
    "@nrwl/workspace": "19.7.2",
    "@nx/esbuild": "19.7.2",
    "@nx/jest": "19.7.2",
    "@nx/js": "19.7.2",
    "@nx/next": "19.7.2",
    "@nx/node": "19.7.2",
    "@nx/storybook": "19.7.2",
    "@nx/vite": "19.7.2",
    "@nx/vue": "19.7.2",
    "@nx/web": "19.7.2",
    "@storybook/addon-essentials": "^8.2.8",
    "@storybook/addon-interactions": "^8.2.8",
    "@storybook/addon-themes": "^8.3.5",
    "@storybook/core-server": "^8.2.8",
    "@storybook/jest": "^0.2.3",
    "@storybook/test-runner": "^0.13.0",
    "@storybook/testing-library": "^0.2.2",
    "@storybook/vue3": "^8.2.8",
    "@storybook/vue3-vite": "^8.2.8",
    "@swc-node/register": "~1.9.1",
    "@swc/core": "~1.5.7",
    "@swc/helpers": "~0.5.11",
    "@testing-library/react": "15.0.6",
    "@types/jest": "29.5.12",
    "@types/node": "18.19.9",
    "@types/react": "18.3.1",
    "@types/react-dom": "18.3.0",
    "@typescript-eslint/eslint-plugin": "^8.5.0",
    "@typescript-eslint/parser": "7.18.0",
    "@vitejs/plugin-vue": "^5.1.3",
    "@vitest/coverage-v8": "^1.0.4",
    "@vitest/ui": "^1.3.1",
    "@vue/eslint-config-prettier": "7.1.0",
    "@vue/eslint-config-typescript": "^11.0.3",
    "@vue/test-utils": "^2.4.1",
    "autoprefixer": "^10.4.13",
    "babel-jest": "^29.7.0",
    "babel-loader": "^8.3.0",
    "c8": "^7.12.0",
    "copyfiles": "^2.4.1",
    "esbuild": "^0.19.2",
    "eslint": "8",
    "eslint-config-airbnb-typescript": "^18.0.0",
    "eslint-config-next": "14.2.3",
    "eslint-config-prettier": "9.1.0",
    "eslint-plugin-import": "2.27.5",
    "eslint-plugin-jsx-a11y": "6.7.1",
    "eslint-plugin-react": "7.32.2",
    "eslint-plugin-react-hooks": "^4.6.2",
    "eslint-plugin-vitest": "^0.5.4",
    "eslint-plugin-vue": "^9.28.0",
    "husky": "^8.0.3",
    "jest": "29.7.0",
    "jest-environment-jsdom": "29.7.0",
    "jest-environment-node": "^29.7.0",
    "jsdom": "~22.1.0",
    "lint-staged": "^13.1.1",
    "nx": "19.7.2",
    "nx-cloud": "19.1.0",
    "postcss": "8.4.38",
    "prettier": "^2.6.2",
    "rxjs": "^7.8.0",
    "storybook": "^8.2.8",
    "tailwindcss": "3.4.3",
    "ts-jest": "29.1.5",
    "ts-node": "10.9.1",
    "typescript": "~5.5.2",
    "vite": "^5.0.0",
    "vite-plugin-eslint": "^1.6.0",
    "vitest": "^1.3.1",
    "vitest-preview": "latest",
    "vue": "^3.3.4",
    "vue-eslint-parser": "^9.4.3",
    "vue-loader": "^16.8.3",
    "vue-tsc": "^2.0.0"
  },
  "overrides": {
    "vite": "^3.1.8"
  },
  "dependencies": {
    "@prisma/client": "^5.19.1",
    "apollo-server": "^3.13.0",
    "axios": "^1.6.0",
    "dotenv": "^16.4.5",
    "graphql": "^16.9.0",
    "next": "14.2.3",
    "nexus": "^1.3.0",
    "prisma": "^5.19.1",
    "react": "18.3.1",
    "react-dom": "18.3.1",
    "tslib": "^2.3.0",
    "vue-router": "^4.2.4"
  }
}
/apps/module_1/package.json
{
  "name": "@nx-vite-infra/frontend-vue"
}
/vite.base.config.js
import { defineConfig } from 'vite';
import vue from '@vitejs/plugin-vue';

export default defineConfig({
  plugins: [vue()],
  build: {
    target: 'es2020',
    minify: 'terser',
    terserOptions: {
      numWorkers: 4, // 多线程压缩
      compress: { drop_console: true }
    },
    rollupOptions: {
      output: {
        manualChunks: {
          vendor: ['vue', 'vue-router', 'pinia']
        }
      }
    }
  },
  cacheDir: '../../.vite_cache', // 统一缓存目录


  resolve: {
    alias: {
      '@': resolve(__dirname, 'apps/host-app/src'),

      // 为库定义别名,便于导入
      '@myrepo/module-1': resolve(__dirname, 'libs/module-1/src'),
      '@myrepo/module-2': resolve(__dirname, 'libs/module-2/src'),
      '@myrepo/module-3': resolve(__dirname, 'libs/module-3/src'),

      '@module_1': '../../libs/module_1/src',
      '@module_2': '../../libs/module_2/src'
    },
  }
});
/apps/module_1/vite.config.ts
import { defineConfig } from 'vite';
import baseConfig from '../../vite.base.config';

export default defineConfig({
  ...baseConfig,

  root: resolve(__dirname, '.'), // 重要:设置当前项目的根目录
  base: '/',
  publicDir: resolve(__dirname, 'public'),

  build: {
    ...baseConfig.build,
    outDir: '../../dist/apps/main-app',

    outDir: resolve(__dirname, '../../dist'),
    emptyOutDir: true,

    rollupOptions: {
      ...baseConfig.build.rollupOptions,
      input: 'src/main.js',

      // 确保外部化处理那些你不想打包进库的依赖
      external: [],
      output: {
        // 提供全局变量到这些外部化的依赖
        globals: {},
      },
    }
  },
  resolve: {
    alias: {
      '@': resolve(__dirname, 'src'),
    },


    // 配置路径别名,确保Vite能正确解析Monorepo中的库
    alias: {
      '@your-project/module_1': join(__dirname, '../../libs/module_1/src/index.ts'),
      '@your-project/utils': join(__dirname, '../../libs/utils/src/index.ts'),
      // ... 其他库的别名
    },
  }
});
/apps/module_1/project.json
每个应用(/apps)和库(/libs)都需要一个 project.json文件来定义其项目特定的目标和配置。
{
  "name": "module_1",

  "$schema": "../../node_modules/nx/schemas/project-schema.json",


  "root": "apps/dashboard",
  "sourceRoot": "apps/mobile/src",
  "projectType": "application",

  "sourceRoot": "apps/webapp/src",
  "sourceRoot": "libs/module_1/src",
  "projectType": "library",

  "tags": [],
  "tags": ["scope:host", "type:app"],

  "targets": {
    "build": {
      "executor": "@nx/vite:build",
      "outputs": ["{options.outputPath}"],
      "options": {
        "outputPath": "dist/libs/module_1",
        "configFile": "libs/module_1/vite.config.js",

        "outputPath": "dist/apps/webapp",
        "configFile": "apps/webapp/vite.config.ts",

        "watch": false,
        "lib": {
          "entry": "src/index.ts",
          "name": "Module1",
          "formats": ["es"]
        }
      },
      "dependsOn": ["^build"]
    },
    "serve": {
      "executor": "@nx/vite:dev-server",
      "options": {
        "configFile": "apps/webapp/vite.config.ts"
      }
    },


    "dev": {
      "executor": "@nx/vite:dev",
      "defaultConfiguration": "development",
      "options": {
        "mode": "development",
        "configFile": "apps/host-app/vite.config.ts",
        "port": 3000
      },
      "configurations": {
        "development": {
          "mode": "development"
        },
        "production": {
          "mode": "production"
        }
      }
    },
    "build": {
      "executor": "@nx/vite:build",
      "defaultConfiguration": "production",
      "outputs": ["{projectRoot}/dist"],
      "dependsOn": ["^build"], // 确保依赖库先构建
      "options": {
        "configFile": "apps/host-app/vite.config.ts",
        "mode": "production"
      },
      "configurations": {
        "production": {
          "mode": "production",
          "sourcemap": false,
          "minify": "esbuild"
        },
        "development": {
          "mode": "development"
        }
      }
    },
    "preview": {
      "executor": "@nx/vite:preview",
      "defaultConfiguration": "production",
      "options": {
        "configFile": "apps/host-app/vite.config.ts",
        "mode": "production"
      }
    }
  }
}
libs/module-1/project.json
{
  "name": "module-1",
  "$schema": "../../node_modules/nx/schemas/project-schema.json",
  "sourceRoot": "libs/module-1/src",
  "projectType": "library",
  "tags": ["scope:module-1", "type:lib"],
  "targets": {
    "build": {
      "executor": "@nx/vite:build",
      "outputs": ["{projectRoot}/dist", "{projectRoot}/src/index.ts"],
      "options": {
        "configFile": "libs/module-1/vite.config.ts",
        "lib": {
          "entry": "libs/module-1/src/index.ts",
          "formats": ["es"]
        },
        "mode": "production"
      }
    },
    "type-check": {
      "executor": "nx:run-commands",
      "options": {
        "command": "tsc --noEmit -p libs/module-1/tsconfig.json"
      }
    }
  }
}
/pnpm-workspace.yaml
packages:
  - 'apps/*'
  - 'libs/*'
/nx.json
包含 Nx 本身的配置设置和各个项目继承的全局默认设置。
{
  "$schema": "./node_modules/nx/schemas/nx-schema.json",
  "npmScope": "workspace",

  "defaultBase": "master",
  "defaultProject": "frontend-vue",

  "installation": {
    "version": "21.4.1"
  },
  "affected": {
    "defaultBase": "main"
  },
  "implicitDependencies": {
      "package.json": {
          "dependencies": "*",
          "devDependencies": "*"
      },
      ".eslintrc.json": "*"
  },


  "neverConnectToCloud": true,
  "namedInputs": {
    "default": ["{projectRoot}/**/*", "sharedGlobals"],
    "production": [
      "default",
      "!{projectRoot}/.eslintrc.json",
      "!{projectRoot}/**/?(*.)+(spec|test).[jt]s?(x)?(.snap)",
      "!{projectRoot}/tsconfig.spec.json",
      "!{projectRoot}/jest.config.[jt]s",
      "!{projectRoot}/**/*.stories.@(js|jsx|ts|tsx|mdx)",
      "!{projectRoot}/.storybook/**/*",
      "!{projectRoot}/tsconfig.storybook.json",
      "!{projectRoot}/eslint.config.js"
    ],
    "sharedGlobals": []
  },

  "parallel": 4,
  "cacheDirectory": "tmp/my-nx-cache",
  // "cacheDirectory": "./.nx-cache"

  "namedInputs": {
    "default": ["{projectRoot}/**/*"],
    "production": ["!{projectRoot}/**/*.spec.tsx"]
  },


  "generators": {
    "@nx/next": {
      "application": {
        "style": "tailwind",
        "linter": "eslint"
      }
    },
    "@nx/js:library": {
      "buildable": true
    }
  },


  "release": {
    "version": {
      "conventionalCommits": true
    },
    "changelog": {
      "git": {
        "commit": true,
        "tag": true
      },
      "workspaceChangelog": {
        "createRelease": "github"
      },
      "projectChangelogs": true
    }
  },
  "sync": {
    "globalGenerators": ["my-plugin:my-sync-generator"]
  },
  "extends": "nx/presets/npm.json",
  "tui": {
    "enabled": true,
    "autoExit": true
  },


  // 任务运行器
  "tasksRunnerOptions": {
    // "runner": "nx/tasks-runners/default",
    "default": {
      "runner": "nx-cloud",  // 配置远程缓存
      "runner": "nx/tasks-runners/default",
      "options": {
        "accessToken": "YOUR_NX_CLOUD_TOKEN",

        "cacheableOperations": ["build", "test", "lint"],

        "parallel": 4,  // 并行任务数
        "cacheDirectory": ".nx/cache",
        "cacheDirectory": "../.nx-cache", // 缓存目录,CI环境中可配置到持久化位置

        "cacheableOperations": [
          "build",
          "nexus-generate",
          "lint",
          "test",
          "generate",
          "build-storybook"
        ],
      }
    }
  },


  "targetDefaults": {
    "@nx/js:tsc": {
      "inputs": ["production", "^production"],
      "dependsOn": ["^build"],
      "options": {
        "main": "{projectRoot}/src/index.ts"
      },
      "cache": true
    },

    "test": {
      "cache": true,
      "inputs": ["default", "^production", "{workspaceRoot}/jest.preset.js"],
      "outputs": ["{workspaceRoot}/coverage/{projectRoot}"],
      "executor": "@nx/jest:jest"
    },

    "build": {
      "dependsOn": ["^build"], // 依赖优先构建
      "inputs": ["production", "^production"]
    },
    "build": {
      "cache": true,
      "inputs": [
        "{projectRoot}/**/*.ts",
        "{projectRoot}/tsconfig.json",
        { "externalDependencies": ["typescript"] }
      ],
      "outputs": ["{projectRoot}/dist"]
    },
    "build": {
      "dependsOn": ["^build"],
      "inputs": ["production", "^production"],
      "executor": "@nx/vite:build",
      "options": {
        "outputPath": "dist/{projectName}",
        "reportCompressedSize": false
      }
    },


    "lint": {
      "inputs": [
        "default",
        "{workspaceRoot}/.eslintrc.json",
        "{workspaceRoot}/eslint.config.js"
      ],
      "cache": true
    },
    "test": {
      "inputs": ["default", "^production", "{workspaceRoot}/jest.preset.js"],
      "cache": true
    },
    "@nx/esbuild:esbuild": {
      "cache": true,
      "dependsOn": ["^build"],
      "inputs": ["production", "^production"]
    },
    "e2e": {
      "cache": true
    },


		"dev": {
			"cache": true,
      "inputs": ["development", "^development"]
		},
		"dev:ts": {
			"cache": true
		},
		"build": {
			"cache": true
		},
		"build:dev": {
			"cache": true
		},
		"build:test": {
			"cache": true
		},
		"build:ts": {
			"cache": true
		},
		"test": {
			"cache": true
		},
		"test:ts": {
			"cache": true
		}
  },


  // 插件
	"plugins": [
    "@my-org/graph-plugin",
    "@nx/vite",
    "@nx/vue",
    {
      "plugin": "@nx/eslint/plugin",
      "options": {
        // "targetName": "eslint:lint"
        "targetName": "lint"
      }
    },

		{
			"plugin": "@nx/jest/plugin",
			"options": {
				"targetName": "jest:test"
			}
		},
    {
      "plugin": "@nx/eslint/plugin",
      "options": {
        "targetName": "lint"
      }
    },

    // 将插件范围限定为特定项目
    {
      "plugin": "@nx/jest/plugin",
      "include": ["packages/**/*"], // include any projects in the packages folder
      "exclude": ["**/*-e2e/**/*"] // exclude any projects in a *-e2e folder
    },


    {
      "plugin": "@nx/js/typescript",
      "options": {
        "typecheck": {
          "targetName": "typecheck"
        },
        "build": {
          "targetName": "build",
          "configName": "tsconfig.lib.json",
          "buildDepsName": "build-deps",
          "watchDepsName": "watch-deps"
        }
      }
    },
    {
      "plugin": "@nx/eslint/plugin",
      "options": {
        "targetName": "lint"
      }
    },

    // vite插件
    {
      "plugin": "@nx/vite/plugin",
      "options": {
        "buildTargetName": "build",
        "testTargetName": "test",
        "serveTargetName": "serve",
        "devTargetName": "dev",

        "previewTargetName": "preview",
        "serveStaticTargetName": "serve-static",
        "typecheckTargetName": "typecheck",
        "buildDepsTargetName": "build-deps",
        "watchDepsTargetName": "watch-deps",

				// "buildTargetName": "vite:build",
				// "testTargetName": "test",
				// "serveTargetName": "serve",
				// "devTargetName": "vite:dev",
				// "previewTargetName": "vite:preview",
				// "serveStaticTargetName": "serve-static",
				// "typecheckTargetName": "typecheck",
				// "buildDepsTargetName": "build-deps",
				// "watchDepsTargetName": "watch-deps"

        // "buildTargetName": "vite:build",
        // "testTargetName": "vite:test",
        // "serveTargetName": "vite:serve",
        // "previewTargetName": "preview",
        // "serveStaticTargetName": "serve-static",
        // "typecheckTargetName": "typecheck"
      }
    },

    {
      "plugin": "@nx/next/plugin",
      "options": {
        "startTargetName": "start",
        "buildTargetName": "build",
        "devTargetName": "dev",
        "serveStaticTargetName": "serve-static"
      }
    },

    {
      "plugin": "@nx/storybook/plugin",
      "options": {
        "serveStorybookTargetName": "storybook",
        "buildStorybookTargetName": "build-storybook",
        "testStorybookTargetName": "test-storybook",
        "staticStorybookTargetName": "static-storybook"
      }
    },

    // 将插件范围限定为特定项目
    {
      "plugin": "@nx/jest/plugin",
      "include": ["packages/**/*"], // include any projects in the packages folder
      "exclude": ["**/*-e2e/**/*"] // exclude any projects in a *-e2e folder
    }
	]
}
.nxignore
实战:改造旧项目
基于vite、vue3的前端工程。
旧有工程
├─ build
├─ env
├─ public
├─ src
│ ├─ api
│ ├─ assets
│ ├─ common
│ ├─ components
│ │ ├─ module_1
│ │ ├─ module_2
│ │ └─ module_3
│ ├─ config
│ ├─ core
│ ├─ helpers
│ ├─ router
│ ├─ stores
│ ├─ utils
│ ├─ views
│ │ ├─ module_1
│ │ ├─ module_2
│ │ └─ module_3
│ ├─ widgets
│ ├─ App.vue
│ └─ main.js
├─ index.html
├─ dist
├─ node_modules
├─ vite.config.js
├─ package.json
└─ Readme.md
配置步骤
# 在已有项目根目录中进行初始化
npx nx@latest init
# 出现下列交互式问答信息
Ok to proceed? (y) y
? Would you like a minimum or guided setup?
# 最小化模式,仅安装 Nx 核心功能(nx包),不添加任何框架插件(如 React/Angular/Vue)或额外工具(如 Cypress、Storybook)。
# 生成基础配置文件(nx.json、package.json更新)和任务运行器,但需手动配置项目结构。
# 已有项目改造为 Monorepo,仅需基础任务管理(如缓存、依赖图)。
# 开发者熟悉 Nx 且希望保持轻量配置,后续按需逐步扩展
❯ Minimum # 最小化模式,自动生成 nx.json 并更新 package.json,手动添加插件:npm install -D @nx/react @nx/webpack
# 引导模式
# 框架选择(React、Angular、Vue 等)及插件自动安装。
# 工具集成:测试框架(Jest/Vitest)、E2E(Cypress)、状态管理(Pinia/NgRx)等。
# 预设项目结构:自动创建 apps/(应用)和 libs/(共享库)目录,配置 TS 路径别名。
# 全新 Monorepo 项目,需快速搭建完整技术栈。
# 不熟悉 Nx 的团队,通过向导减少配置错误
Guided # 引导模式,交互式向导引导配置
# 渠道二
# 选择 Guided
? Which of the following scripts are cacheable? # 在package.json的"scripts"中哪些指令需要缓存?按空格键实现选择,按上下键跳转选项,可单选,可多选
✔ dev
✔ dev:ts
✔ build
✔ build:dev
✔ build:test
✔ build:ts
✔ test
✔ test:ts
✔ lint
✔ view
✔ lint:stylelint
✔ test:unit
? Would you like remote caching to make your build faster?
skip
? Which plugins would you like to add? Press <Space> to select and <Enter> to submit. …
@nx/vite
? Do you want to start using Nx in your package.json scripts?
Yes
# 生成或修改以下文件
nx.json
package.json
.gitignore
? Would you like to enable AI-powered Self-Healing CI and Remote Caching? …
# (it's free and can be disabled any time)
Yes
Skip for now
# 安装必要的插件
npm install -D @nx/vue @nx/vite @nx/workspace
重构项目结构
├─ packages
├─ apps # 应用程序
│ ├─ module_1
│ │ ├─ public
│ │ ├─ src
│ │ │ ├─ api
│ │ │ ├─ router
│ │ │ └─ views
│ │ ├─ vite.config.ts
│ │ ├─ project.json # Nx项目配置
│ │ └─ Readme.md
│ ├─ module_2
│ └─ module_3
├─ libs # 共享库
│ ├─ core
│ ├─ components
│ └─ utils
├─ widgets
├─ nx.json # Nx工作区配置
├─ workspace.json
└─ package.json
apps/module_1/project.json
{
  "name": "your-vue-app",
  "projectType": "application",
  "sourceRoot": "apps/your-vue-app/src",
  "targets": {
    "serve": {
      "executor": "@nx/vite:dev-server",
      "options": {
        "buildTarget": "your-vue-app:build",
        "configFile": "apps/main-app/vite.config.ts"
      }
    },
    "build": {
      "executor": "@nx/vite:build",
      "outputs": ["{options.outputPath}"],
      "options": {
        "outputPath": "dist/apps/your-vue-app",
        "configFile": "apps/main-app/vite.config.ts"
      }
    },
    "test": {
      "executor": "@nx/vite:test",
      "options": {}
    }
  }
}
apps/module_1/vite.config.ts
import { defineConfig } from 'vite';
import vue from '@vitejs/plugin-vue';
import { resolve } from 'path';
import { nxViteTsPaths } from '@nx/vite/plugins/nx-tsconfig-paths.plugin'

// 关键:修正路径别名
export default defineConfig({
  plugins: [vue(), nxViteTsPaths()],
  resolve: {
    alias: {
      '@': resolve(__dirname, './src'),
      // 添加monorepo内其他库的路径映射
      '@shared': resolve(__dirname, '../../libs/shared')
    }
  }
})
nx.json
{

}
package.json
{
  "nx": {},
  "workspaces": [
    "apps/*"
  ]
}
安装 Nx 插件
yarn add @nx/vite @nx/vue @nx/js @nx/workspace
实战:新项目
项目名称:nx_project
# 初始化Nx工作空间
npx create-nx-workspace
npx create-nx-workspace@latest # 最新

# NX   Let's create a new workspace [https://nx.dev/getting-started/intro]

# 填写项目名称
? Where would you like to create your workspace? ‣ nx_project


# 选择技术栈
? Which stack do you want to use? …
None:          Configures a TypeScript/JavaScript monorepo.
React:         Configures a React application with your framework of choice.
Vue:           Configures a Vue application with your framework of choice.
Angular:       Configures a Angular application with modern tooling.
Node:          Configures a Node API application with your framework of choice.

# 选择 Vue
None          I only want Vue
Nuxt          [ https://nuxt.com/ ]


# 应用名称
? Application name ‣ vue_project


? Which unit test runner would you like to use? …
Vitest [ https://vitest.dev/ ]
None


? Test runner to use for end to end (E2E) tests …
Playwright [ https://playwright.dev/ ]
Cypress [ https://www.cypress.io/ ]
None


? Default stylesheet format …
CSS
SASS(.scss)       [ https://sass-lang.com   ]
LESS              [ https://lesscss.org     ]
None


? Would you like to use ESLint? …
Yes
No


? Would you like to use Prettier for code formatting? …
Yes
No


? Which CI provider would you like to use? …
GitHub Actions
Gitlab
Azure DevOps
BitBucket Pipelines
Circle CI

Do it later


? Would you like remote caching to make your build faster? …
(can be disabled any time)
Yes
No - I would not like remote caching


✔ Where would you like to create your workspace? · nx_project
✔ Which stack do you want to use? · vue
✔ What framework would you like to use? · none
✔ Application name · vue_project
✔ Which unit test runner would you like to use? · vitest
✔ Test runner to use for end to end (E2E) tests · none
✔ Default stylesheet format · scss
✔ Would you like to use ESLint? · Yes
✔ Would you like to use Prettier for code formatting? · Yes
✔ Which CI provider would you like to use? · skip
✔ Would you like remote caching to make your build faster? · skip

 NX   Creating your v21.4.1 workspace.


# 初始化依赖
✔ Installing dependencies with npm
✔ Successfully created the workspace: nx_project


# 新建后的项目结构 nx_project
├─ node_modules
├─ apps
│ ├─ vue_project
│ │ ├─ src
│ │ ├─ index.html
│ │ └─ package.json
│ └─ project_01
├─ tsconfig.json
├─ vitest.workspace.ts
├─ nx.json
├─ package.json
└─ README.md
实战:将现有项目导入 Nx 工作区
其他创建参考
操作示例一
# 新建目录
mkdir nx_test
cd nx_test

# 初始化
nx init

CREATE nx.json
CREATE .gitignore
CREATE .nx/nxw.js
CREATE nx.bat
CREATE nx
操作示例二
# 新建目录
mkdir nx_test
cd nx_test


# 初始化package.json
yarn init

# package.json
{
  "name": "my-workspace",
  "version": "1.0.0",
  "private": true,
  "workspaces": ["packages/*", "apps/*"]
}


# 初始化
nx init

? Would you like a minimum or guided setup? …
❯ Minimum
  Guided

# 结果:nx_test
├─ node_modules
├─ nx.json
└─ package.json
创建新工作区
# 在任意目录执行该命令
npx create-nx-workspace@latest


Need to install the following packages:
create-nx-workspace@21.5.3
Ok to proceed? (y)


NX Let\'s create a new workspace [https://nx.dev/getting-started/intro]
? Where would you like to create your workspace? › nx_debug


? Which stack do you want to use? …
None:          Configures a TypeScript/JavaScript monorepo.
React:         Configures a React application with your framework of choice.
Vue:           Configures a Vue application with your framework of choice.
Angular:       Configures a Angular application with modern tooling.
Node:          Configures a Node API application with your framework of choice.


? What framework would you like to use? …
None          I only want Vue
Nuxt          [ https://nuxt.com/ ]


? Application name › nx_debug_app


? Which unit test runner would you like to use? …
Vitest [ https://vitest.dev/ ]
None


? Test runner to use for end to end (E2E) tests …
Playwright [ https://playwright.dev/ ]
Cypress [ https://www.cypress.io/ ]
None


? Default stylesheet format …
CSS
SASS(.scss)       [ https://sass-lang.com   ]
LESS              [ https://lesscss.org     ]
None


? Would you like to use ESLint? …
Yes
No


? Would you like to use Prettier for code formatting? …
Yes
No


? Which CI provider would you like to use? …
GitHub Actions
Gitlab
Azure DevOps
BitBucket Pipelines
Circle CI

Do it later

Self-healing CI, remote caching, and task distribution are provided by Nx Cloud: https://nx.dev/nx-cloud


? Would you like remote caching to make your build faster? …
(can be disabled any time)
Yes
No - I would not like remote caching

Read more about remote caching at https://nx.dev/ci/features/remote-cache


# 开始安装
NX   Creating your v21.5.3 workspace.

✔ Installing dependencies with npm
✔ Successfully created the workspace: nx_debug
- 创建成功后的工程目录
├─ node_modules
├─ .nx
├─ .vscode
├─ apps # 必须
│ ├─ nx_debug_app # vue工程
│ │ ├─ src
│ │ │ ├─
│ │ │ ├─
│ │ │ └─
│ │ ├─ index.html
│ │ ├─ package.json
│ │ └─ vite.config.ts
├─ .editorconfig
├─ .gitignore
├─ .prettierignore
├─ .prettierrc
├─ eslint.config.mjs
├─ tsconfig.base.json
├─ tsconfig.json
├─ vitest.workspace.ts
├─ nx.json # 必须
└─ package.json # 必须
Turborepo:monorepo管理工具
Jenkins集成方案
基于java语言编写的CI自动部署工具
- 官网:https://www.jenkins.io/
- GitHub:<>
检测package.json是否存在未安装的依赖包
diff --unified file1.json file2.json
安装配置java见/computer/java.md
安装配置
配置JDK环境
见/Language/java/install.md配置文档
进入官网, yum安装可忽略此步骤
首页:https://jenkins.io/download/
选择Red Hat/Fedora/CentOS,进入https://pkg.jenkins.io/redhat-stable/
选择版本:https://pkg.jenkins.io/redhat-stable/jenkins-2.150.1-1.1.noarch.rpm
添加Jenkins库到yum库, Jenkins将从这里下载安装
wget -O /etc/yum.repos.d/jenkins.repo http://pkg.jenkins-ci.org/redhat/jenkins.repo
rpm --import https://jenkins-ci.org/redhat/jenkins-ci.org.key
yum install -y jenkins
配置jenkis的端口
vim /etc/sysconfig/jenkins
JENKINS_PORT="1899"
启动jenkins
service jenkins start
注意事项
安装成功后Jenkins将作为一个守护进程随系统启动
系统会创建一个“jenkins”用户来允许这个服务,如果改变服务所有者,同时需要修改/var/log/jenkins, /var/lib/jenkins, 和/var/cache/jenkins的所有者
启动的时候将从/etc/sysconfig/jenkins获取配置参数
默认情况下,Jenkins运行在8080端口,在浏览器中直接访问该端进行服务配置
Jenkins的RPM仓库配置被加到/etc/yum.repos.d/jenkins.repo
在浏览器打开jenkins
106.13.47.239:1899/jenkins
初始密码在:vim /var/lib/jenkins/secrets/initialAdminPassword
选择"Install suggested plugins"
上传下载配置文件
get:get /etc/sysconfig/jenkins D:/devpt/project/server/docment/Jenkins/Document
get:get /var/lib/jenkins/secrets/initialAdminPassword D:/devpt/project/server/docment/Jenkins/Document
创建超级管理员账号
用户名:ysungod
密码:noPs_123
确认密码:noPs_123
全名:ysun
电子邮件地址:ysungod@163.com
Jenkins配置
下载插件: 系统管理 > 插件管理 > 插件(publis over ssh)
服务器配置:系统管理 > 系统设置 > SSH Servers(name | Host Name | Username | Remote Directoey | Password)
配置多台服务器
管理节点 > 新建节点 > 配置好节点相关参数
例如:两台服务器节点:Release-Linux-1 和 Release-Linux-2
保存的这些服务器就是以后要分发到各台的服务器
创建一个构建任务(注意权限)
创建一个新任务: 构建一个自由风格的软件项目 > (General | 源码管理 | 构建触发器 | 构建环境 | 构建 | 构建后操作)> 配置仓库(URL | 权限 | 分支)
立即构建:生存工作空间
再次进入工作空间,看到构建任务
填写jenkins构建时执行的shell脚本: 首页 > 配置 > 构建触发器 > 配置构建shell脚本(见vue构建脚本)
保存,应用,返回首页
立即构建,测试是否构建成功
Vue系列插件
系统管理 > 插件管理 > (可更新 | 可选插件 | 已安装 | 高级)
插件:node.js | npm | webpack
注意,需要安装node.js环境
给用户添加对应目录权限
chown -R jenkins:jenkins /www/web/site
profile
# /etc/profile

# System wide environment and startup programs, for login setup
# Functions and aliases go in /etc/bashrc

# It's NOT a good idea to change this file unless you know what you
# are doing. It's much better to create a custom.sh shell script in
# /etc/profile.d/ to make custom changes to your environment, as this
# will prevent the need for merging in future updates.

pathmunge () {
    case ":${PATH}:" in
        *:"$1":*)
            ;;
        *)
            if [ "$2" = "after" ] ; then
                PATH=$PATH:$1
            else
                PATH=$1:$PATH
            fi
    esac
}


if [ -x /usr/bin/id ]; then
    if [ -z "$EUID" ]; then
        # ksh workaround
        EUID=`/usr/bin/id -u`
        UID=`/usr/bin/id -ru`
    fi
    USER="`/usr/bin/id -un`"
    LOGNAME=$USER
    MAIL="/var/spool/mail/$USER"
fi

# Path manipulation
if [ "$EUID" = "0" ]; then
    pathmunge /usr/sbin
    pathmunge /usr/local/sbin
else
    pathmunge /usr/local/sbin after
    pathmunge /usr/sbin after
fi

HOSTNAME=`/usr/bin/hostname 2>/dev/null`
HISTSIZE=1000
if [ "$HISTCONTROL" = "ignorespace" ] ; then
    export HISTCONTROL=ignoreboth
else
    export HISTCONTROL=ignoredups
fi

export PATH USER LOGNAME MAIL HOSTNAME HISTSIZE HISTCONTROL

# By default, we want umask to get set. This sets it for login shell
# Current threshold for system reserved uid/gids is 200
# You could check uidgid reservation validity in
# /usr/share/doc/setup-*/uidgid file
if [ $UID -gt 199 ] && [ "`/usr/bin/id -gn`" = "`/usr/bin/id -un`" ]; then
    umask 002
else
    umask 022
fi

for i in /etc/profile.d/*.sh /etc/profile.d/sh.local ; do
    if [ -r "$i" ]; then
        if [ "${-#*i}" != "$-" ]; then
            . "$i"
        else
            . "$i" >/dev/null
        fi
    fi
done

unset i
unset -f pathmunge


#set java environment
JAVA_HOME=/usr/lib/jvm/jre-1.8.0-openjdk.x86_64
PATH=$PATH:$JAVA_HOME/bin
CLASSPATH=.:$JAVA_HOME/lib/dt.jar:$JAVA_HOME/lib/tools.jar
export JAVA_HOME CLASSPATH PATH
Plugins
插件安装
Publish Over SSH
用于SSH连接远程的服务器
安装步骤:系统管理 - 管理插件 - Publish Over SSH - Install without restore
Git
用于拉取GitHub | GitLab上的代码,若非开源,则需要配置帐号与密码
NodeJs
安装步骤:系统管理 - 管理插件 - NodeJs
配置步骤:系统管理 - Global Tool Configuration -
Vue工程部署集成
# Vue构建脚本
npm install
rm -rf ./dist/*
npm run build
# 备份旧版本项目/home/www/fujinhuo/*
cp -rf /home/www/fujinhuo/* /home/www/default/fujinhuo/
rm -rf /home/www/fujinhuo/*
cp -rf ./dist/* /home/www/fujinhuo/

# Excute shell
cd /var/jenkins_home/workspace/test #进入test项目目录
npm install chromedriver --chromedriver_cdnurl=http://cdn.npm.taobao.org/dist/chromedriver
npm install
npm run build
cd dist
rm -rf test.tar.gz #删除上次打包生成的压缩文件
tar -zcvf test.tar.gz * #把生成的项目打包成test方便传输到远程服务器
cd ../


# Send build artifacts over SSH
> Name:第三步创建的远程服务器名称
> Source files:本地需要传输过去的文件路径
> Remove prefix:过滤掉的目录名
> Remote directory:远程服务器的保存路径

> Exec command:传输完成后在远程服务器执行的sh命令
# 把打包后的代码拷贝至目标服务器
cd /home/wwwroot/test              # 进入远程服务器的test目录
tar -zxvf test.tar.gz -C dist/     # 解压test文件到dist文件夹
rm -rf test.tar.gz                 # 删除test文件
其他构建工具
Yeoman
Yeoman是用于现代 WEBAPPS 的 WEB 脚手架工具,可以帮助开发人员快速构建漂亮、引人注目的 Web 应用程序。
Babel
Babel 是一个 JavaScript 编译器。
安装配置
> pnpm i babel-cli babel-preset-es2015
Browserify
Browserify 可以让你使用类似于 node 的 require() 的方式来组织浏览器端的 Javascript 代码,通过预编译让前端 Javascript 可以直接使用 Node NPM 安装的一些库。
安装配置
> npm install -g browserify
开发环境规范工具
TSLint
TSLint 是一个可扩展的静态分析工具,用于检查TypeScript代码的可读性、可维护性和功能错误。
严重警告
TSLint自2019 年起已被弃用,typescript-eslint现在是 linting TypeScript 的最佳选择。。
TypeScript ESLint
typescript-eslint使 ESLint 能够在 TypeScript 代码上运行,它结合了这两种工具的精华,帮助您编写尽可能好的 JavaScript 或 TypeScript 代码。
.eslintrc.js
module.exports = {
  root: true,
  parser: '@typescript-eslint/parser',
  parserOptions: {
    tsconfigRootDir: __dirname,
    project: ['./tsconfig.json'],
  },
  plugins: ['@typescript-eslint'],
  extends: [
    'eslint:recommended',
    'plugin:@typescript-eslint/recommended',
    'plugin:@typescript-eslint/recommended-requiring-type-checking',
  ],
};
JSLint
JSLint定义了一组编码约定,这比ECMA定义的语言更为严格。
Commitlint
commitlint帮助您的团队遵守提交约定。通过支持 npm 安装的配置,它使提交约定的共享变得容易。
> npm install -g @commitlint/cli @commitlint/config-conventional
> echo "module.exports = {extends: ['@commitlint/config-conventional']}" > commitlint.config.js
- commitlint.config.js
module.exports = {
  ignores: [(commit) => commit.includes('init')],
  extends: ['@commitlint/config-conventional'],
  rules: {
    'body-leading-blank': [2, 'always'],
    'footer-leading-blank': [1, 'always'],
    'header-max-length': [2, 'always', 108],
    'subject-empty': [2, 'never'],
    'type-empty': [2, 'never'],
    'subject-case': [0],
    'type-enum': [
      2,
      'always',
      [
        'feat',
        'fix',
        'perf',
        'style',
        'docs',
        'test',
        'refactor',
        'build',
        'ci',
        'chore',
        'revert',
        'wip',
        'workflow',
        'types',
        'release',
      ],
    ],
  },
};
Polyfill
vitest
其他测试工具
QUnit
QUnit是一个功能强大、易于使用的 JavaScript 测试框架。
Mocha
Mocha用于 node.js 和浏览器的简单、灵活、有趣的 JavaScript 测试框架。
ava
AVA 是 Node.js 的测试运行器,具有简洁的 API、详细的错误输出、新的语言特性和进程隔离,让您可以放心地进行开发。
- GitHub:https://github.com/avajs/ava
jasmine
Jasmine 是 JavaScript 的行为驱动开发测试框架。它不依赖于浏览器、DOM 或任何 JavaScript 框架。因此,它适用于网站、Node.js项目或 JavaScript 可以运行的任何地方。
intern
Intern 是一个 JavaScript 自动化测试框架,支持浏览器和 nodejs 两种环境,支持 AMD。
Enzyme
Enzyme 是一个用于 React 的 JavaScript 测试实用程序,可以更轻松地测试 React 组件的输出,Enzyme 的 API 旨在通过模仿 jQuery 的 API 来进行 DOM 操作和遍历,从而变得直观和灵活。
测试体系
- 黑盒测试
- 白盒测试
- 单元测试
- 集成测试
- 基准测试
- 压力测试
其它辅助工具
Gulp
Gulp是一款增强工作流程的自动化构建工具。
// 安装:npm install --global gulp-cli
// 创建目录,进入目录初始化:npm init
// 安装 gulp:npm install --save-dev gulp
// 检查 gulp:版本 gulp --version

// 创建 gulpfile 文件:gulpfile.js
// npm install --save readable-stream
// npm install --save-dev gulp-uglify
var gulp = require('gulp');
var uglify = require('gulp-uglify');
var pipeline = require('readable-stream').pipeline;

gulp.task('compress', function () {
  return pipeline(
    gulp.src('src/*.js'),
    uglify(),
    gulp.dest('dist')
  );
});
Grunt
Grunt是一个JavaScript 任务运行器,在2013年发行了v0.4.0版本,实现了压缩、编译、单元测试、linting等重复性任务的自动化工作。
安装配置
> npm install -g grunt-cli
- 代码示例
module.exports = function(grunt) {
  // Do grunt-related things in here
};
网站应用发布部署
资源版本管理规范
- [x].x.x:
- x.[x].x:
- x.x.[x]:
资源缓存生命周期
资源非覆盖式发布
分布式文件存储系统
DevOps 解决方案
- coding:https://coding.net/
- 猪齿鱼:http://choerodon.io/zh/
集群与分布式架构
多平台构建工具
Electron
Electron是使用 JavaScript,HTML 和 CSS 构建跨平台的桌面应用程序。
- 官网:https://www.electronjs.org/
- 技术文档:https://www.electronjs.org/docs
- GitHub:https://github.com/electron
Flutter
Flutter 可以轻松快速地为移动设备及其他应用构建漂亮的应用程序。
Taro
Taro 是一个开放式跨端跨框架解决方案,支持使用 React/Vue/Nerv 等框架来开发 微信 / 京东 / 百度 / 支付宝 / 字节跳动 / QQ 小程序 / H5 / RN 等应用。
DCloud
DCloud是一个快速将H5站点转换为跨平台app的方案。
- 官网:https://ask.dcloud.net.cn
- MUI文档:https://dev.dcloud.net.cn/mui/ui/
- API Reference:https://www.html5plus.org/doc/zh_cn/audio.html
- uni-app:https://uniapp.dcloud.io/
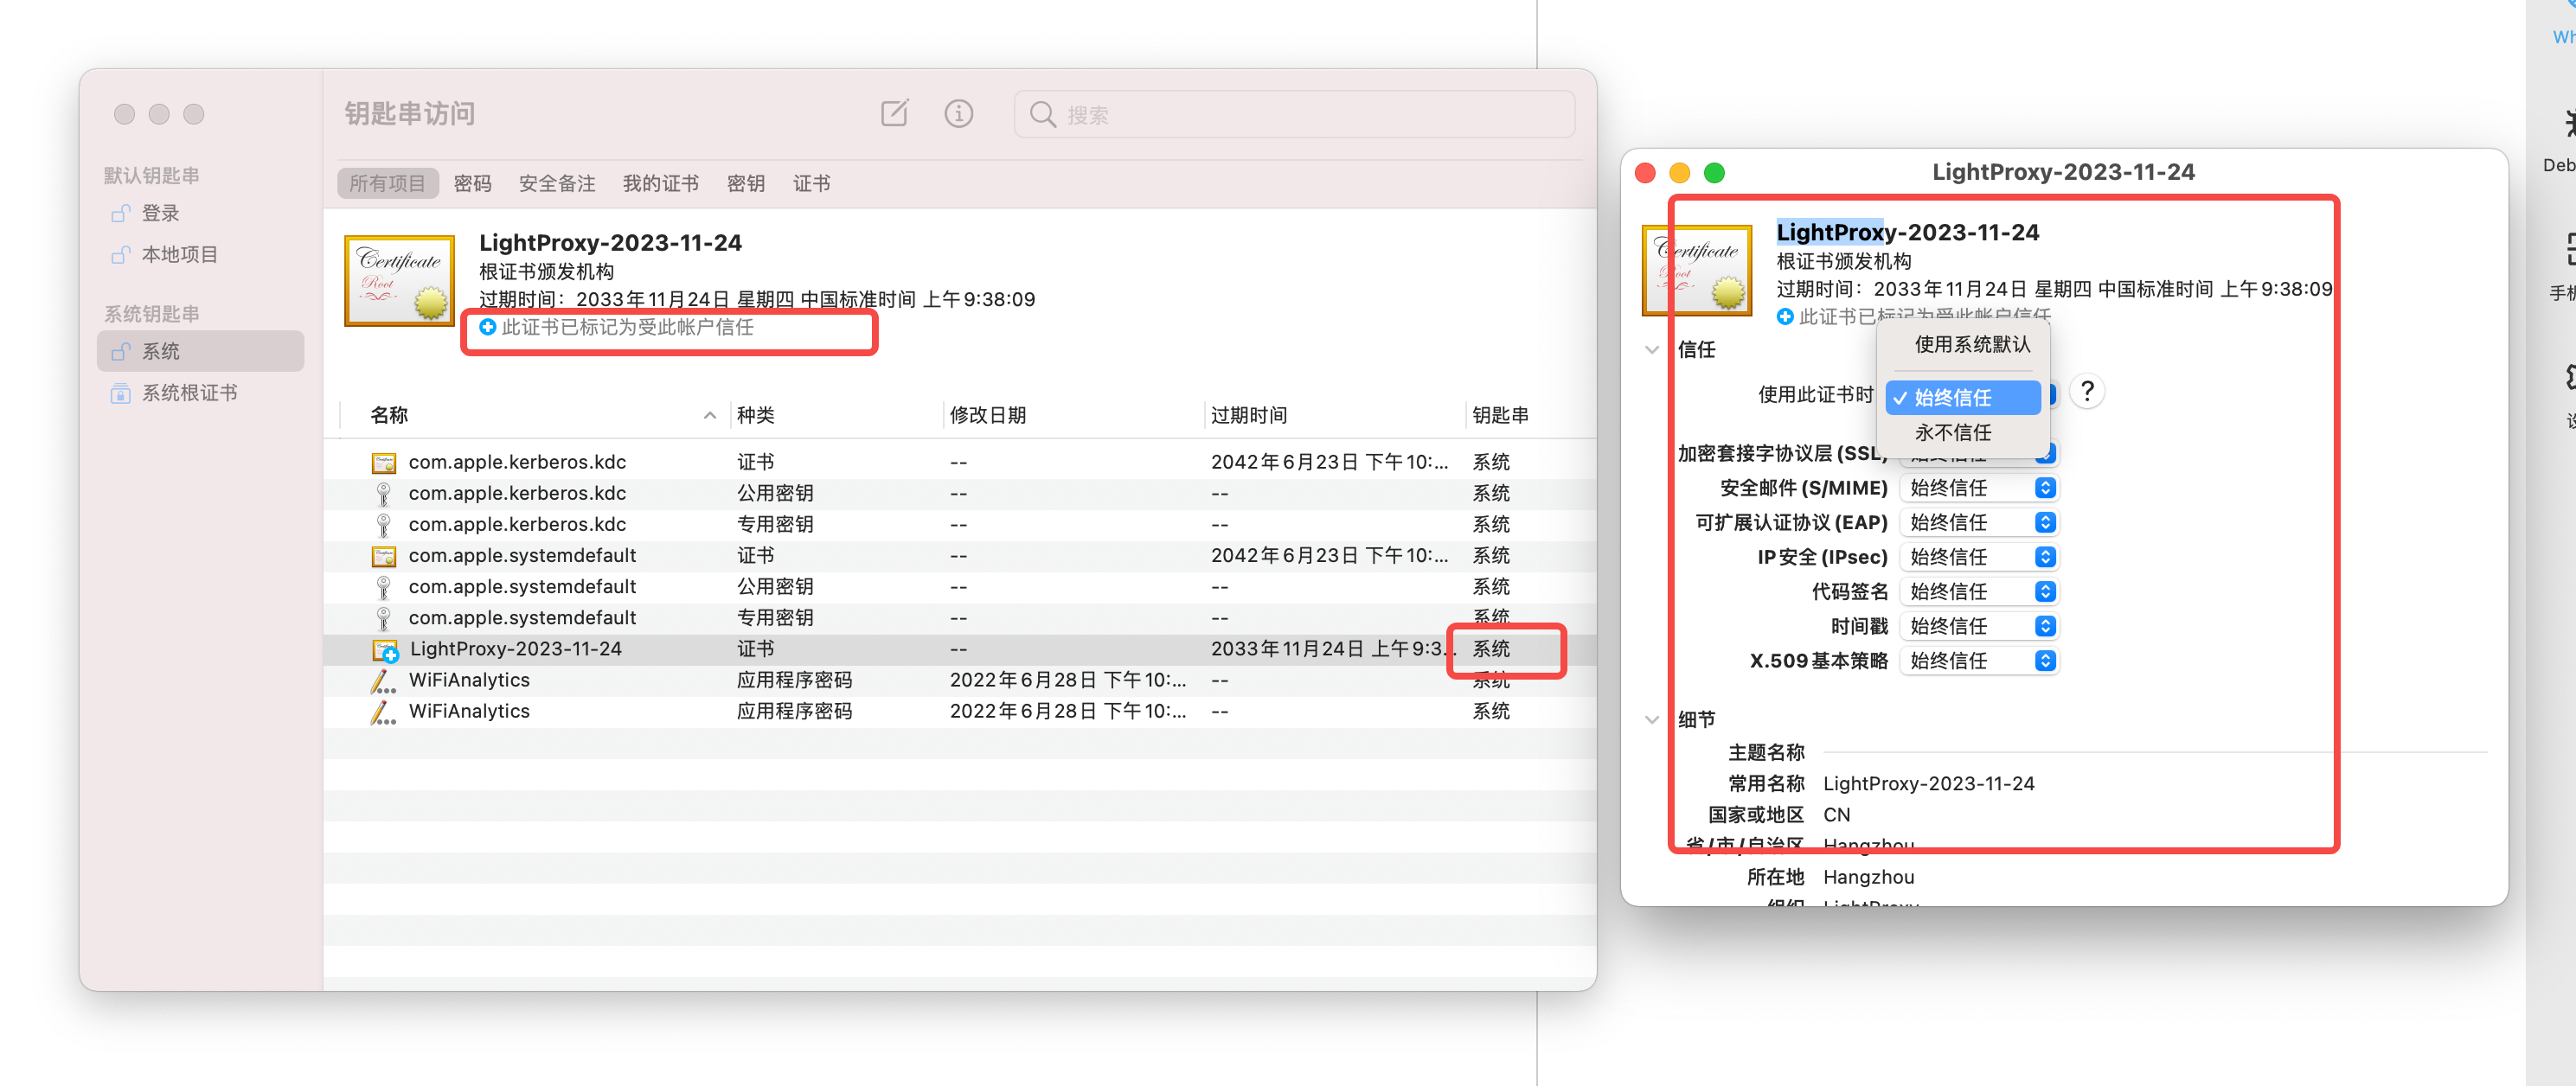
LightProxy网络代理工具
LightProxy(阿里抓包工具)是一款由阿里巴巴团队网络编程人员开发的更符合国内情况的抓包工具,软件更加适合中国的网络编程工作者使用,LightProxy具有稳定、快速验证、线上一致性等特点。
注意事项
浏览器是否配置了VPN等,否则不生效。
下载安装
- GitHub(附带下载地址,滚动到中间):https://github.com/alibaba/lightproxy
- whistle:https://wproxy.org/whistle/
- macOS Version Download: https://github.com/alibaba/lightproxy
- Windows Version Download: https://github.com/alibaba/lightproxy
安装配置
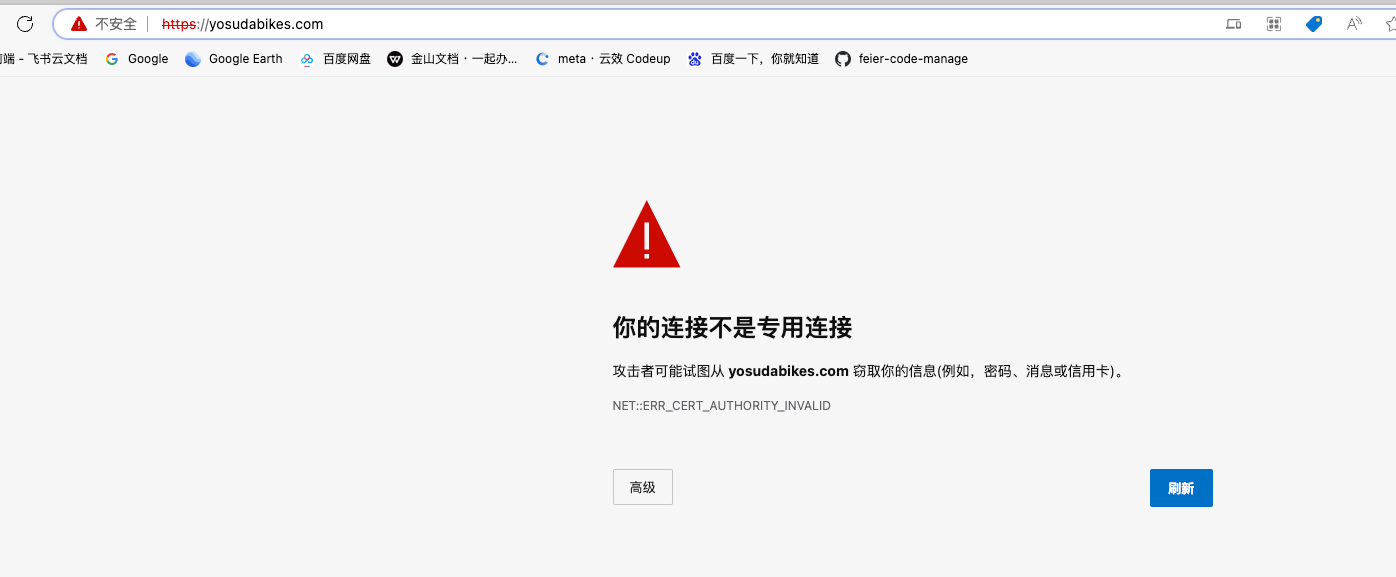
安装证书后HTTPS访问受限,是因为浏览器缓存的问题,可以关闭浏览器清除缓存后再访问。
# 步骤一:下载安装lightproxy。
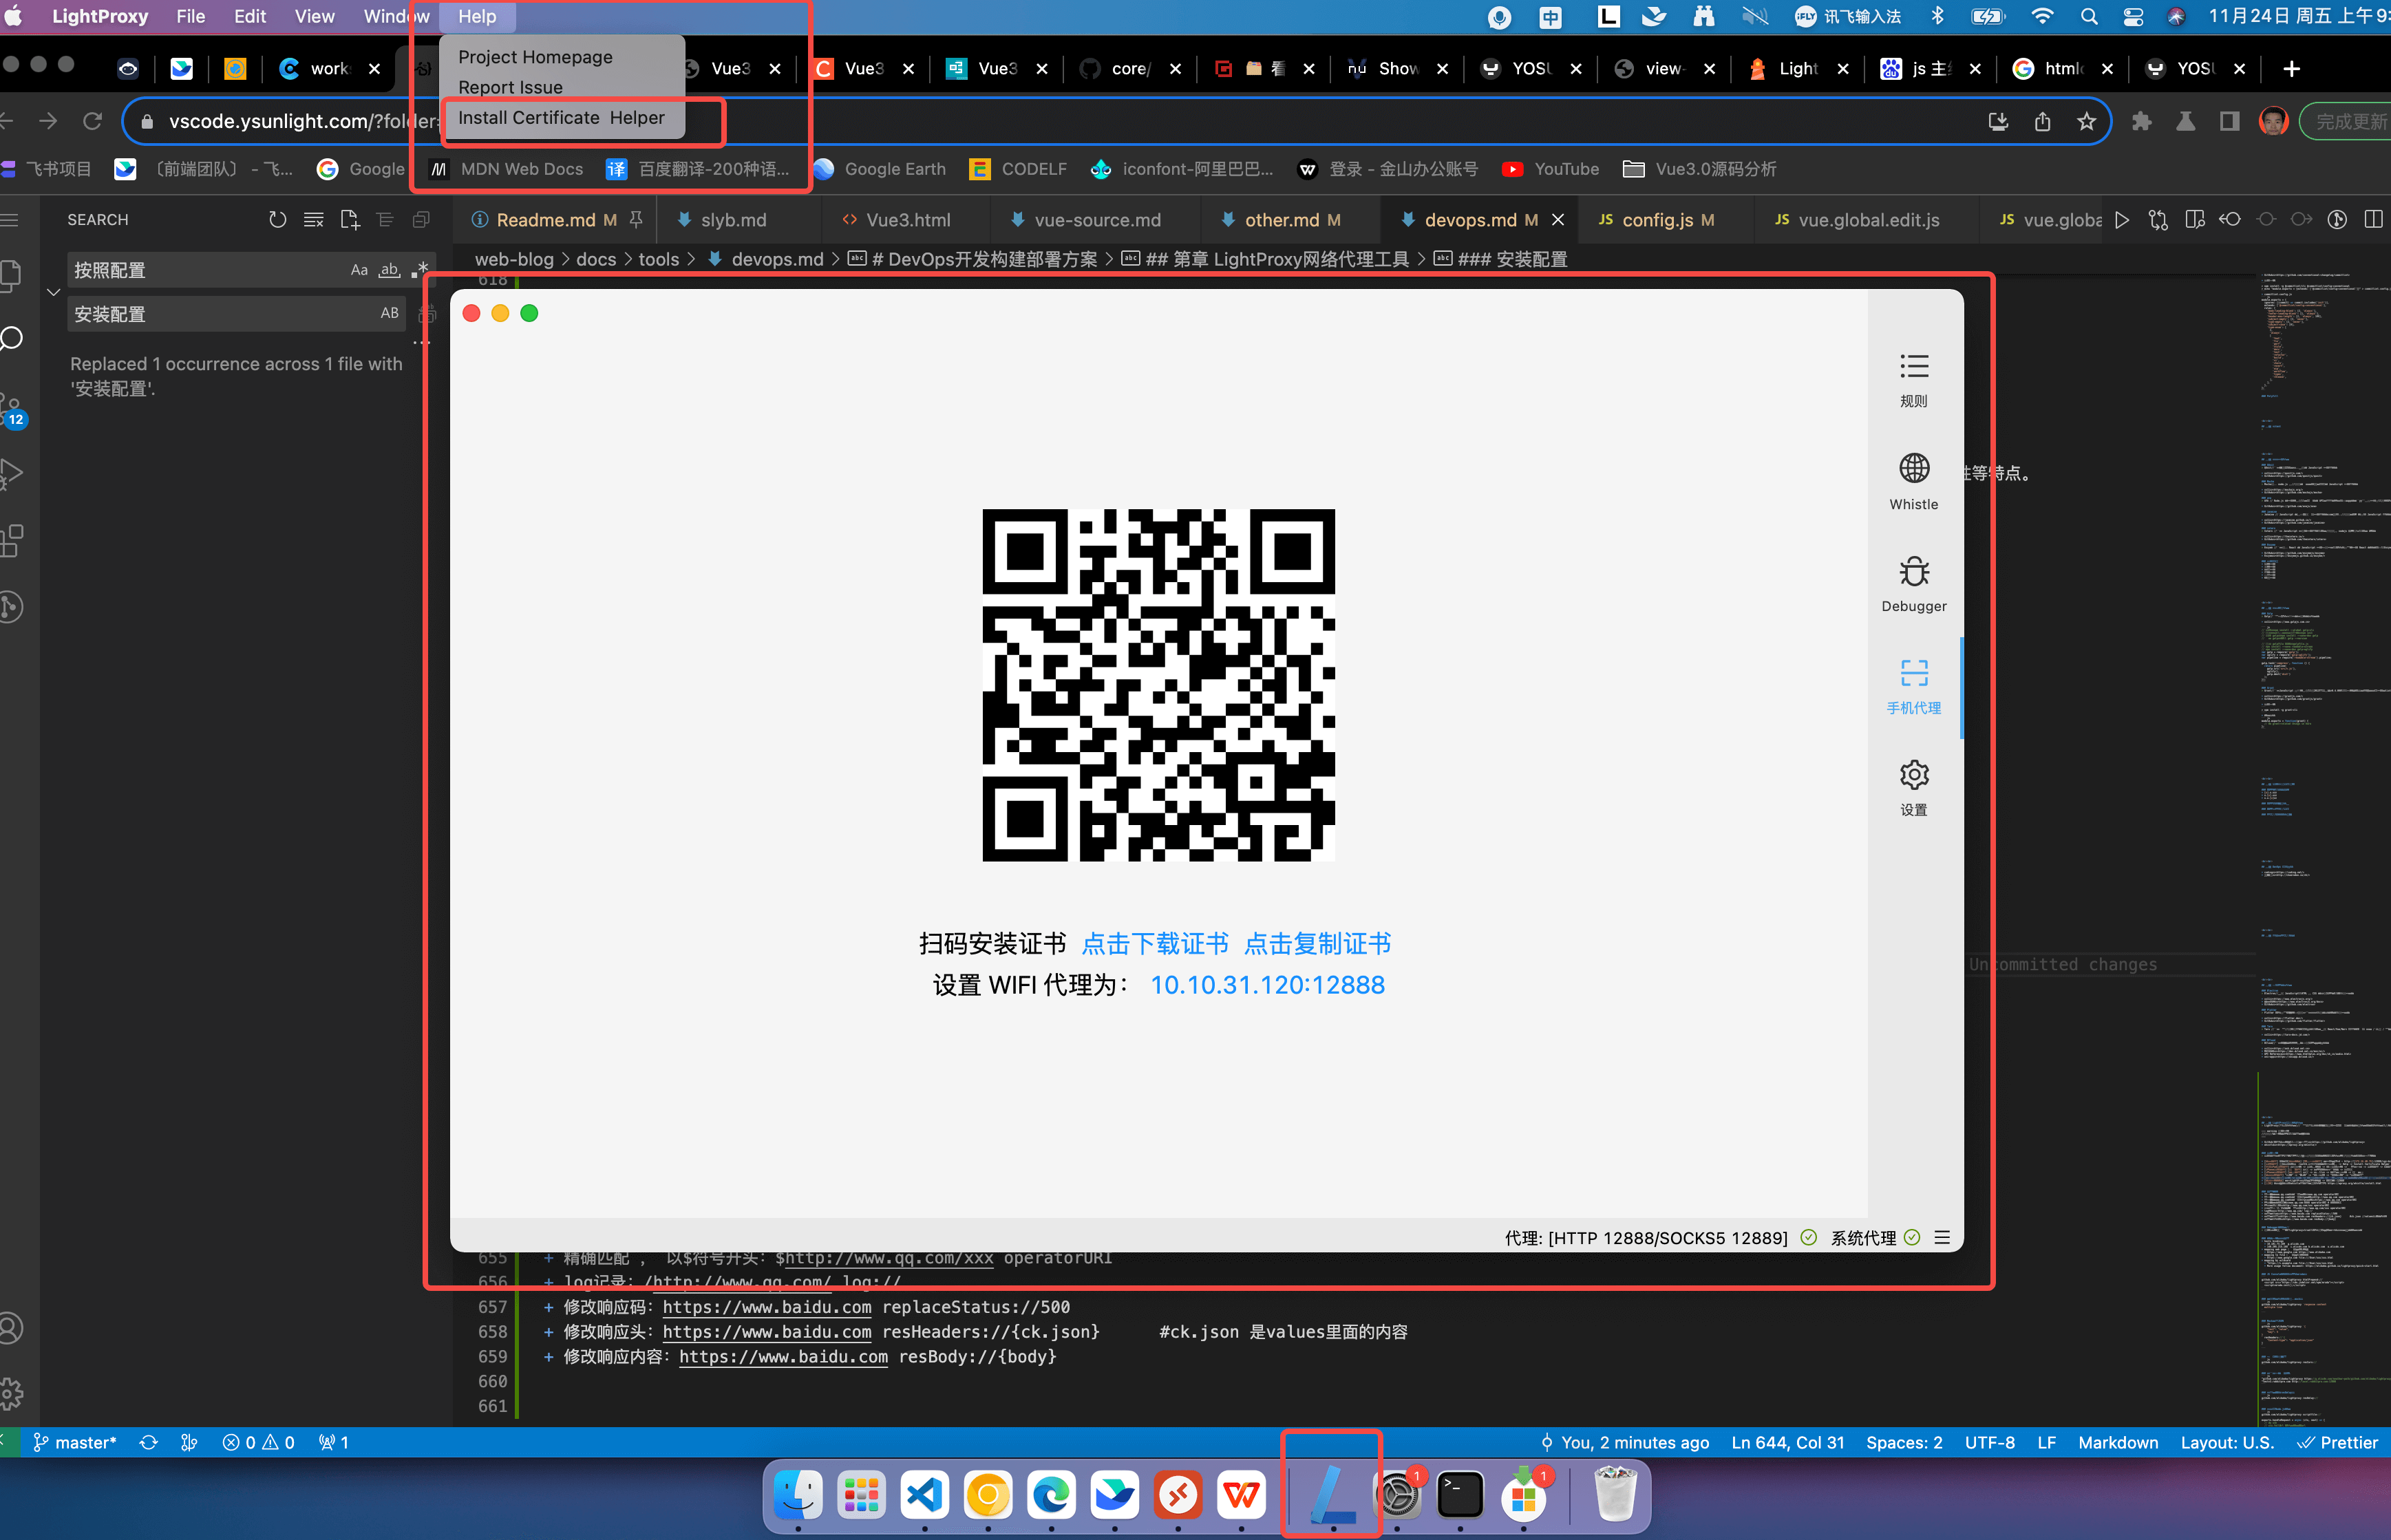
# 步骤二:打开lightproxy,切换至 "手机代理",手机扫描后在手机下载rootCA.crt,具体配置见下面指示。
# 步骤三:保障手机与电脑同连一个WIFI,手机设计WIFI代理(修改网络 - 代理:手动 - 服务器主机名 - 服务器端口)
# 步骤四:打开lightproxy,切换至 "Whistle",手机上访问其他网页,然后查看是否出现访问记录,如果没有,则异常
# 步骤五:手机端访问网页 https://www.xxx.com/?lightproxy=true,必须携带lightproxy=true
# 步骤六:OK
- [下载证书] 切换至[手机代理] [点击复制证书] 查看电脑IPv4 - http://[172.16.40.76]:12888/cgi-bin/rootca | 即可。
Mac桌面端配置
[安装证书] 在手机终端打开rootCA.crt,以管理员身份运行 -> Help -> Install Certificate Helper
华为手机,很容易出问题,尝试了几遍才成功
第一步: 设置 -> 安全 -> 更多安全设置 -> 加密和凭据 -> 从储存设置安装 -> WLAN证书 [必须安装]
第二步: 设置 -> 安全 -> 更多安全设置 -> 加密和凭据 -> 从储存设置安装 -> CA证书 [必须安装]
第三步:设置 -> 安全 -> 更多安全设置 -> 加密和凭据 -> 受信任的凭据 -> 用户 [是否存在以上两步安装的证书,如果没有,则失败]
[联想iPad安装证书] 通用设置 -> 安全和隐私 -> 更多安全设置 -> 加密与凭据 -> 安装证书 -> CA证书
[iPhone安装证书] [添加证书] 通用 -> 描述文件与设备管理 -> 选择添加
[iPhone安装证书] [信任证书] 通用 -> 关于本机 -> 证书信任设置 -> 添加信任
[手机安装证书] "设置" -> "WLAN" -> "更多选项 -> "高级设置" -> "安装证书"
[手机设置代理] 查找LightProxy电脑IPV4地址 -> 端口号为12888
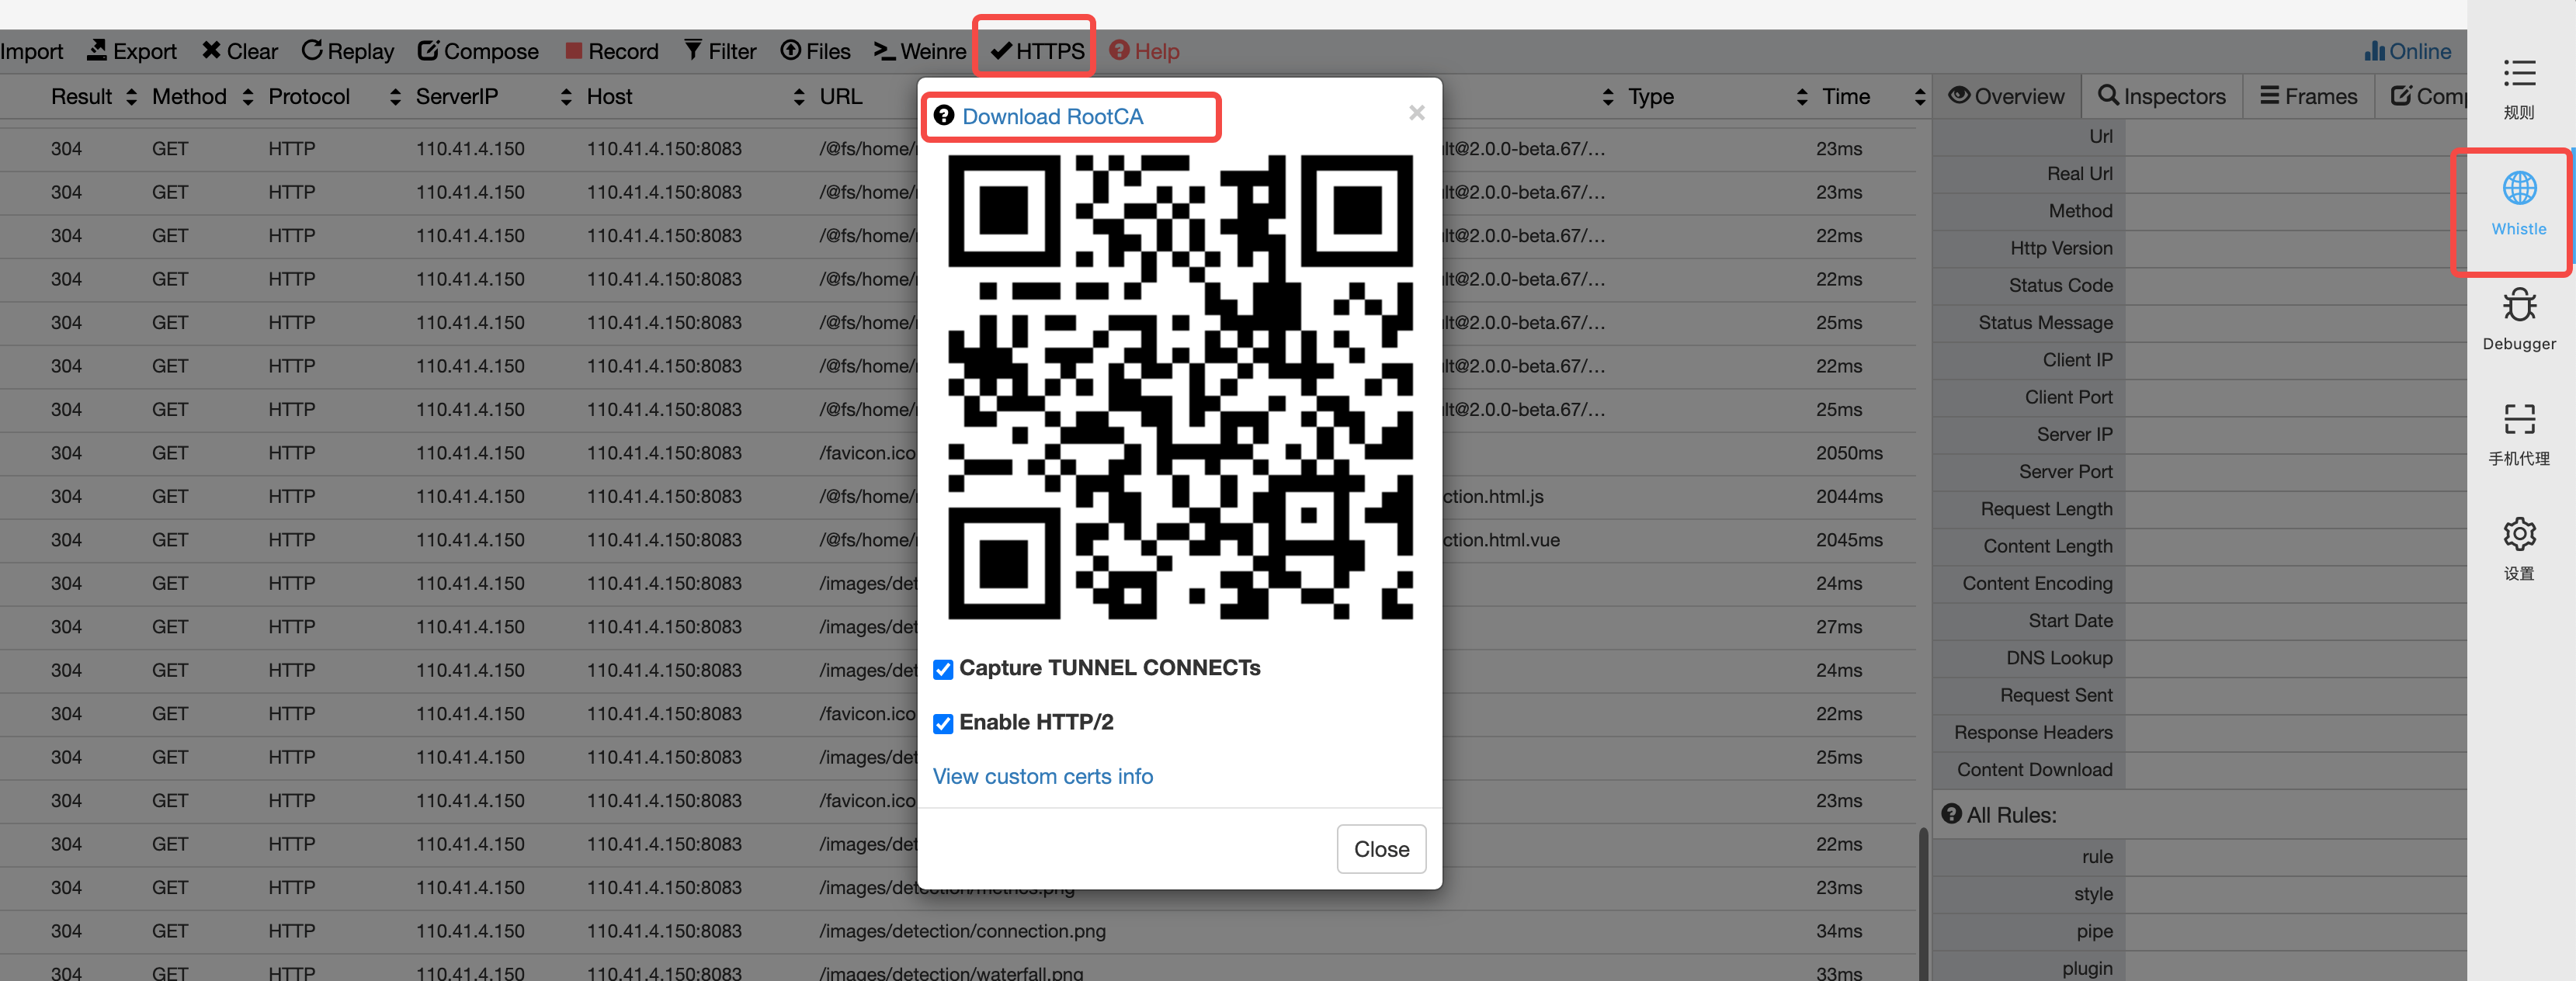
HTTPS抓包配置
⚠️ 手机抓包HTTPS时,需要在桌面端安装whistle根证书才能抓包HTTPS https://wproxy.org/whistle/install.html
配置步骤:https://wproxy.org/whistle/webui/https.html
证书按下面步骤安装后,如果还出现安全提醒,这个主要原因是之前你访问过该页面,导致长连接已建立,可以等段时间再访问、或重新打开浏览器,或重启下whistle: w2 restart
# 一键安装 Whistle(Mac & Windows)
> npm i -g whistle && w2 start --init


# 全局代理需要设置不代理的域名
> npm i -g whistle && w2 start --init "domain1, domain2, *.domain"


# 启动 whistle
> w2 start

# 重启 whistle
> w2 restart
规则列表
- 匹配域名www.qq.com下的所有请求:www.qq.com operatorURI
- 匹配域名www.qq.com下的所有http请求:http://www.qq.com operatorURI
- 匹配域名www.qq.com下的所有https请求:https://www.qq.com operatorURI
- 限定域名的端口号:www.qq.com:8888 operatorURI # 8888端口
- 限定具体路径:http://www.qq.com/xxx operatorURI
- 精确匹配 , 以$符号开头:$http://www.qq.com/xxx operatorURI
- log记录:/http://www.qq.com/ log://
- 修改响应码:https://www.baidu.com replaceStatus://500
- 修改响应头:https://www.baidu.com resHeaders://{ck.json} #ck.json 是values里面的内容
- 修改响应内容:https://www.baidu.com resBody://{body}
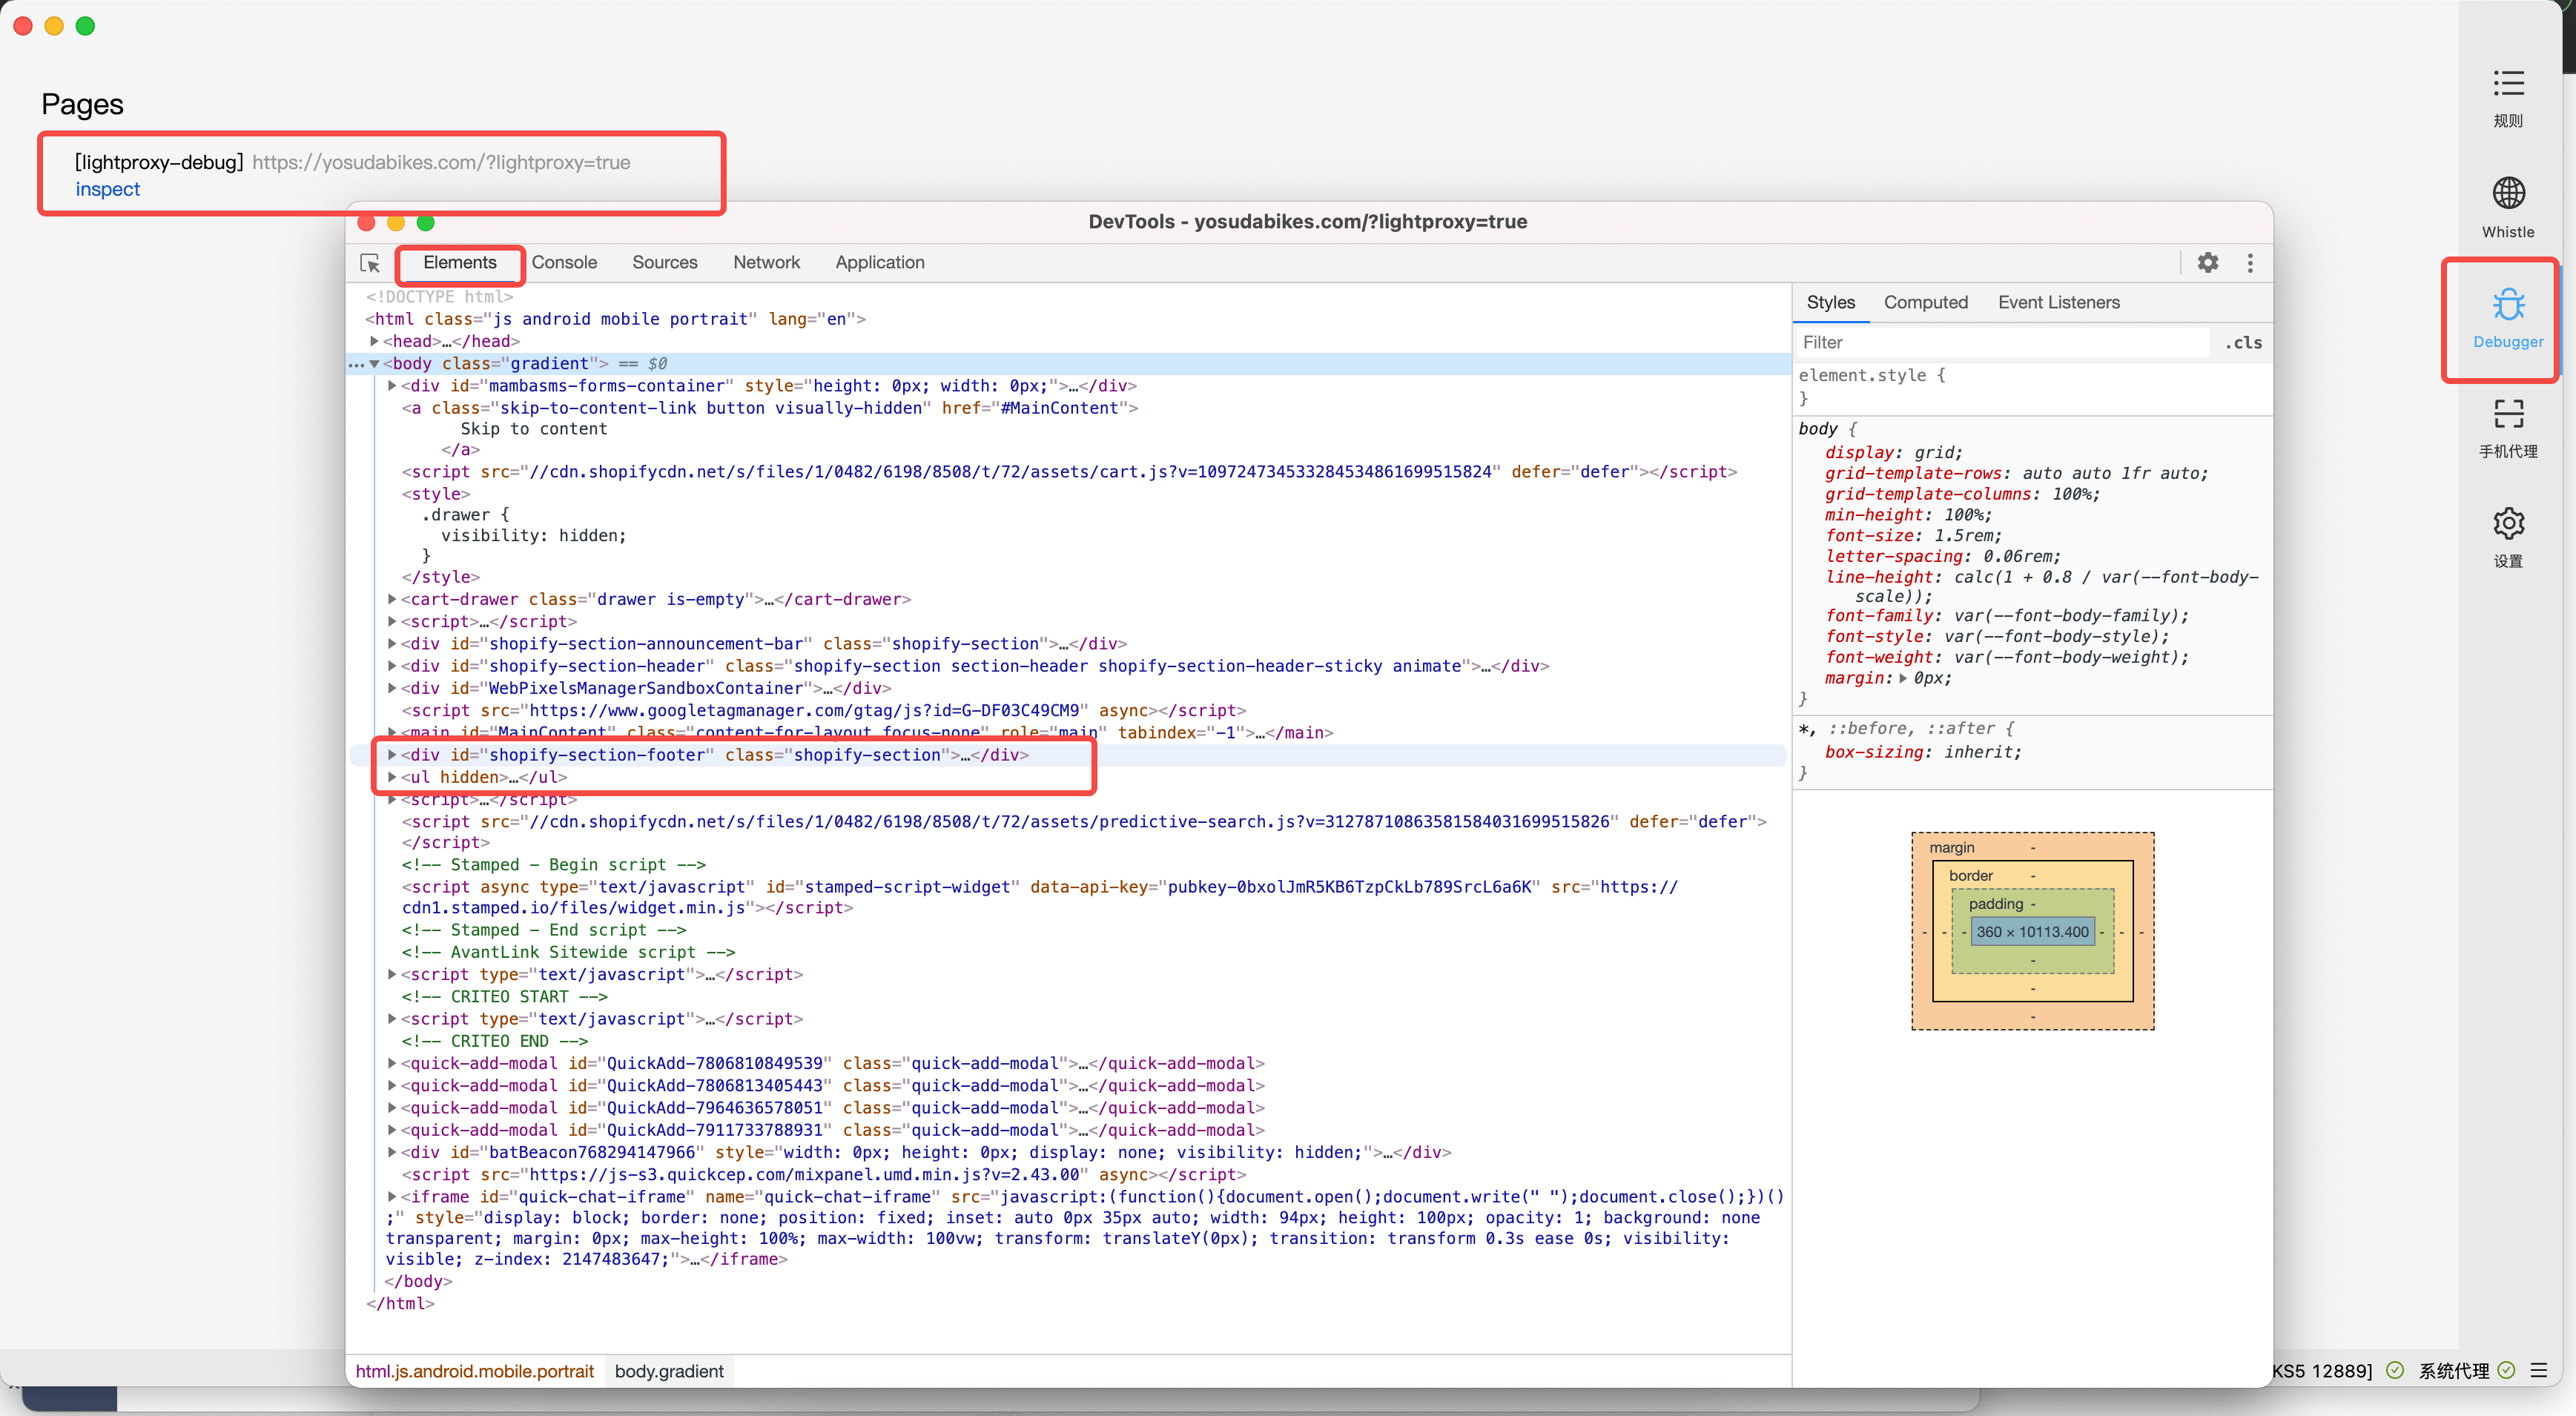
Debugger调试模式
在URL后面添加参数?lightproxy=true,可以在电脑端查看手机移动端上的UI视图结构,实现电脑端调试手机端的实际效果。
代理配置相关规则
- hosts bindings
- 10.101.73.189 g.alicdn.com
- 140.205.215.168 i.alicdn.com b.alicdn.com u.alicdn.com
- mapping web page | 映射到URL地址
- https://www.google.com https://www.alibaba.com
- mapping to file | 映射到本地文件
- https://www.google.com file:///User/xxx/xxx.html
- mapping by wildcard
- ^https://*.example.com file:///User/xxx/xxx.html
- More usage follow document: https://alibaba.github.io/lightproxy/quick-start.html
JS Console调试控制台(eruda)
github.com/alibaba/lightproxy htmlPrepend://`
  <script src="https://cdn.jsdelivr.net/npm/eruda"></script>
  <script>eruda.init();</script>
`
响应静态内容(可用于mock)
github.com/alibaba/lightproxy `resposne content
  multiple line
`
Mock模拟JSON
github.com/alibaba/lightproxy `{
    "test": "value",
    "key": 5
}
` resHeaders://`{
    "Content-type": "application/json"
}
`
增加CORS跨域头
github.com/alibaba/lightproxy resCors://
通过通配符映射URL
^github.com/alibaba/lightproxy https://g.alicdn.com/another-path/github.com/alibaba/lightproxy
^testv3.rabbitpre.com http://local.rabbitpre.com:12000
延迟请求(resDelay)
github.com/alibaba/lightproxy resDelay://
自定义Node.js代码
github.com/alibaba/lightproxy scriptfile://`

exports.handleRequest = async (ctx, next) => {
  // do sth
  // ctx.fullUrl 可以获取请求url
  // ctx.headers 可以获取请求头
  // ctx.options 里面包含一些特殊的请求头字段,分别可以获取一些额外信息,如请设置的规则等
  // ctx.method 获取和设置请求方法
  // const reqBody = await ctx.getReqBody(); 获取请求body的Buffer数据,如果没有数据返回null
  // const reqText = await ctx.getReqText();  获取请求body的文本,如果没有返回''
  // const formData = await ctx.getReqForm(); 获取表单对象,如果不是表单,返回空对象{}
  // ctx.req.body = String| Buffer | Stream | null,修改请求的内容
  // next方法可以设置next({ host, port });
  // 只有执行next方法后才可以把正常的请求发送出去
  const { statusCode, headers } = await next();
  // do sth
  // const resBody = yield ctx.getResBody();
  // const resText = yield ctx.getResText();
  // ctx.status = 404; 修改响应状态码
  // ctx.set(headers); 批量修改响应头
  // ctx.set('x-test', 'abc'); 修改响应头
  // ctx.body = String| Buffer | Stream | null; 修改响应内容
  ctx.body = 'test';
};`

// 也可以直接指向一个文件
github.com/alibaba/lightproxy scriptfile:/path/to/file.js