Chrome Extension 插件
重要通知
Chrome 开发扩展程序目前以Manifest V3为主,并逐步淘汰 Manifest V2,请注意相关配置文档与接口语法。
基本概况
扩展程序是基于 Web 技术(如 HTML、CSS 和 JavaScript)构建的软件程序,使用户能够自定义 Chrome 浏览体验。
- Chrome Developers:https://developer.chrome.com/
- Chrome DevTools技术文档:https://developer.chrome.com/docs/devtools/overview/
- 插件:https://developer.chrome.com/docs/extensions/
- API接口:https://developer.chrome.com/docs/extensions/reference/
- API接口参考: https://developer.chrome.com/docs/extensions/reference/api?hl=zh-cn
- Chrome 开发扩展程序:https://developer.chrome.com/docs/extensions/mv3/
- 指引文档:https://developer.chrome.com/docs/extensions/mv3/getstarted/
- chrome网上应用店:https://chrome.google.com/webstore/category/extensions
- 权限管理:chrome://flags/
插件开发示例
- 示例一:https://github.com/GoogleChrome/chrome-extensions-samples
- manifest.json
{
  "name": "Chrome Extension",
  "version": "1.0",
  "manifest_version": 3,
  "background": {
		"service_worker": "background.js",
		"type": "module"
	},
  "action": {},
  "content_scripts": [
    {
      "matches": ["<all_urls>"],
			"run_at": "document_start",
      "js": ["content-script.js"]
    }
  ],
  "permissions": [],
	"host_permissions": ["<all_urls>"],
	"web_accessible_resources": [
		{
			"resources": [],
			"matches": ["<all_urls>"],
			"use_dynamic_url": true
		}
	]
}
- background.js
chrome.runtime.onInstalled.addListener(({ reason, version }) => {
  if (reason === chrome.runtime.OnInstalledReason.INSTALL) {
    showReadme();
  }
});

chrome.action.onClicked.addListener((tab) => {
  showReadme();
});

function showReadme(info, tab) {
  let url = chrome.runtime.getURL("readme.html");
  chrome.tabs.create({ url });
}
- content-script.js
let imageIds = ["test2", "test4"];

let loadButton = document.createElement('button');
loadButton.innerText = 'Load images';
loadButton.addEventListener('click', handleLoadRequest);

document.querySelector('body').append(loadButton);

function handleLoadRequest() {
  for (let id of imageIds) {
    let element = document.getElementById(id);
    element.src = chrome.runtime.getURL(`${id}.png`);
  }
}
本地机器安装扩展
- 在Chrome浏览器打开网址chrome://extensions
- 如下图所示
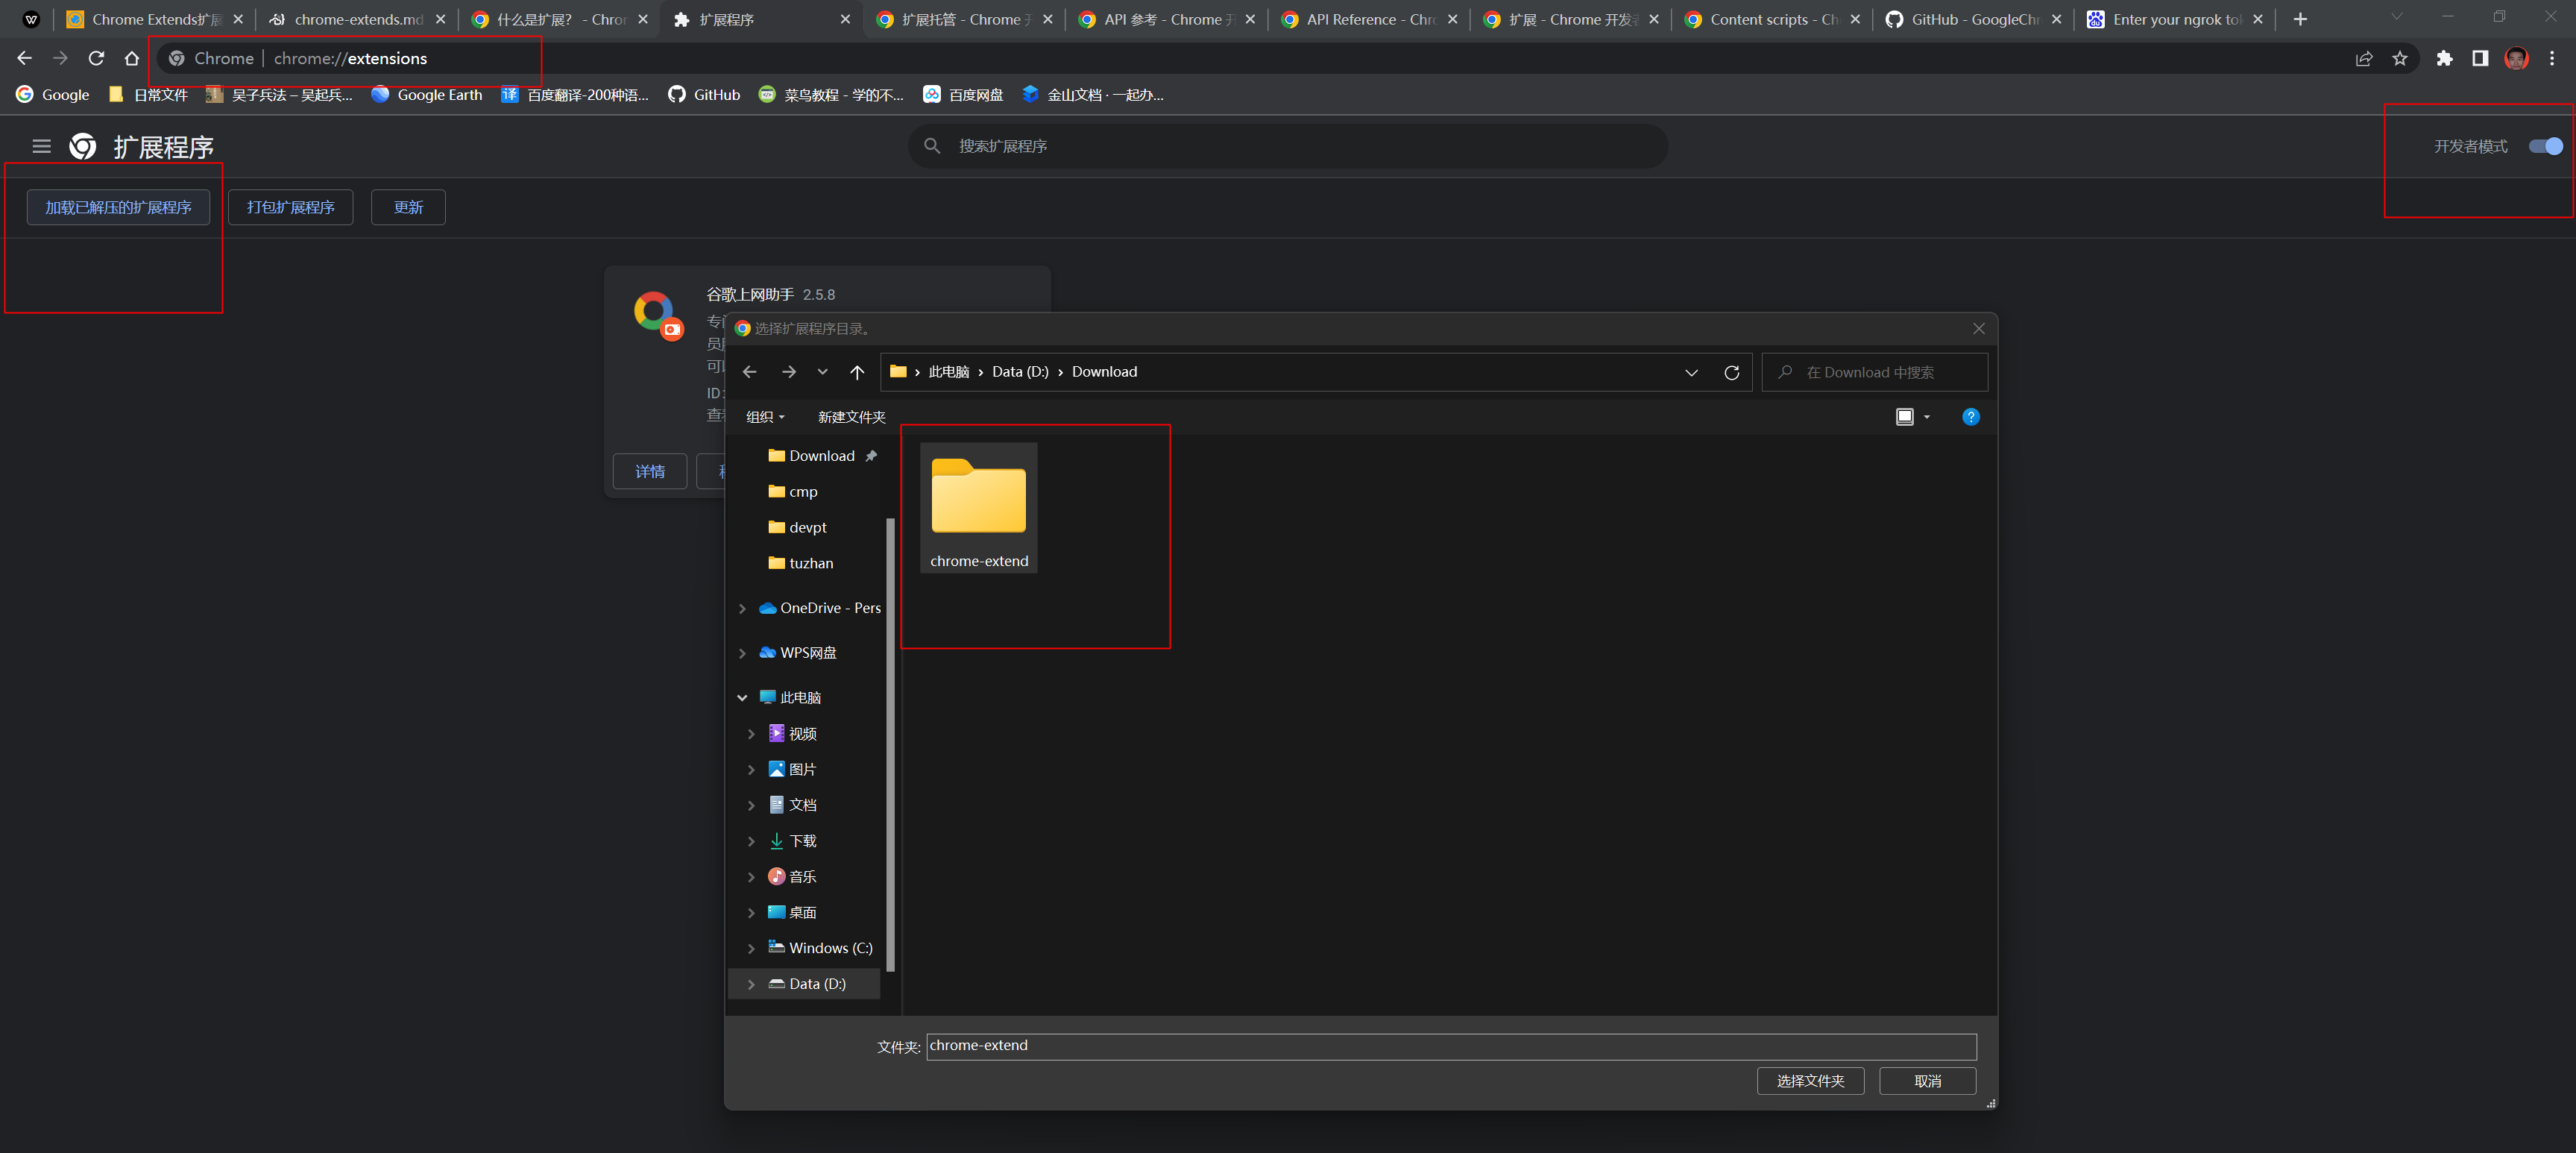
- 单击"开发者模式"并激活它
- 单击"加载已解压的扩展程序",并选择chrome-extend扩展示例项目文件夹
架构设计与实现原理
工程组织结构
manifest.json清单文件
- 参考文档:https://developer.chrome.com/docs/extensions/mv3/manifest/
- 声明权限:https://developer.chrome.com/docs/extensions/mv3/declare_permissions/
- 配置文件
{
  // 必填字段
  "name": "扩展应用名称", // <必填>
  "manifest_version": 3, // <必填>
  "version": "1.0", // <必填>


  // [选填] 推荐
  "author": "作者",
  "description": "描述内容",

  "action": {},
  "default_locale": "en",

  // 扩展程序还会在扩展程序管理页面、权限警告和网站图标上显示图像。一个或多个代表扩展或主题的图标,不支持 SVG 文件。
  "icons": {
    "16": "/icon16.png",
    "32": "/icon32.png",
    "48": "/icon48.png",
    "128": "/icon128.png"
  },

  // 后台脚本,
  "background": { // <必填>
    // 用于的脚本"service_worker"必须位于扩展的根目录中。
    "service_worker": "background.js", // <必填>
    // "type": "module"以将服务工作者包含为 ES 模块,这允许您import进一步编码。
    "type": "module"
  },

  // 内容脚本
  "content_scripts": [
    {
      "matches": ["https://*.nytimes.com/*"], // Array<string> [必选] 指定此内容脚本将被注入到哪些页面。
      "exclude_matches": ["*://*/*business*"], // Array<string> [可选] 排除此内容脚本将被注入的页面。
      "include_globs": ["*nytimes.com/???s/*"], // Array<string> [可选] 之后应用matches以仅包含那些也匹配此 glob 的 URL。
      "exclude_globs": ["*science*"], // Array<string> [可选] 之后应用matches以排除与此 glob 匹配的 URL。
      "css": ["content-style.css"], // Array<string> [可选] 要注入匹配页面的 CSS 文件列表。
      "js": ["content-script.js"], // Array<string> [可选] 要注入匹配页面的 JavaScript 文件列表。
    },
    {
      // 匹配任何地址
      "*://*/*",
      "file://*/*"
    },
    {
      "matches": ["<all_urls>"], // 匹配所有地址
    }
  ],

  // 扩展动作
  "action": {
    // 工具栏图标
    "default_icon": {
      "16": "/images/icon16.png",   // 扩展页面上的图标和上下文菜单图标。
      "32": "/images/icon32.png",   // Windows 计算机通常需要这种尺寸。
      "48": "/images/icon48.png",   // 显示在分机管理页面。
      "124": "/images/icon124.png"  // 在安装时和 Chrome 网上应用店中显示。
    },
    // 将鼠标悬停在操作图标上时,使用工具提示向用户提供简短描述或说明。默认情况下,提示会显示扩展名。
    "default_title": "悬停标题",
    // 弹出窗口
    "default_popup": "popup.html"
  },

  // 选项页面
  "options_page": "options.html",
  "options_ui": {
    "page": "options.html", // 选项页面的路径,相对于扩展的根目录
    "open_in_tab": false // 指定为false声明嵌入的选项页面。如果true是,则扩展的选项页面将在新选项卡中打开,而不是嵌入在chrome://extensions中。
  },

  // 声明哪些资源被公开以及哪些来源,默认情况下,没有任何资源可通过 Web 访问;只有从扩展源加载的页面或脚本才能访问该扩展的资源。
  // 在 Manifest V2 之前,可以从 Web 上的任何页面访问扩展中的所有资源。这允许恶意网站识别用户已安装的扩展程序或利用已安装扩展程序中的漏洞(例如XSS 错误)。
  // https://developer.chrome.com/docs/extensions/mv3/manifest/web_accessible_resources/
  // [不需要允许内容脚本本身]
  "web_accessible_resources": [
    {
      "resources": [ "images/*.png" ],
      "matches": ["<all_urls>"],
      // 如果为 true,则只允许通过动态 ID 访问资源。每个会话都会生成动态 ID。它在浏览器重新启动或扩展重新加载时重新生成。
      "use_dynamic_url": true
    }
  ],

  // 权限申请 permissions包含已知字符串列表中的项目(例如“地理位置”)
  "permissions": [
    "cookies",
    "contentSettings"
  ],

  // optional_permissions类似于常规permissions,但由扩展的用户在运行时授予,而不是提前授予
  "optional_permissions": [

  ],

  // 想要访问其 cookie 的任何主机的主机权限, host_permissions包含一个或多个匹配模式,可以访问一个或多个主机
  "host_permissions": [
    "<all_urls>",
    "*://*.google.com"
  ],

  // 您的扩展可以接收和响应来自常规网页的消息。
  "externally_connectable": {
    "matches": ["<all_urls>"]
  },

  // 扩展 ID是一个 32 个字符的字母字符串,用于标识浏览器和 Chrome 网上应用店中的扩展。在开发过程中,加载解压扩展时会生成一个新 ID ,除非在 manifest"key"中设置了该属性。
  "key": ""
}
background.js背景脚本
用于的脚本"service_worker"必须位于扩展的根目录中。
content-script.js内容脚本
UI元素
- 参考文档:<>
- 一个动作点击事件
- 一个弹出窗口:popup.html
- 上下文菜单
- 一个多功能框
- 键盘快捷键
- 桌面通知
- 文字转语音
- 注入页面的自定义 UI
选项页面
- 参考文档:https://developer.chrome.com/docs/extensions/mv3/options/
- options.html
各种逻辑文件
API接口文档
chrome接口,有些是必须配置才会生效,需要在manifest.json配置permissions字段中配置后,才会content-script.js与background.js中读取chrome全局对象呈现出来。
  // 列出所有现有的cookie存储
  const cookieStores = await chrome.cookies.getAllCookieStores();
  console.info('cookie存储:', cookieStores);

  const cookies = await chrome.cookies.getAll({});
  console.info('cookies:', cookies);

  // 获取所有标签
  const tabs = await cmTabsQuery({});
  console.info('获取所有标签:', tabs);

  // 在浏览器中创建、修改和重新排列窗口
  const windows = await chrome.windows.getAll();
  console.info('获取窗口信息:', windows);


  // 获取当前窗口
  const currentWindow = await chrome.windows.getCurrent();
  console.info('获取当前窗口:', currentWindow);


  // 获取当前标签 {id:'',title:'',url:'',windowId:'',active:''}
  const tab = await cmTabsQuery({ active: true, currentWindow: true });
  console.info('当前标签:', tab);


  // 检测语言
  // const language = await chrome.tabs.detectLanguage();
  // console.info('语言:', language);


  // 获取清单
  const manifest = await chrome.runtime.getManifest();
  console.info('清单配置', manifest);


  // 获取平台信息
  const platformInfo = await chrome.runtime.getPlatformInfo();
  console.info('获取平台信息:', platformInfo);


  // 管理已安装和运行的扩展程序/应用程序列表
  const management = await chrome.management.getAll();
  console.info('扩展程序/应用程序列表:', management);
chrome.fileSystem
使用chrome.fileSystemAPI 创建、读取、导航和写入用户的本地文件系统。
chrome.tabs
使用chrome.tabsAPI 与浏览器的标签系统进行交互。您可以使用此 API 在浏览器中创建、修改和重新排列选项卡。
- 代码示例
// 后台脚本初始化获取tab参数与内容脚本向后台脚本通信获取tab参数具体内容不一致,请考虑由内容脚本向后台脚本触发获取
const [tab] = await chrome.tabs.query({ active: true, currentWindow: true });
console.info(tab);
// 后台脚本初始化
{
  active: true
  audible: false
  autoDiscardable: true
  discarded: false
  groupId: -1
  height: 893
  highlighted: true
  id: 482
  incognito: false
  index: 5
  mutedInfo: {muted: false}
  pinned: false
  selected: true
  status: "complete"
  width: 1371
  windowId: 235
}

// 内容脚本向后台脚本
{
  active: true
  audible: false
  autoDiscardable: true
  discarded: false
  favIconUrl: "https://www.baidu.com/favicon.ico"
  groupId: -1
  height: 893
  highlighted: true
  id: 901
  incognito: false
  index: 6
  mutedInfo: {muted: false}
  pinned: false
  selected: true
  status: "loading"
  title: "百度一下,你就知道"
  url: "https://www.baidu.com/"
  width: 1380
  windowId: 235
}
chrome.contentSettings
使用chrome.contentSettingsAPI 更改控制网站是否可以使用 cookie、JavaScript 和插件等功能的设置。更一般地说,内容设置允许您基于每个站点而不是全局自定义 Chrome 的行为。
- 代码示例
chrome.cookies
使用chrome.cookiesAPI 查询和修改 cookie,并在它们发生变化时得到通知。
- 代码示例
function initCookies() {
  const get = function() {}
  const getAll = function() {}
  const getAllCookieStores = function() {}
  const remove = function() {}
  const set = function() {}

  return {
    get,
    getAll,
    getAllCookieStores,
    remove,
    set
  }
}
chrome.events
命名空间包含 API 使用的chrome.events常用类型,用于在有趣的事情发生时通知您分派事件。
- 代码示例
chrome.action
使用chrome.actionAPI 控制 Google Chrome 工具栏中的扩展程序图标。
- 代码示例
chrome.fileBrowserHandler
使用chrome.fileBrowserHandlerAPI 扩展 Chrome OS 文件浏览器。例如,您可以使用此 API 使用户能够将文件上传到您的网站。
- 代码示例
chrome.dom
使用chrome.domAPI 访问扩展的特殊 DOM API。
- 代码示例
chrome.dom.openOrClosedShadowRoot(
  element: HTMLElement,
)
chrome.downloads
使用chrome.downloadsAPI 以编程方式启动、监控、操作和搜索下载。
- 代码示例
chrome.downloads.download(
  options: DownloadOptions,
  callback?: function,
)
- 事件Event
- onChanged
- onCreated
- onDeterminingFilename
- onErased
chrome.webNavigation
使用chrome.webNavigationAPI 接收有关正在进行的导航请求状态的通知。
- 代码示例
// 对于成功完成的导航,将按以下顺序触发事件
// onBeforeNavigate -> onCommitted -> [onDOMContentLoaded] -> onCompleted
chrome.webNavigation.getAllFrames(
  details: object,
  callback?: function,
)

chrome.webNavigation.onBeforeNavigate.addListener(
  callback: function,
  filters?: object,
)
- 事件列表
- onBeforeNavigate
- onCommitted
- onCompleted
- onCreatedNavigationTarget
- onDOMContentLoaded
- onErrorOccurred
- onHistoryStateUpdated
- onReferenceFragmentUpdated
- onTabReplaced
chrome.scripting
使用chrome.scriptingAPI 在不同的上下文中执行脚本,使用chrome.scriptingAPI 将 JavaScript 和 CSS 注入网站。
- 代码示例
const tabId = getTabId();

//  注入脚本
chrome.scripting.executeScript({
  target: {
    tabId: tabId,
    allFrames: true, // 在指定选项卡的所有帧中运行
  },
  files: ['url/script.js'],
}, () => {
  // 注入脚本后执行代码,但是不会继承函数的任何当前执行上下文,例如this会报错
});

// 注入CSS,scripting.insertCSS()不返回任何结果。
chrome.scripting.insertCSS({
  target: {tabId: tabId},
  css: 'body { background-color: red; }',
}, () => {
  //
});
- 方法
- executeScript
- getRegisteredContentScripts
- insertCSS
- registerContentScripts
- removeCSS
- unregisterContentScripts
- updateContentScripts
chrome.webRequest
使用chrome.webRequestAPI 观察和分析流量并拦截、阻止或修改正在进行的请求。
方法
- onActionIgnored
- onAuthRequired
- onBeforeRedirect
- onBeforeRequest
- onBeforeSendHeaders
代码示例
// 回调函数
const callback = function(details) {
  //
}
// 过滤器
const filter = {
  urls: []
};
// 可选的额外信息参数
const extra = [];

// 注册事件监听器
chrome.webRequest.onBeforeRequest.addListener(callback, filter, extra);
chrome.webRequest.onBeforeSendHeaders.addListener(callback, filter, extra);

chrome.webRequest.onBeforeRequest.addListener((detail) => {
  console.info(details.type);
}, {urls: ["<all_urls>"]}, ["blocking"]);
chrome.storage
使用chrome.storageAPI 存储、检索和跟踪对用户数据的更改。
- 代码示例
chrome.alarms
安排代码定期运行或在未来的指定时间运行。
- 代码示例
chrome.alarms.create({
  delayInMinutes: 3,  // 延迟3分钟
  periodInMinutes: 1, // 定时1分钟
  when: 1 // 警报应该触发的时间,以历元过去的毫秒数为单位(例如Date.now() + n)。
});

chrome.alarms.onAlarm.addListener(() => {
  students.count++;
  students.time = Date.now();

  console.info(chrome);
});
chrome.runtime
使用chrome.runtimeAPI 检索后台页面,返回有关清单的详细信息,以及侦听和响应应用程序或扩展生命周期中的事件。
- 代码示例
chrome.management
提供了管理已安装和运行的扩展程序/应用程序列表的方法。
- 代码示例
通信机制
网页上下文向扩展程序通信
- 网页上下文发送消息
chrome.runtime.sendMessage({greeting: "hello"}, function(response) {
  console.log('响应后台脚本消息:', response);
});
- 扩展程序接收消息
chrome.runtime.onMessage.addListener(
  function(request, sender, sendResponse) {
    // request: {}
    // sender: { id: '', documentId: '', frameId: 0, origin: '', tab: {active:true,width:0,height:0,windowId:0}, url: '' }
    console.log('接收内容脚本消息:', request, sender, sendResponse);

    sendResponse({farewell: "goodbye"});
  }
);
扩展程序向网页上下文通信
- 扩展程序发送消息
chrome.tabs.query({active: true, currentWindow: true}, function(tabs) {
  chrome.tabs.sendMessage(tabs[0].id, {greeting: "hello"}, function(response) {
    console.log(response.farewell);
  });
});
- 网页上下文接收消息
chrome.runtime.onMessage.addListener(
  function(request, sender, sendResponse) {
    console.log(sender.tab ?
                "from a content script:" + sender.tab.url :
                "from the extension");
    if (request.greeting === "hello")
      sendResponse({farewell: "goodbye"});
  }
);
长期连接
- 网页上下文发送消息
const port = chrome.runtime.connect({name: "knockknock"});
port.postMessage({joke: "Knock knock"});
port.onMessage.addListener(function(msg) {
  console.log('持久连接 | 接收后台脚本消息:', msg);
});

window.setInterval(() => {
  port.postMessage({joke: "Knock knock", timestamp: Date.now()});
}, 5000);
- 扩展程序接收消息
chrome.runtime.onConnect.addListener(function(port) {
  // port: {disconnect, name, onDisconnect, onMessage, postMessage, sender}
  console.info(port);

  port.onMessage.addListener(function(msg) {
    console.log('持久连接', msg);
  });
});
网络请求
严重警告
在 Manifest V3XMLHttpRequest中,后台页面不支持(由 Service Worker 提供),请考虑使用它的现代替代品,fetch()。
background.js后台脚本
后台页面为扩展作者提供了一个独立于任何其他窗口或选项卡的环境。这允许扩展观察并采取行动以响应事件。浏览器关闭后终止生命周期。
- 后台脚本:https://developer.chrome.com/docs/extensions/mv3/service_workers/
- 服务工作者中的 ES 模块: https://web.dev/es-modules-in-sw/
- 注意事项
- 无权访问 DOM。
- 不再提供XMLHttpRequest,而是支持更现代的fetch()。
生命周期
内容脚本API接口
- chrome.csi:与内容脚本一致
- chrome.dom:与内容脚本一致
- chrome.extension:与内容脚本一致
- chrome.i18n:与内容脚本一致
- chrome.loadTimes:与内容脚本一致
- chrome.runtime:与内容脚本一致
- chrome.cookies
- chrome.cookies.OnChangedCause
- chrome.cookies.SameSiteStatus
- chrome.cookies.get
- chrome.cookies.getAll
- chrome.cookies.getAllCookieStores
- chrome.cookies.onChanged
- chrome.cookies.remove
- chrome.cookies.set
- chrome.management
- chrome.management.ExtensionDisabledReason
- chrome.management.ExtensionInstallType
- chrome.management.ExtensionType
- chrome.management.LaunchType
- chrome.management.getPermissionWarningsByManifest
- chrome.management.getSelf
- chrome.management.uninstallSelf
- chrome.permissions
- chrome.permissions.contains
- chrome.permissions.containsgetAll
- chrome.permissions.containsonAdded
- chrome.permissions.containsonRemoved
- chrome.permissions.containsremove
- chrome.permissions.containsrequest
- chrome.scripting
- chrome.scripting.ExecutionWorld
- chrome.scripting.StyleOrigin
- chrome.scripting.executeScript
- chrome.scripting.getRegisteredContentScripts
- chrome.scripting.insertCSS
- chrome.scripting.registerContentScripts
- chrome.scripting.removeCSS
- chrome.scripting.unregisterContentScripts
- chrome.scripting.updateContentScripts
- chrome.tabs
- chrome.tabs.MAX_CAPTURE_VISIBLE_TAB_CALLS_PER_SECOND
- chrome.tabs.MutedInfoReason
- chrome.tabs.TAB_ID_NONE
- chrome.tabs.TabStatus
- chrome.tabs.WindowType
- chrome.tabs.ZoomSettingsMode
- chrome.tabs.ZoomSettingsScope
- chrome.tabs.captureVisibleTab
- chrome.tabs.connect
- chrome.tabs.create
- chrome.tabs.detectLanguage
- chrome.tabs.discard
- chrome.tabs.duplicate
- chrome.tabs.get
- chrome.tabs.getCurrent
- chrome.tabs.getZoom
- chrome.tabs.getZoomSettings
- chrome.tabs.goBack
- chrome.tabs.goForward
- chrome.tabs.group
- chrome.tabs.highlight
- chrome.tabs.move
- chrome.tabs.onActivated
- chrome.tabs.onAttached
- chrome.tabs.onCreated
- chrome.tabs.onDetached
- chrome.tabs.onHighlighted
- chrome.tabs.onMoved
- chrome.tabs.onRemoved
- chrome.tabs.onReplaced
- chrome.tabs.onUpdated
- chrome.tabs.onZoomChange
- chrome.tabs.query
- chrome.tabs.reload
- chrome.tabs.remove
- chrome.tabs.sendMessage
- chrome.tabs.setZoom
- chrome.tabs.setZoomSettings
- chrome.tabs.ungroup
- chrome.tabs.update
- chrome.windows
- chrome.windows.CreateType
- chrome.windows.WINDOW_ID_CURRENT
- chrome.windows.WINDOW_ID_NONE
- chrome.windows.WindowState
- chrome.windows.WindowType
- chrome.windows.create
- chrome.windows.get
- chrome.windows.getAll
- chrome.windows.getCurrent
- chrome.windows.getLastFocused
- chrome.windows.onBoundsChanged
- chrome.windows.onCreated
- chrome.windows.onFocusChanged
- chrome.windows.onRemoved
- chrome.windows.remove
- chrome.windows.update
- background.js
chrome.runtime.onInstalled.addListener(() => {
  console.info('我是后台脚本', Date.now());
  console.info('后台脚本API接口列表:', chrome);
  console.info('\n\n\n\n\n');

  main();
});


async function main() {
  //
}

// 接收内容脚本消息
chrome.runtime.onMessage.addListener(
  function(request, sender, sendResponse) {
    // request: {}
    // sender: { id: '', documentId: '', frameId: 0, origin: '', tab: {active:true,width:0,height:0,windowId:0}, url: '' }
    console.log('接收内容脚本消息:', request, sender, sendResponse);

    sendResponse({farewell: "goodbye"});
  }
);

// 持久连接
chrome.runtime.onConnect.addListener(function(port) {
  console.info(port);

  port.onMessage.addListener(function(msg) {
    console.log('持久连接', msg);
  });
});


console.info(chrome.runtime.getURL("/images/icon16.png"));
content-script.js内容脚本
内容脚本是在网页上下文中运行的文件。通过使用标准文档对象模型(DOM),他们能够读取浏览器访问的网页的详细信息,对其进行更改,并将信息传递给其父扩展。
注意事项
扩展程序不能在“chrome://extensions”等内部 Chrome 页面上注入内容脚本。请务必在https://google.com等真实网页上试用该扩展程序。
内容脚本:https://developer.chrome.com/docs/extensions/mv3/content_scripts/
注意事项
- 内容脚本无法直接访问其他 API。
生命周期
内容脚本API接口
- chrome.csi
- chrome.dom
- chrome.dom.openOrClosedShadowRoot
- chrome.extension
- chrome.extension.ViewType
- chrome.extension.inIncognitoContext
- chrome.i18n
- chrome.i18n.detectLanguage
- chrome.i18n.getAcceptLanguages
- chrome.i18n.getMessage
- chrome.i18n.getUILanguage
- chrome.loadTimes
- chrome.runtime
- chrome.runtime.OnInstalledReason
- chrome.runtime.OnRestartRequiredReason
- chrome.runtime.PlatformArch
- chrome.runtime.PlatformNaclArch
- chrome.runtime.PlatformOs
- chrome.runtime.RequestUpdateCheckStatus
- chrome.runtime.connect
- chrome.runtime.id
- chrome.runtime.sendMessage
content-script.js
// 内容脚本向后台脚本通信
chrome.runtime.sendMessage({greeting: "hello"}, function(response) {
  console.log('响应后台脚本消息:', response);
});

// 持久连接
const port = chrome.runtime.connect({name: "knockknock"});
port.postMessage({joke: "Knock knock"});
port.onMessage.addListener(function(msg) {
  console.log('持久连接 | 接收后台脚本消息:', msg);
});


console.info(chrome.runtime.getURL("/images/icon16.png"));
第三方插件
jsdom
各种 Web 标准的 JavaScript 实现。
代码示例
const jsdom = require("jsdom");
const { JSDOM } = jsdom;

const dom = new JSDOM(`<!DOCTYPE html><p>Hello world</p>`);
console.log(dom.window.document.querySelector("p").textContent);
undom
最小可行的 DOM 文档实现,如果您想要 DOM 而不是解析器,这可能适合您。
代码示例
import undom from 'undom';

let document = undom();
let foo = document.createElement('foo');
foo.appendChild(document.createTextNode('Hello, World!'));
document.body.appendChild(foo);
部署运维
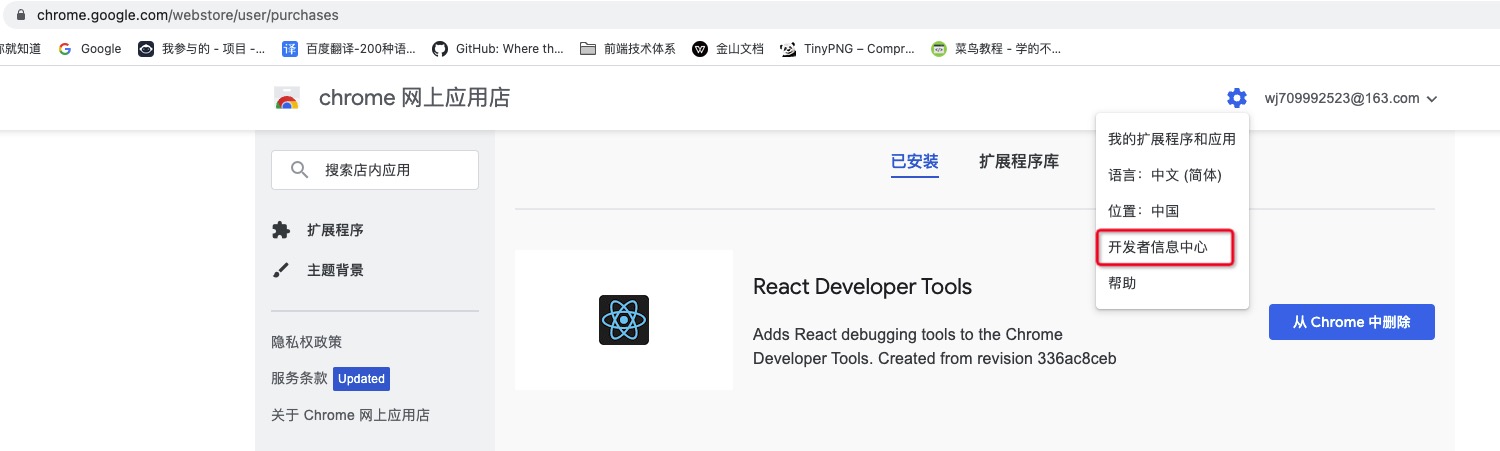
发布到 Chrome 网上应用店
- 创建项目的 zip 文件。
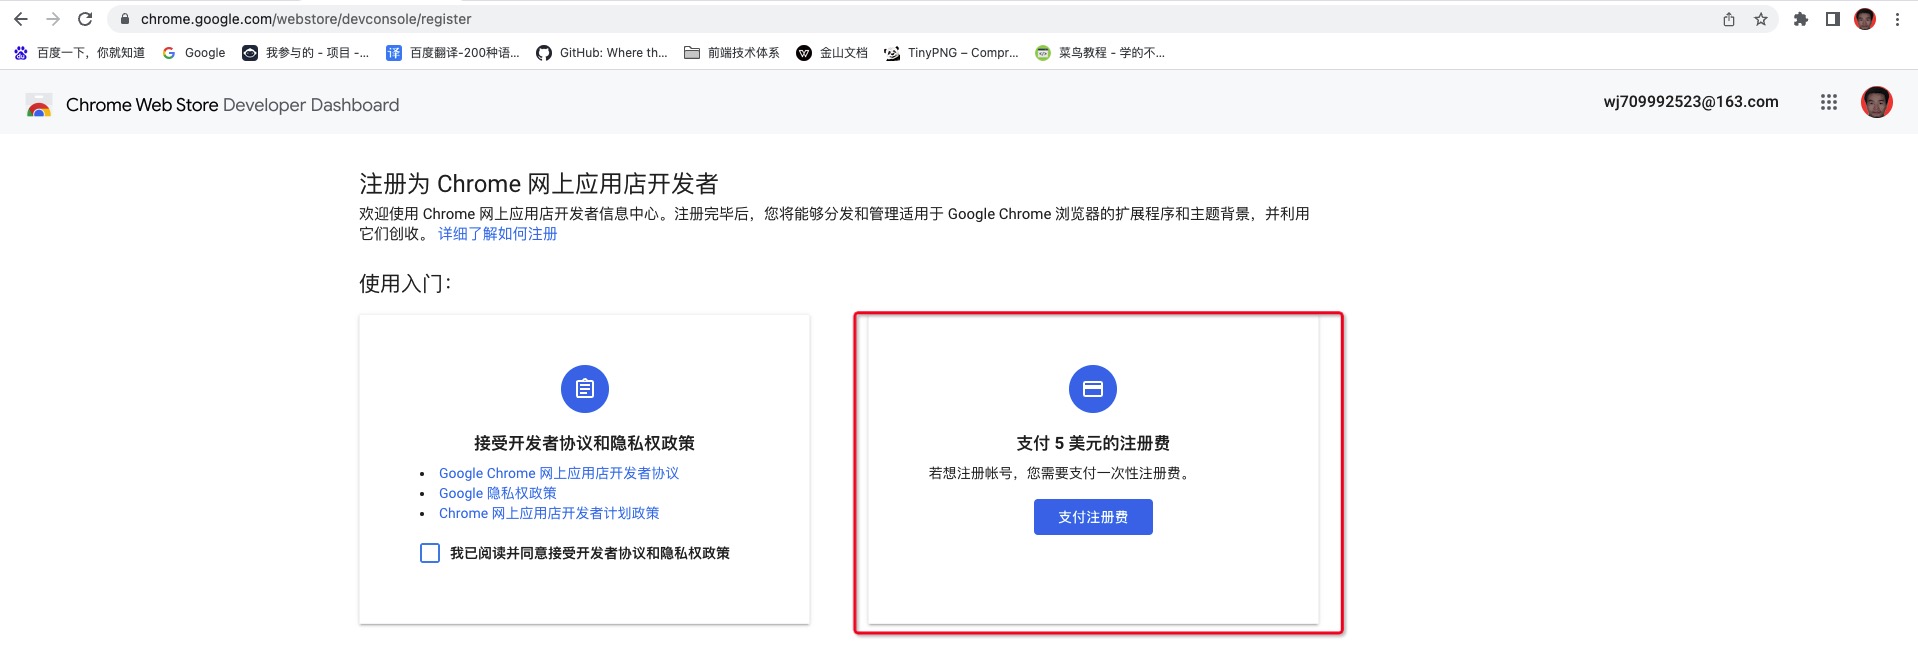
- 创建并设置开发者帐户。
- 上传您的项目。
- 为您的列表添加资产。
- 提交您的项目以供发布。
支付注册费
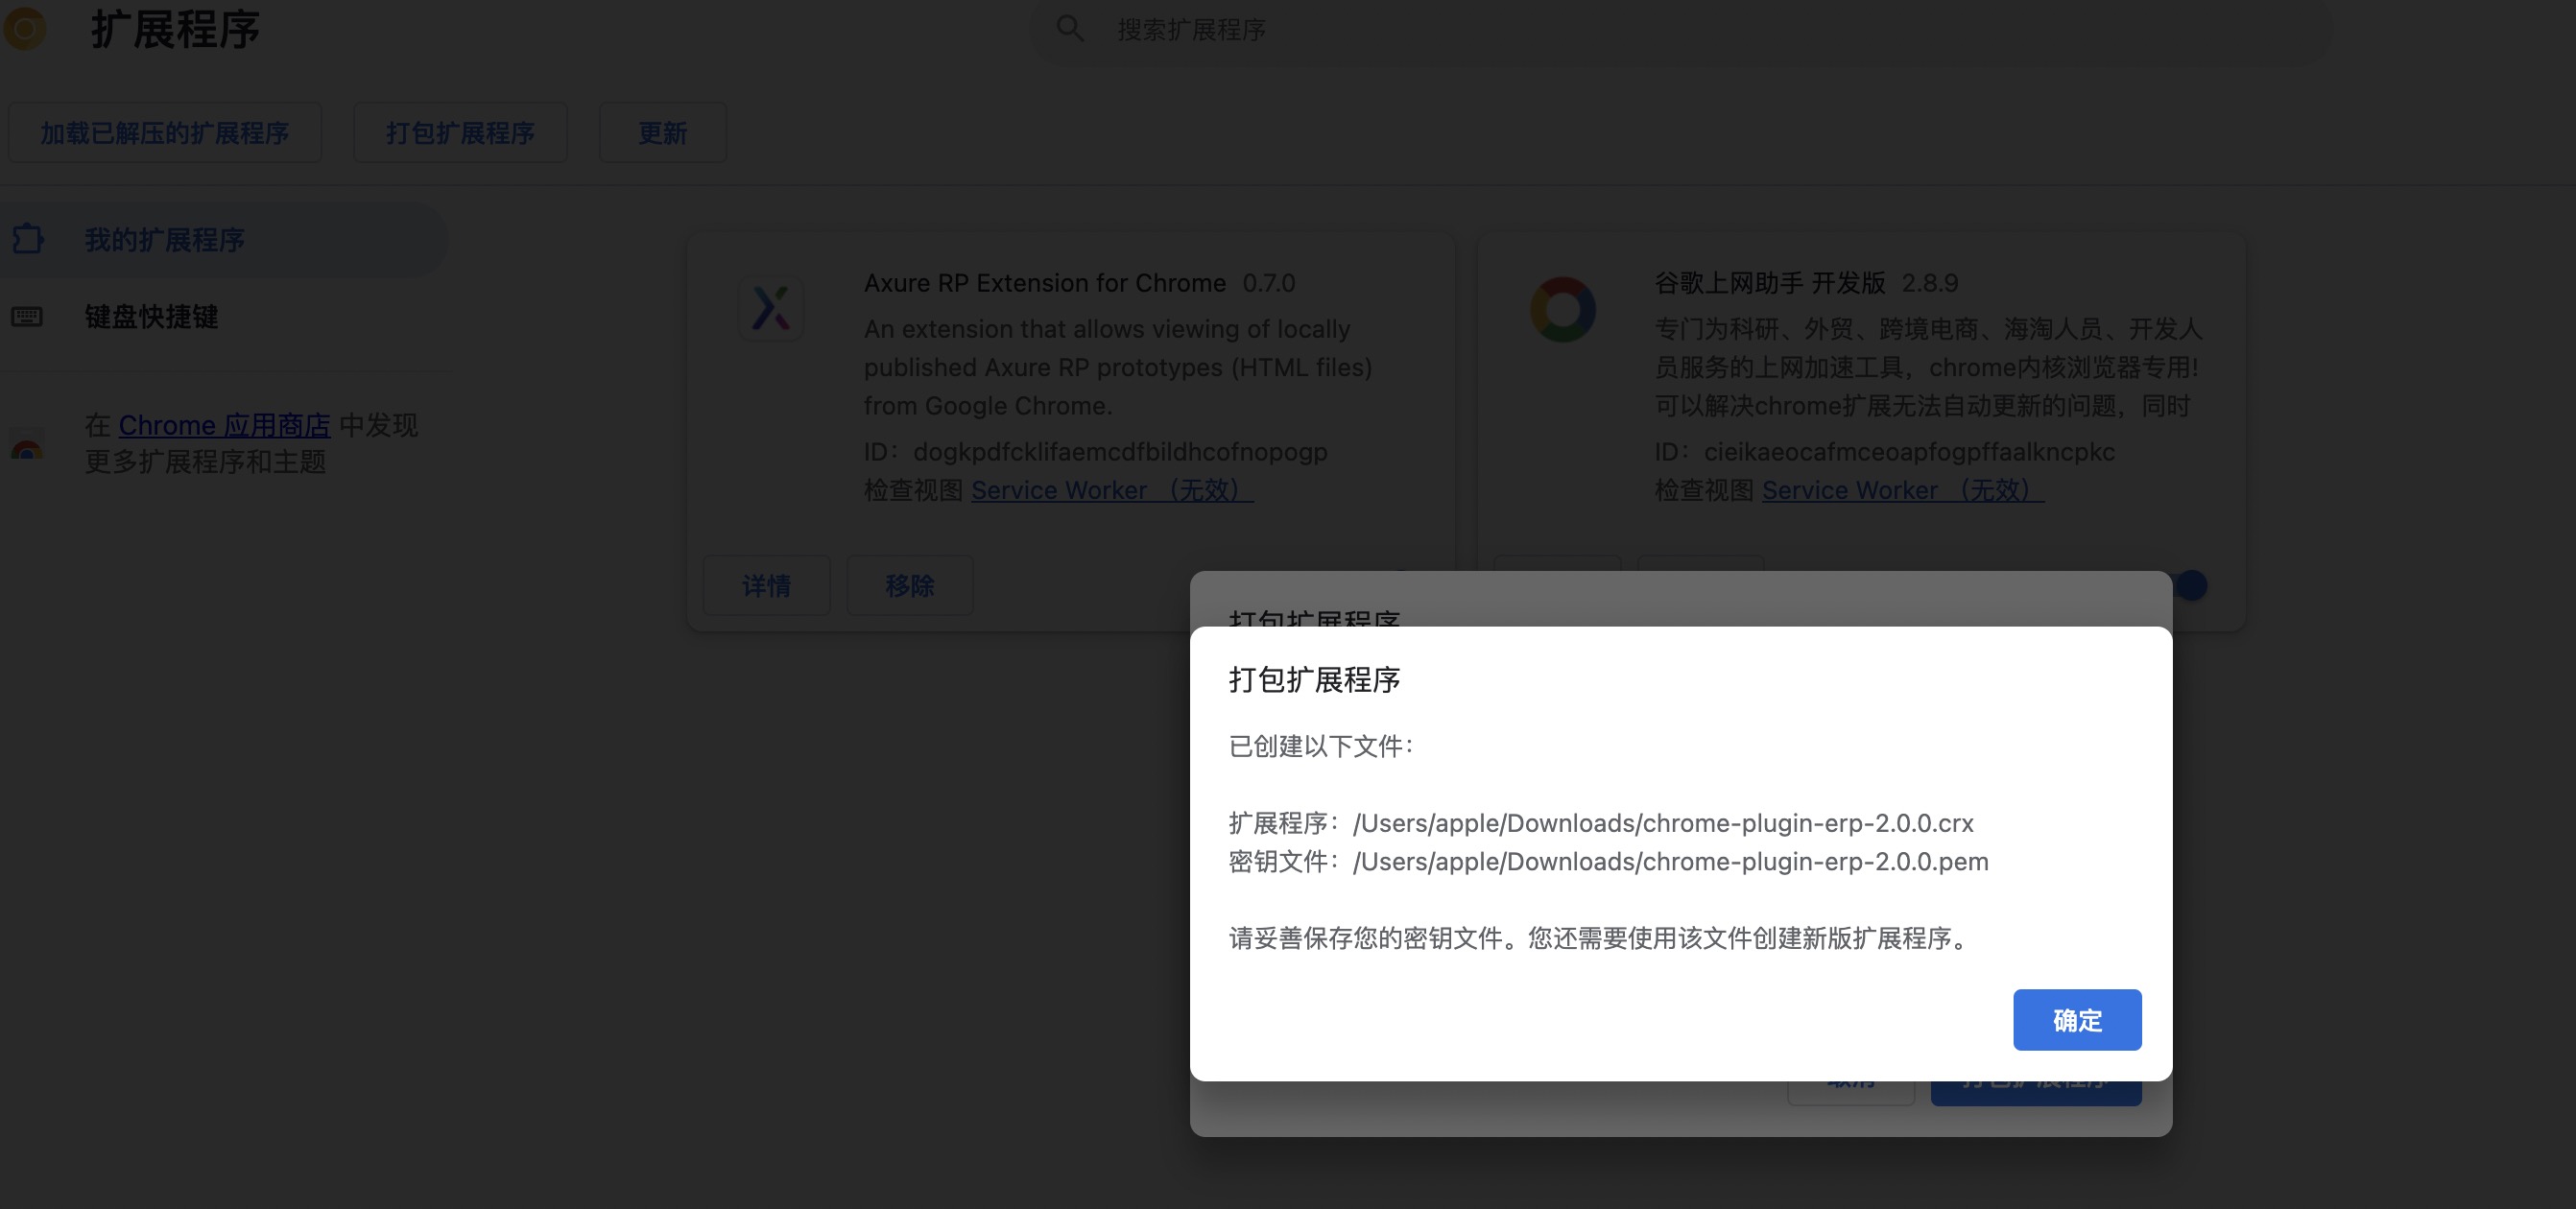
打包应用
注意私钥文件(选填)的位置,方便删除或新增,chrome-extend.pem
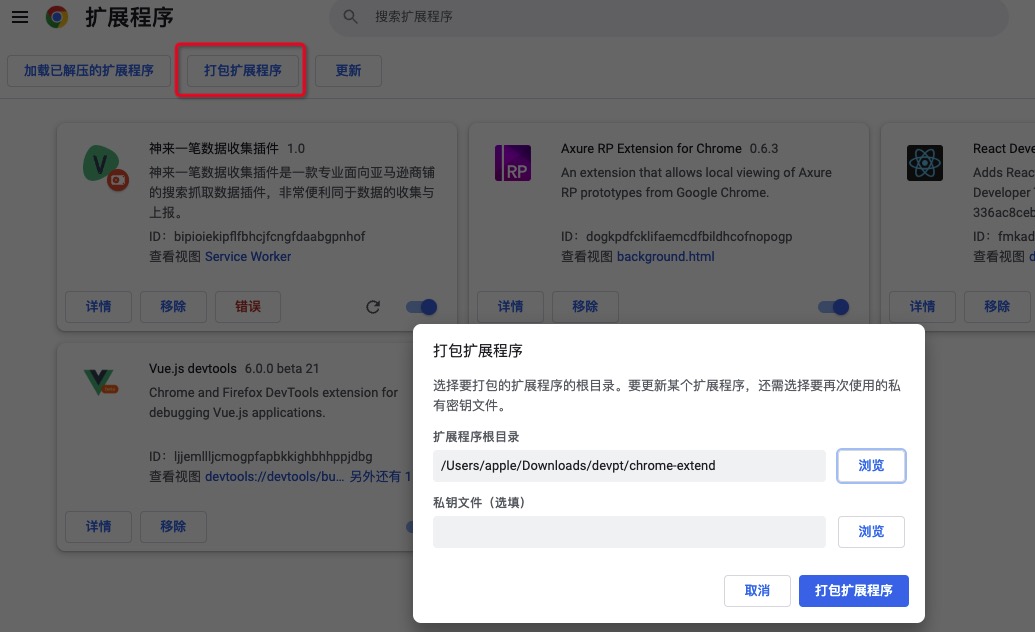
CRX文件
常见问题与释疑
- 扩展应用渠道:https://developer.chrome.com/docs/extensions/mv3/faq/
- 常规扩展渠道:https://developer.chrome.com/docs/webstore/faq/
- Stack Overflow渠道:https://stackoverflow.com/questions/tagged/google-chrome-extension
- chromium-extensions组渠道:https://groups.google.com/a/chromium.org/g/chromium-extensions
工程化建设方案
性能调优最佳实践
生态系统
Google一键快捷功能
项目管理: https://console.cloud.google.com/cloud-resource-manager
Google 一键快捷功能: https://developers.google.com/identity/gsi/web/guides/offerings?hl=zh-cn
JWT 解码库: https://jwt.io/
JSRSASIGN: https://github.com/kjur/jsrsasign
JSRSASIGN: https://kjur.github.io/jsrsasign/
jwt-decode: https://github.com/auth0/jwt-decode
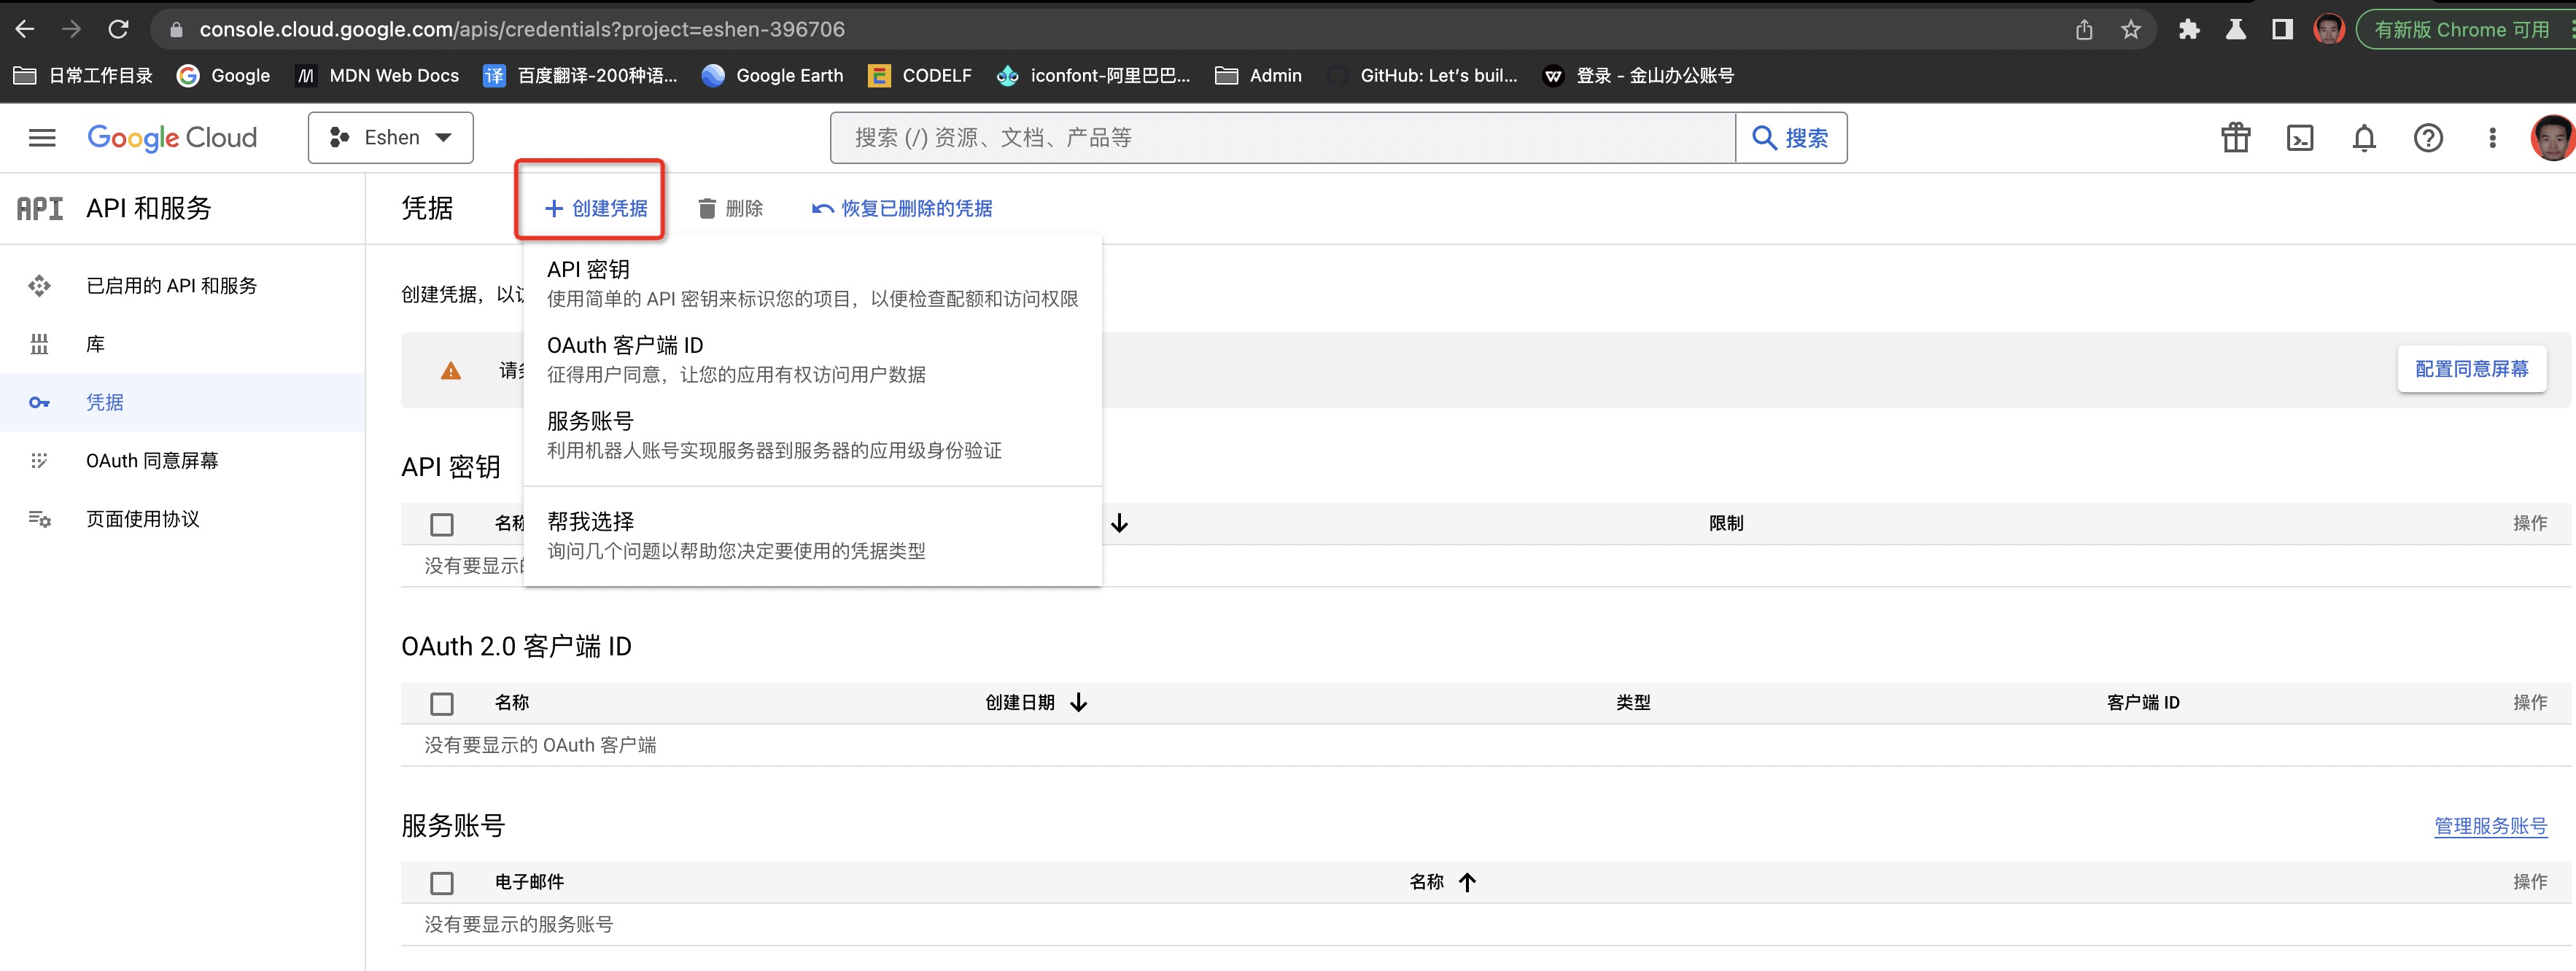
创建OAuth 客户端
具体步骤指引: https://developers.google.com/identity/gsi/web/guides/get-google-api-clientid?hl=zh-cn
创建Google API项目:https://console.cloud.google.com/projectselector2/apis/dashboard?hl=zh-cn&supportedpurview=project
创建凭据 > OAuth 客户端 ID
名称: Eshen-app
客户端 ID: 785088667888-nihednr5l4q2n3fnkls79hqknvnb9tm9.apps.googleusercontent.com
客户端密钥: 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
完整代码示例
<!--
  data-login_uri: “使用 Google 帐号登录”按钮的 redirect 用户体验模式需要 data-login_uri 属性,该模式会忽略 data-callback 属性。
  data-callback: 必须为 Google 一键和 Google 登录按钮 popup 用户体验模式设置这两个属性之一。如果两者都设置,data-callback 属性的优先级较高。
-->
<div id="g_id_onload"
     data-client_id="785088667888-nihednr5l4q2n3fnkls79hqknvnb9tm9.apps.googleusercontent.com"

     data-context="signin" // 登录
     data-context="signup" // 注册
     data-context="use"    // 使用

     data-callback="googleCallback"
     data-auto_select="true"
     data-itp_support="true">
</div>

<!--加载客户端库-->
<script src="https://accounts.google.com/gsi/client" async></script>
<script src="/public/source/jwt-decode/jwt-decode.js"></script>
<script type="text/javascript">
function googleCallback(response) {
  /**
    {
      "clientId": "83070755859-ve315mmqf66f66pivm2k4ftrcao1crem.apps.googleusercontent.com",
      "client_id": "83070755859-ve315mmqf66f66pivm2k4ftrcao1crem.apps.googleusercontent.com",
      "credential": "",
      "select_by": "user"
    }
   */
  console.info(response)

  /**
    aud: "83070755859-ve315mmqf66f66pivm2k4ftrcao1crem.apps.googleusercontent.com"
    azp: "83070755859-ve315mmqf66f66pivm2k4ftrcao1crem.apps.googleusercontent.com"
    email: "wj709992523@163.com"
    email_verified: true
    exp: 1692706139
    family_name: "ysun"
    given_name: "God"
    iat: 1692702539
    iss: "https://accounts.google.com"
    jti: "7b61afd011e9ba0beeb3402a5f3c80829d7732f1"
    locale: "zh-CN"
    name: "God ysun"
    nbf: 1692702239
    picture: "https://lh3.googleusercontent.com/a/AAcHTtcgs9nJZuS0IyU9fDZaY5PO1PdWFjgkE-VWYqq604VQNQ=s96-c"
    sub: "105175875415623597678"
   */
  const responsePayload = jwt_decode(response.credential);
  console.info(responsePayload)
}
</script>
Shopify接入Google登录
使用 Storefront API 或 Basic 套餐中提供的任何适用 API 在 Shopify 商店中创建或更新用户帐户。
Shopify 后台创建应用
- 在 Shopify 后台中,点击设置 > 应用和销售渠道。
- 点击开发应用。
- 点击创建自定义应用。
Social Login by Oxi Apps插件: https://apps.shopify.com/oxi-social-login?locale=zh-CN