Vue3生态技术栈与工程方案
重要通知
Vue3.x是Vue历史版本中更改程度最大的一次版本升级,从响应式系统的底层实现,以及编程风格,语法结构、API等,提供了更友好的编程实现。
Vue3基本概况
- 官网:https://vuejs.org/
- 中文文档:https://cn.vuejs.org/
- GitHub:https://github.com/vuejs
- 已发行版本:https://github.com/vuejs/core/releases
Vue3新特性
- 组合式 API*
- 单文件组件中的组合式 API 语法糖 (
<script setup>)* - Teleport 组件
- Fragments 片段
- Emits 组件选项**
- 来自 @vue/runtime-core 的 createRenderer API 用来创建自定义渲染函数
- 单文件组件中的状态驱动的 CSS 变量 (
<style>中的 v-bind)* - SFC
<style scoped>新增全局规则和针对插槽内容的规则 - Suspense 实验性
Vue2迁移Vue3指南
初始化工程
npm create vue@latest

cd <your-project-name>

npm install
npm run dev
npm run build
重构响应式系统
采用Proxy与Reflect替代Object.defineProperty重构了响应式系统。
- 解决了Vue2.x中Object.defineProperty自身的缺陷,⽆法监控到数组下标的变化,以及对象属性多层深度嵌套的递归问题。
Performance:性能优化
vue2.x的父组件更新,导致子组件必须更新,增加了性能消耗;vue3.x的父组件更新,子组件不会更新,降低了性能消耗。
Tree-shaking支持
通过ES6模块化API,借助webpack、vite等打包工具实现按需打包,实现了打包代码体积的降低,降低了代码冗余问题。
Composition API
Composition API的设计,增强了Vue体系在实际开发项目中组件化的灵活运用。
TypeScript支持
使用TypeScript重写Vue,降低了线上运行时的明显问题。
Custom Renderer API
自定义渲染函数API,Vue3.X提供了比模板更接近编译器的渲染系统。
重写虚拟DOM优化diff算法
vue3.x新增静态标记PatchFlag,创建vnode时会判断是否发生内容变化而添加静态标记patchFlag,diff阶段仅仅处理标记patchFlag部分,避开了全量比较的损耗问题。 vue3.0将 vdom 更新性能由与模版整体大小相关提升为与动态内容的数量相关。
新增组件与其他
- Fragment:用于减少不必要嵌套的组件,类似于React的React.Fragment。
- Teleport:可以将一个组件的一部分模板“传送”到该组件的 DOM 层次结构之外的 DOM 节点中。类似于React的ReactDOM.createPortal方法。
- Suspense:是一个内置组件,用来在组件树中编排异步依赖。
基础语法
- 示例文件:example.vue
<template>
  <section>

  </section>
</template>

<script lang="ts">
  export default {
    name: '',
    props: {
      value: {
        type: Boolean | String | Number | Boolean | Array | Object | Date | Function | Symbol,
        required: true,
        // 自定义验证函数
        validator(value) {
          // 这个值必须与下列字符串中的其中一个相匹配
          return ['success', 'warning', 'danger'].includes(value);
        },
        default() {
          return false;
        }
      }
    },
    data() {
      return {
        count: 0
      };
    },
    computed: {
      calcCount() {
        return this.count;
      }
    },
    methods: {}
  }
</script>
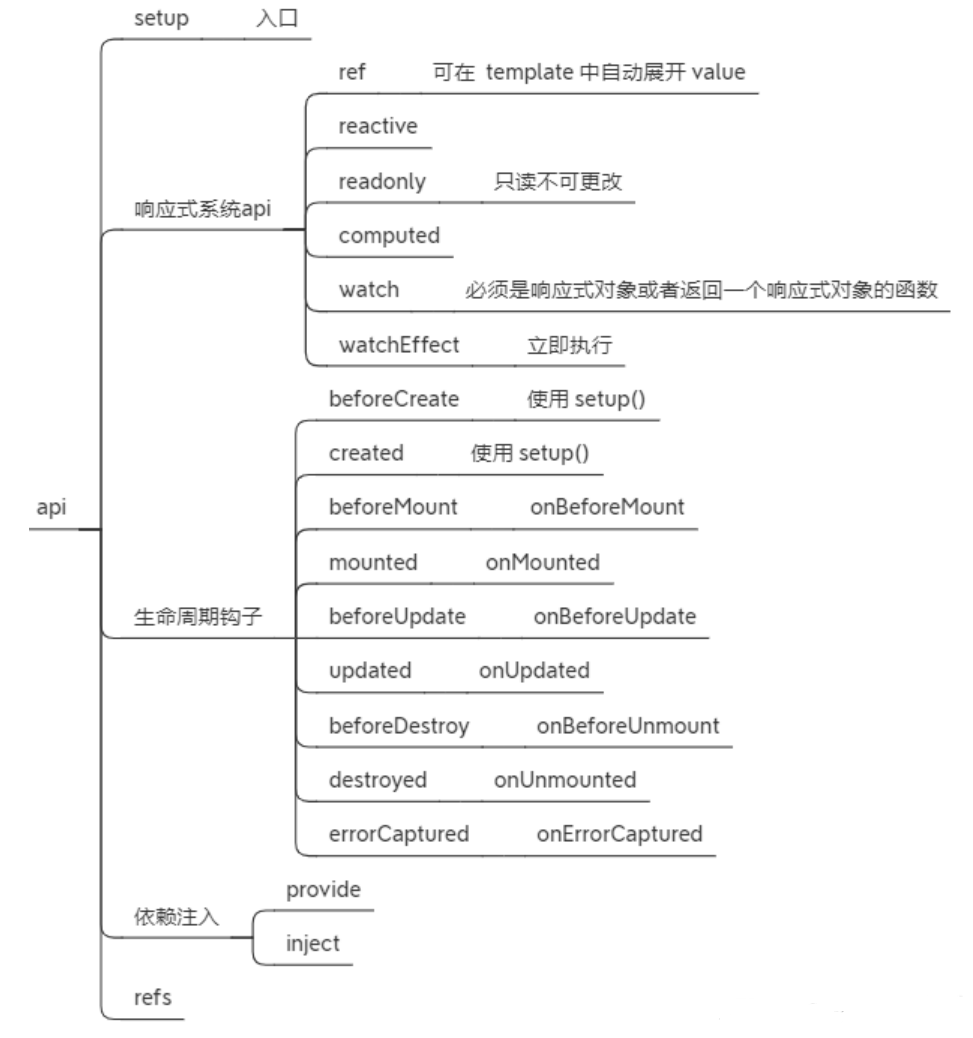
第02章 生命周期与相关钩子
每个 Vue 组件实例在创建时都需要经历一系列的初始化步骤,比如设置好数据侦听,编译模板,挂载实例到 DOM 以及数据改变时更新 DOM。在此过程中,它也会运行称为生命周期钩子的函数,让开发者有机会在特定阶段添加自己的代码。
生命周期图示
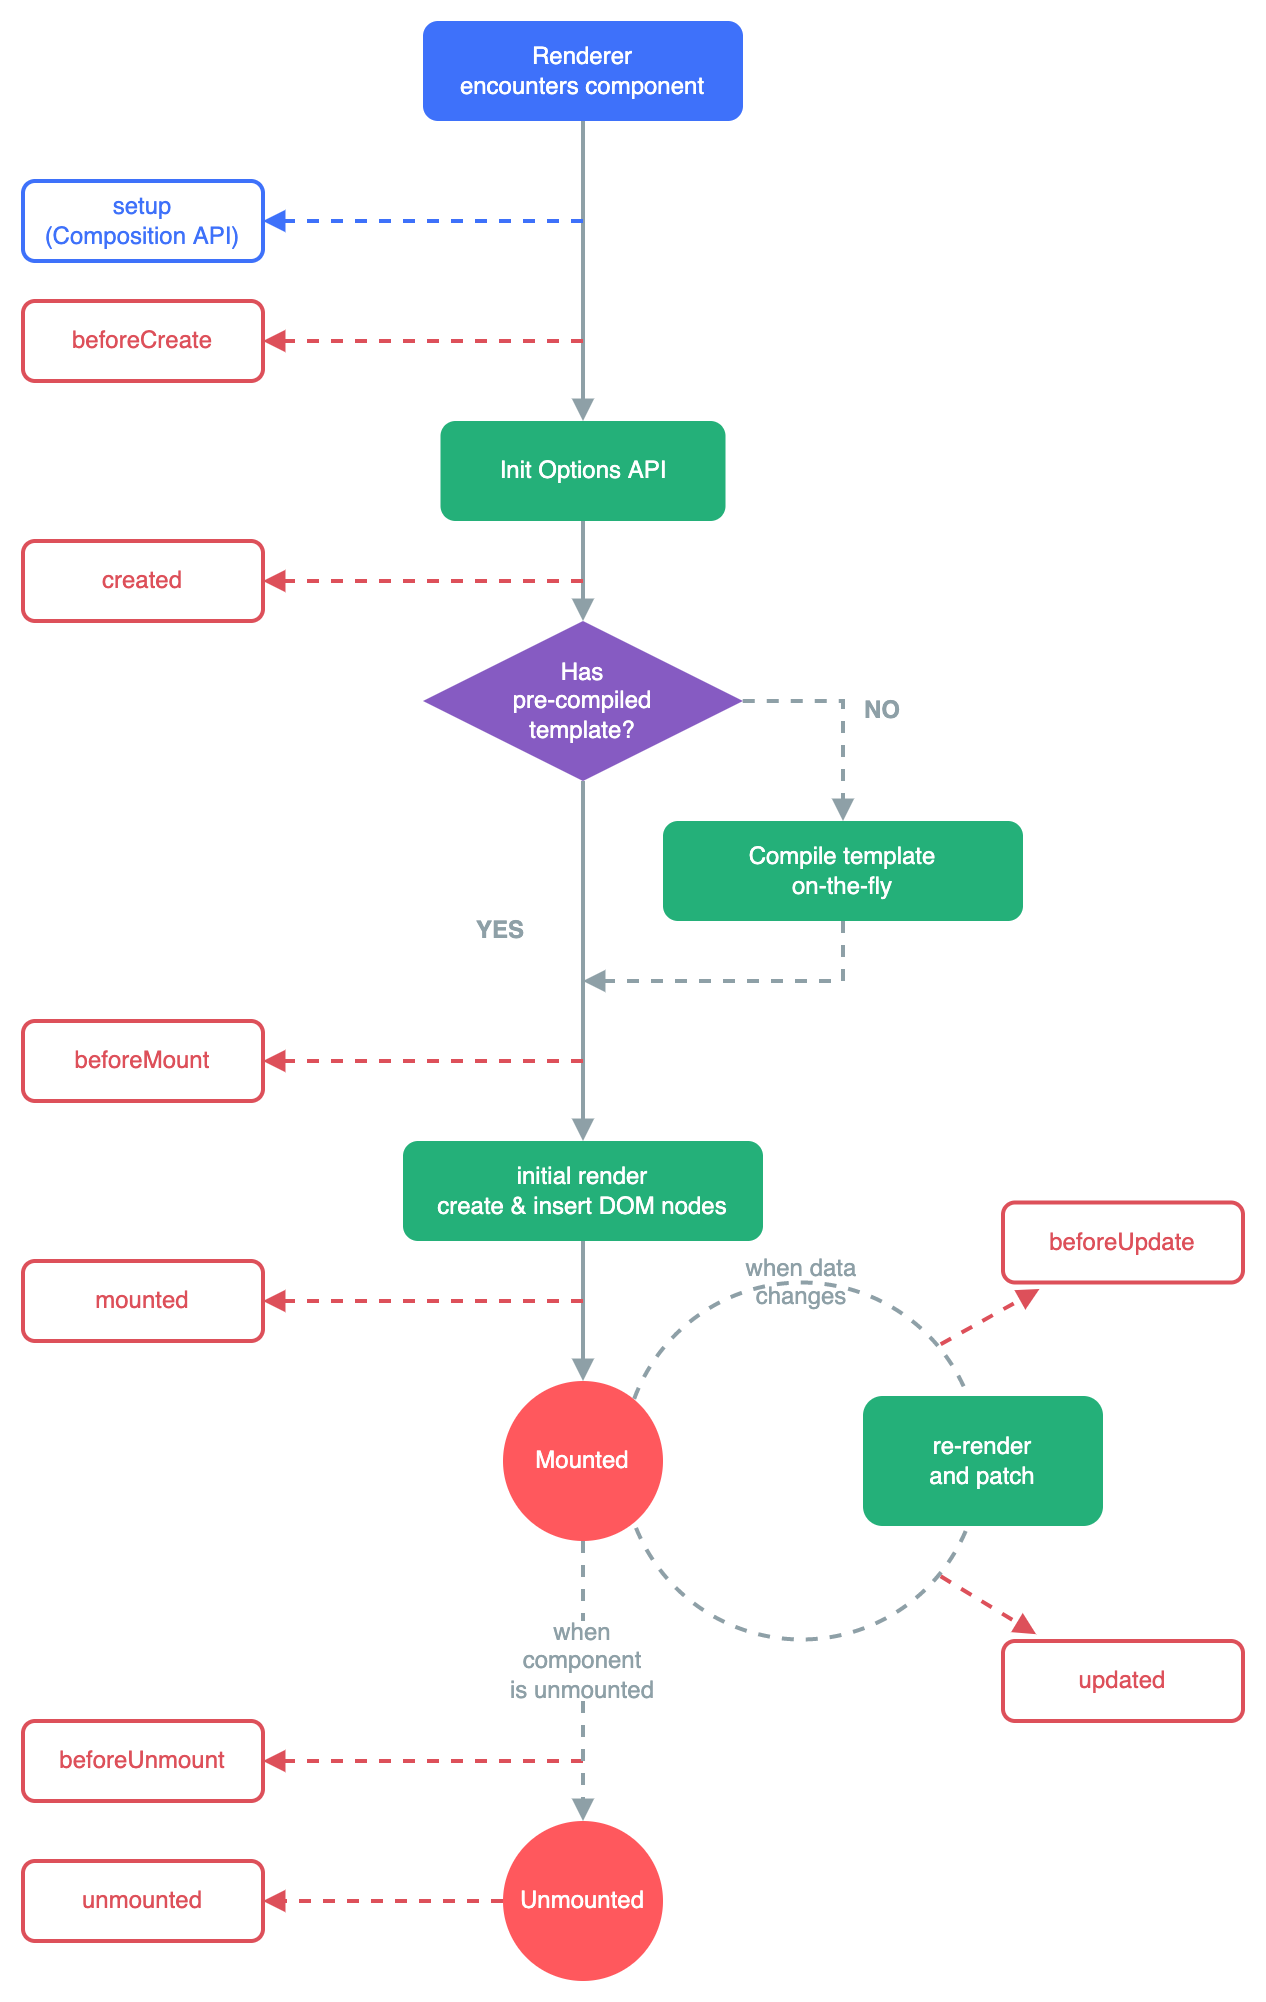
注册周期钩子
Vue.createApp({
  // 在组件实例初始化完成之后立即调用。
  beforeCreate() {},

  // 在组件实例处理完所有与状态相关的选项后调用。
  created() {},

  // 在组件被挂载之前调用。
  beforeMount() {},

  // 在组件被挂载之后调用。
  mounted() {},

  // 在组件即将因为一个响应式状态变更而更新其 DOM 树之前调用。
  beforeUpdate() {},

  // 在组件即将因为一个响应式状态变更而更新其 DOM 树之后调用。
  updated() {},

  // 在一个组件实例被卸载之前调用。
  beforeUnmount() {},

  // 在一个组件实例被卸载之后调用。
  unmounted() {},

  // 在捕获了后代组件传递的错误时调用。
  errorCaptured() {},

  // 在一个响应式依赖被组件的渲染作用追踪后调用。
  renderTracked() {},

  // 在一个响应式依赖被组件触发了重新渲染之后调用。
  renderTriggered() {},

  // 若组件实例是 <KeepAlive> 缓存树的一部分,当组件被插入到 DOM 中时调用。[这个钩子在服务端渲染时不会被调用]
  activated() {},

  // 若组件实例是 <KeepAlive> 缓存树的一部分,当组件从 DOM 中被移除时调用。[这个钩子在服务端渲染时不会被调用]
  deactivated() {},

  // 当组件实例在服务器上被渲染之前要完成的异步函数。
  serverPrefetch() {}
});
Vue3.x API接口
import {
  BaseTransition, Comment, EffectScope, Fragment, KeepAlive, ReactiveEffect, Static,
  Suspense, Teleport, Text, Transition, TransitionGroup, VueElement,
  callWithAsyncErrorHandling, callWithErrorHandling, camelize, capitalize, cloneVNode,
  compatUtils, compile, computed, createApp, createBlock, createCommentVNode,
  createElementBlock, createElementVNode, createHydrationRenderer, createPropsRestProxy,
  createRenderer, createSSRApp, createSlots, createStaticVNode, createTextVNode,
  createVNode, customRef, defineAsyncComponent, defineComponent, defineCustomElement,
  defineEmits, defineExpose, defineProps, defineSSRCustomElement, effect, effectScope,
  getCurrentInstance, getCurrentScope, getTransitionRawChildren, guardReactiveProps,
  h, handleError, hydrate, initCustomFormatter, initDirectivesForSSR, inject,
  isMemoSame, isProxy, isReactive, isReadonly, isRef, isRuntimeOnly, isShallow, isVNode,
  markRaw, mergeDefaults, mergeProps, nextTick, normalizeClass, normalizeProps,
  normalizeStyle, onActivated, onBeforeMount, onBeforeUnmount, onBeforeUpdate,
  onDeactivated, onErrorCaptured, onMounted, onRenderTracked, onRenderTriggered,
  onScopeDispose, onServerPrefetch, onUnmounted, onUpdated, openBlock, popScopeId,
  provide, proxyRefs, pushScopeId, queuePostFlushCb, reactive, readonly, ref,
  registerRuntimeCompiler, render, renderList, renderSlot, resolveComponent,
  resolveDirective, resolveDynamicComponent, resolveFilter, resolveTransitionHooks,
  setBlockTracking, setDevtoolsHook, setTransitionHooks, shallowReactive,
  shallowReadonly, shallowRef, ssrContextKey, ssrUtils, stop, toDisplayString,
  toHandlerKey, toHandlers, toRaw, toRef, toRefs, transformVNodeArgs, triggerRef,

  unref, useAttrs, useCssModule, useCssVars, useSSRContext, useSlots, useTransitionState, useId,

  vModelCheckbox, vModelDynamic, vModelRadio, vModelSelect, vModelText, vShow, version,
  warn, watch, watchEffect, watchPostEffect, watchSyncEffect, withAsyncContext,
  withCtx, withDefaults, withDirectives, withKeys, withMemo, withModifiers, withScopeId,
} from 'Vue';
ref
<template>
	<ul>
		<li v-for="(dx, index) in menuConf.list" :key="index">
			<div :ref="(ref) => (popoverRefMap[dx.key + index] = ref)"></div>
		</li>
	</ul>
</template>

<script lang="ts" setup>
// 第三方资源类库
import { ref, reactive, computed } from 'vue';

/**
 * @当前业务
 * 具体逻辑实现代码
 */
const popoverRefMap = ref<Record<string, any>>({});
const menuConf = reactive({
	list: [] as Record<string, any>[]
});
</script>

<!--当前页面作用域-->
<style lang="scss" scoped>
.page-module {
	position: relative;
}
</style>
核心模块机制
单向数据流
状态向下流往子组件,而不会逆向传递。每次父组件更新后,所有的子组件中的 props 都会被更新到最新值。
双向数据流
无论数据改变,或是用户操作,都能带来互相的变动,自动更新。
混合Mixin
Mixin 提供了一种非常灵活的方式,来分发 Vue 组件中的可复用功能。
const myMixin = {
  created() {
    this.hello()
  },
  methods: {
    hello() {
      console.log('hello from mixin!')
    }
  }
}
const app = Vue.createApp({
  mixins: [myMixin]
})
通信机制
可行方案:props、$emit、vuex、provide/inject、$attrs/$listeners、$root、$parent,、$refs、eventBus等。
从父组件向子组件传递数据
- 使用 props
从子组件向父组件传递数据
- 父组件:parent.vue
<template>
  <HelloWorld @hello-event="helloCallback"></HelloWorld>
</template>

<script lang="ts">
  export default {
    methods: {
      helloCallback(params: any) {
        console.log(params);
      }
    }
  }
</script>
- 子组件:child.vue
<script lang="ts">
  export default {
    methods: {
      submit() {
        this.$emit('event-name', options);
      }
    }
  }
</script>
深度嵌套组件
- 使用一对 provide 和 inject
// 祖级组件
app.component('todo-list', {
  provide: {
    user: 'John Doe'
  },
});

// 孙级组件
app.component('todo-list-statistics', {
  inject: ['user'],
  created() {
    console.log(this.user)
  }
})
- 组件与组件
- 使用reactive()
- vuex或Pinia、$root、$parent
Provide / Inject
- provide()
import { ref, provide } from 'vue';

// 提供响应式的值
const count = ref(0)
provide('count', count)
- inject()
import { inject } from 'vue';

// 注入响应式的值
const count = inject('count')
自定义指令
除了核心功能默认内置的指令 (例如 v-model 和 v-show),Vue 也允许注册自定义指令。
app.directive('my-directive', {
  // 在绑定元素的 attribute 或事件监听器被应用之前调用。在指令需要附加在普通的 v-on 事件监听器调用前的事件监听器中时,这很有用。
  created() {},

  // 当指令第一次绑定到元素并且在挂载父组件之前调用。
  beforeMount() {},

  // 在绑定元素的父组件挂载之后调用
  mounted(el, binding, vnode) {
    // binding包含以下 property 的对象
    instance:使用指令的组件实例。
    value:传递给指令的值。例如,在 v-my-directive="1 + 1" 中,该值为 2。
    oldValue:先前的值,仅在 beforeUpdate 和 updated 中可用。无论值是否有更改都可用。
    arg:传递给指令的参数(如果有的话)。例如在 v-my-directive:foo 中,arg 为 "foo"。
    modifiers:包含修饰符(如果有的话) 的对象。例如在 v-my-directive.foo.bar 中,修饰符对象为 {foo: true,bar: true}。
    dir:一个对象,在注册指令时作为参数传递。例如,在以下指令中
  },

  // 在包含组件的 VNode 更新之前调用
  beforeUpdate(prevNode) {},

  // 在包含组件的 VNode 及其子组件的 VNode 更新之后调用
  updated(prevNode) {},

  // 在绑定元素的父组件卸载之前调用
  beforeUnmount() {},

  // 在绑定元素的父组件卸载之后调用
  unmounted() {}
})
深度作用选择器
处于 scoped 样式中的选择器如果想要做更“深度”的选择,也即:影响到子组件,可以使用 :deep() 这个伪类。
<style scoped>
  .a :deep(.b) {
    /* ... */
  }
</style>
sass预处理器
<style scoped>
  .a ::v-deep .b {
    /* ... */
  }
</style>
组件式编程
React倡导函数式编程,即一个函数相当于一个组件。而Vue中通过组件式编程,可以更友好地将复杂的系统拆分为每一个相对独立而可维护性的组件。
动态组件<KeepAlive>与<component>
缓存包裹在其中的动态切换组件,动态组件常与keep-alive与
<component>组合使用。
- keep-alive的五个生命周期:created、mounted、destroyed、activated、deactivated
<KeepAlive
  include=['componentA', 'componentA']
  exclude=['componentC', 'componentD']
  max=100
>
  <component :is="componentCtn"></component>
</KeepAlive>
import componentA from 'componentA';
import componentB from 'componentB';

Vue.createApp({
  data() {
    return {
      componentCtn: componentA,
    }
  },
  methods: {
    changeTab(type: String) {
      this.componentCtn = type;
    }
  }
});
异步组件
在大型项目中,我们可能需要拆分应用为更小的块,并仅在需要时再从服务器加载相关组件。
import { defineAsyncComponent } from 'vue'

const AsyncComp = defineAsyncComponent(() =>
  import('./components/MyComponent.vue')
)

const AsyncComp = defineAsyncComponent({
  // 加载函数
  loader: () => import('./Foo.vue'),

  // 加载异步组件时使用的组件
  loadingComponent: LoadingComponent,
  // 展示加载组件前的延迟时间,默认为 200ms
  delay: 200,

  // 加载失败后展示的组件
  errorComponent: ErrorComponent,
  // 如果提供了一个 timeout 时间限制,并超时了
  // 也会显示这里配置的报错组件,默认值是:Infinity
  timeout: 3000
})
自定义组件
类型检查:可以是下列原生构造函数中的一个,String、Number、Boolean、Array、Object、Date、Function、Symbol。
Attribute 继承:当组件返回单个根节点时,非 prop 的 attribute 将自动添加到根节点的 attribute 中。
自定义事件
插槽
app.component('my-component-name', {
  props: {
    visual: Boolean,
    title: {
      type: String,
      required: true,
      default: '自定义组件'
    },
    // 对象或数组的默认值必须从一个工厂函数返回
    list: {
      type: Array,
      required: false,
      default() {
        return []
      }
    }
  },
  template: ``
})
插槽
具名插槽
- 插槽组件: child.vue
<template>
  <section class="component-">
    <!--$slots对象无需手动导入,Vue3亿实现自动导入处理-->
    <slot v-if="$slots[`column-${item.prop}`]"></slot>

    <!--没有提供 name 的 <slot> 出口会隐式地命名为“default”-->
    <slot v-else-if="$slots[`default`]"></slot>

    <slot name="header"></slot>

    <!--传参-->
    <slot name="footer"></slot>
  </section>
</template>

<script setup lang="ts">
</script>
- 引用组件: current.vue
<template>
  <section class="page-">
    <componentEl>
      内容
      <template v-slot:header>
        <!-- header 插槽的内容放这里 -->
      </template>

      <template #footer>
        <!-- footer 插槽的内容放这里 -->
      </template>
    </componentEl>
  </section>
</template>

<script setup lang="ts">
  import componentEl from "@/components/child.vue";
</script>
条件插槽
<template>
  <div class="card">
    <div v-if="$slots.header" class="card-header">
      <slot name="header" />
    </div>

    <div v-if="$slots.default" class="card-content">
      <slot />
    </div>

    <div v-if="$slots.footer" class="card-footer">
      <slot name="footer" />
    </div>
  </div>
</template>
动态插槽名
<base-layout>
  <template v-slot:[dynamicSlotName]>
    ...
  </template>

  <!-- 缩写为 -->
  <template #[dynamicSlotName]>
    ...
  </template>
</base-layout>
表格组件
- src/components/table/table-search.vue
<div class="com-flex-center action">
  <slot name="search-prefix" :data="searchSubmitData"></slot>
  <el-button :loading="initLoading" @click="clearAction">重置</el-button>
  <el-button type="primary" :loading="initLoading" @click="searchAction"
    >搜索</el-button
  >
  <slot name="search-suffix" :data="searchSubmitData"></slot>
</div>
- src/components/table/table-list.vue
<template>
  <section class="frag-container-padding-rl table">
    <el-table
      ref="tableRef"
      :data="initDataList"
      :tooltip-options="initTooltipOptions"
      height="100%"
      style="width: 100%"
      @sort-change="initTableParams?.sortChange"
      @selection-change="handleSelectionChange"
    >
      <el-table-column
        v-for="dx in initTableColumns"
        row-key="uuid"
        :type="dx.type"
        :prop="dx.prop"
        :label="dx.label"
        :width="dx.width || 'auto'"
        :min-width="dx.minWidth"
        :align="dx.align"
        :fixed="dx.fixed"
        :sortable="dx.sortable"
        :show-overflow-tooltip="dx.ellipsisTooltip"
        :class-name="dx.className"
      >
        <!--文本内容省略号查看全部-->
        <template v-if="dx.exclude === 'ellipsis'" #default="{ row, $index }">
          <div class="com-flex ellipsis-container">
            <div class="content">
              <template
                v-for="(ellipsisItem, ellipsisIndex) in dx.format
                  ? dx.format(row, $index)
                  : [row[dx.prop] || '-']"
                :key="`${dx.prop + $index + ellipsisIndex}`"
              >
                <component-column-ellipsis-content
                  :ref="(ref) => (popoverRefMap[dx.prop + $index] = ref)"
                  :column-props="dx"
                  :column-row="row"
                  :column-content="ellipsisItem"
                  @mouseover="
                    updatePopoverRefMap(
                      popoverRefMap[dx.prop + $index],
                      row[dx.prop_default || dx.prop],
                      dx
                    )
                  "
                />
              </template>
            </div>
            <slot :name="`column-${dx.prop}-suffix`"></slot>
          </div>
        </template>

        <!--图片缩略图弹窗预览框 preview-->
        <template v-else-if="dx.exclude === 'preview'" #default="{ row }">
          <div class="fragment-preview-image-container">
            <el-image
              v-if="Array.isArray(row[dx.prop])"
              :preview-teleported="true"
              :src="row[dx.prop][0]"
              :preview-src-list="row[dx.prop]"
              fit="cover"
            >
              <template #error>
                <div class="el-image__error">无图</div>
              </template>
            </el-image>
            <el-image
              v-else
              :preview-teleported="true"
              :src="row[dx.prop]"
              :preview-src-list="[row[dx.prop]]"
              fit="cover"
            >
              <template #error>
                <div class="el-image__error">无图</div>
              </template>
            </el-image>
            <div
              v-if="Array.isArray(row[dx.prop]) && row[dx.prop].length"
              class="com-flex-center preview-image-count"
            >
              <span>{{ row[dx.prop].length }}</span>
            </div>
          </div>
        </template>

        <!--图片缩略图快照预览框 snapshot-->
        <template
          v-else-if="dx.exclude === 'snapshot'"
          #default="{ row, $index }"
        >
          <component-column-thumbnail-preview
            :ref="(ref) => (popoverRefMap[dx.prop + $index] = ref)"
            :imgUrl="row[dx.prop]"
            @mouseover="
              updateImagePopoverRefMap(
                popoverRefMap[dx.prop + $index],
                row[dx.prop],
                dx
              )
            "
          />
        </template>

        <!--操作栏,不可配置UI项-->
        <template v-else-if="dx.type === 'action'" #default="{ row, $index }">
          <ysunColumnAction
            :row="row"
            :index="$index"
            @callback="tableColumnActionEmit"
          />
        </template>

        <!--操作栏,排斥在默认栏之外,可定义配置项,兼容旧配置-->
        <template
          v-else-if="dx.prop === 'action' && dx.exclude"
          #default="scope"
        >
          <slot :name="`column-${dx.prop}`" :scope="scope" :item="dx">
            <template v-for="idx in dx.actions" :key="idx.value">
              <el-button
                :type="idx.type || 'primary'"
                text
                :icon="idx.icon"
                @click="idx.actionEvent(idx.value, scope.row, scope.$index)"
                >{{ idx.label }}</el-button
              >
            </template>
          </slot>
        </template>

        <!--默认栏,可配置插槽自定义内容-->
        <template v-else-if="!dx.type && dx.prop" #default="scope">
          <slot :name="`column-${dx.prop}`" :scope="scope" :item="dx">
            {{
              initDefaultContent(
                dx.format
                  ? dx.format(scope.row, scope.$index)
                  : scope.row[dx.prop]
              )
            }}
          </slot>
        </template>

        <!--element-plus中<el-table-column>默认的type类型栏-->
      </el-table-column>
    </el-table>

    <div v-if="dataLoading" class="com-full com-flex-core table-data-loading">
      <flower-spinner :animation-duration="2500" :size="48" color="#409EFF" />
      <p>正在加载中</p>
    </div>

    <!--虚拟触发 | HTML字符串-->
    <el-popover
      v-if="popoverType === 'html'"
      v-model:visible="popoverVisible"
      popper-class="component-el-popover-table-html"
      :virtual-ref="popoverTempRef"
      placement="top"
      virtual-triggering
      v-bind="popoverOptions"
    >
      <div v-html="popoverTempContent"></div>
    </el-popover>

    <!--虚拟触发 | 图片缩略图快照预览框 snapshot-->
    <el-popover
      v-if="popoverType === 'image'"
      v-model:visible="popoverVisible"
      popper-class="component-el-popover-table-image"
      :virtual-ref="popoverTempRef"
      placement="right"
      virtual-triggering
      v-bind="popoverOptions"
    >
      <el-image
        :preview-teleported="true"
        :src="popoverTempContent"
        fit="cover"
      >
        <template #error>
          <div class="el-image__error">无图</div>
        </template>
      </el-image>
    </el-popover>
  </section>
</template>

<script lang="ts" setup>

</script>
- src/components/table/index.vue
<template>
  <!--搜索栏-->
  <component-table-search
    v-if="searchColumns?.searchs?.length"
    v-model:loading="submitLoading"
    :config="searchColumns"
    @update:submit="searchConditionsEmit"
  >
    <template #search-prefix="{ data }">
      <slot name="search-prefix" :data="data"></slot>
    </template>
    <template #search-suffix="{ data }">
      <slot name="search-suffix" :data="data"></slot>
    </template>
  </component-table-search>

  <!--功能区-->
  <div v-if="actionSlot" class="frag-container-padding-rl table-action">
    <slot name="table-action"></slot>
  </div>

  <!--表格模块-->
  <component-table-list
    v-if="tableColumns.length"
    :dataList="tableData.list"
    :tableColumns="tableColumns"
    :dataLoading="dataLoading"
    :tooltipOptions="tooltipOptions"
    :tableParams="tableParams"
    :tableConfig="tableConfig"
    :selectionChange="handleSelectionChange"
    :class="{ 'table-action-null': !actionSlot }"
    @tableColumnActionEmit="tableColumnActionEmit"
  >
    <template
      v-for="dx in (tableColumns as Record<string, any>[])"
      :key="dx.prop || dx.type"
      #[`column-${dx.prop||dx.type}`]="{ scope, item }"
    >
      <slot
        v-if="!dx.type"
        :name="`column-${dx.prop}`"
        :row="scope.row"
        :$index="scope.$index"
        :column="scope.column"
        :item="item"
      >
      </slot>
      <slot
        v-if="dx.type === 'action'"
        :name="`column-${dx.type}`"
        :row="scope.row"
        :$index="scope.$index"
        :column="scope.column"
        :item="item"
      ></slot>
    </template>

    <!--后缀-->
    <template
      v-for="dx in (tableColumns as Record<string, any>[])"
      :key="dx.prop || dx.type"
      #[`column-${dx.prop||dx.type}-suffix`]
    >
      <slot name="column-cover_uri_link-suffix"></slot>
    </template>
  </component-table-list>
</template>

<script lang="ts" setup>
import componentTableSearch from "./table-search.vue";
import componentTableList from "./table-list.vue";
</script>
- view/table.vue
<template>
  <component-table
    ref="tableRef"
    :action-slot="true"
    :search-columns="searchColumns"
    :data-api="getListAPI"
    :data-params="listApiParams"
    field-alias="img_list"
    :table-columns="listColumns"
  >
    <template #table-action>
      <el-button type="primary" plain @click="addItemAction">新建</el-button>
    </template>

    <template #column-cover_uri_link-suffix>
      <div class="copy-cover_uri_link">辅助 222</div>
    </template>

    <template #column-sort="{ row }">
      <span>{{ row?.sort }}</span>
    </template>
  </component-table>
</template>

<script lang="ts" setup>
import componentTable from "@/components/table/index.vue";
</script>
<Suspense>
<Suspense>是一个内置组件,用来在组件树中编排异步依赖,可以在等待组件树下的多个嵌套异步依赖项解析完成时,呈现加载状态。
<Suspense>
  <!-- 主要内容 -->
  <component :is="Component"></component>

  <!-- 加载中状态 -->
  <template #fallback>
    正在加载...
  </template>
</Suspense>
组件 v-model 传值
自定义事件也可以用于创建支持 v-model 的自定义输入组件。
<Teleport>
<Teleport>在Vue的DOM结构外渲染了Vue组件,维持着Vue的逻辑关系,但是由于没有维持虚拟结构关系,因此在使用Event等事件会出现问题,需要单独去兼容。
<template>
  <Teleport to="body">
    <div v-if="open" class="modal">
      <p>Hello from the modal!</p>
      <button @click="open = false">Close</button>
    </div>
  </Teleport>
</template>
指令系统
v-model
响应式系统
响应式对象
ref
v-model
监听数据源
watch
const state = reactive({ count: 0 })
watch(state, (newValue, oldValue) => {
  /* 深层级变更状态所触发的回调 */
},
{
  immediate: // 在侦听器创建时立即触发回调。第一次调用时旧值是 undefined。
  deep: // 如果源是对象,强制深度遍历,以便在深层级变更时触发回调。参考深层侦听器。
  flush: //调整回调函数的刷新时机。参考回调的刷新时机及 watchEffect()。
  onTrack / onTrigger: // 调试侦听器的依赖。参考调试侦听器。
  once: // 回调函数只会运行一次。侦听器将在回调函数首次运行后自动停止。
}
)
watchEffect
立即运行一个函数,同时响应式地追踪其依赖,并在依赖更改时重新执行。
Composition API
setup函数
setup函数是处于 生命周期函数 beforeCreate 和 Created 两个钩子函数之间的函数。
import { toRef } from 'vue'
export default {
  setup(props, context) {
    // props 是响应式的,不能使用 ES6 解构,它会消除 prop 的响应性,但是可以在setup函数中使用toRefs函数
    console.log(props.title)
    const title = toRef(props, 'title')

    // Attribute (非响应式对象,等同于 $attrs)
    console.log(context.attrs)

    // 插槽 (非响应式对象,等同于 $slots)
    console.log(context.slots)

    // 触发事件 (方法,等同于 $emit)
    console.log(context.emit)

    // 暴露公共 property (函数)
    console.log(context.expose)


    return {
      name: ''
    }
  }
}
单文件组件 (SFC)
- 注意事项
- 语块包裹的内容将会被提取、传递给 @vue/compiler-dom,预编译为 JavaScript 渲染函数,并附在导出的组件上作为其 render 选项。
- 每个 *.vue 文件最多可以包含一个
<script>块,不包括<script setup>,两者可以并存。 - 每个 *.vue 文件最多可以包含一个
<script setup>,<script setup>是在单文件组件 (SFC) 中使用组合式 API 的编译时语法糖。
传统写法
<template src="./template.vue"></template>
<script lang="ts" src="./script.ts"></script>
<style lang="less" src="./style.less"></style>


<template lang="pug"></template>
<template>
  <section>
  </section>
</template>

<script lang="ts">
  export default {
    data() {
      return {}
    },
    props: {
      title: String
    },
    // 不能解构 props 对象,否则解构出的变量将会丢失响应性。
    // 上下文对象是非响应式
    setup(props, context) {
      // 将 `props` 转为一个其中全是 ref 的对象,然后解构
      const { title } = toRefs(props);
      // `title` 是一个追踪着 `props.title` 的 ref
      console.log(title.value);

      // 或者,将 `props` 的单个 property 转为一个 ref
      const title = toRef(props, 'title');

      return {}
    }
  }
</script>

<style lang='less' scoped>
</style>
<script setup>语法
- 更少的样板内容,更简洁的代码。
- 能够使用纯 Typescript 声明 prop 和抛出事件。
- 更好的运行时性能 (其模板会被编译成同一作用域的渲染函数,没有任何的中间代理)。
- 更好的 IDE 类型推断性能 (减少语言服务器从代码中抽离类型的工作)。
当前文件
组件名称: current.vue
<template>
  <!-- 视图页面 -->
	<section class="page-xxx"></section>

  <!-- 组件 -->
	<section class="component-xxx"></section>

  <componentUI v-model="childConf.visual" @action:submit="actionEvent"></componentUI>
</template>

<script lang="ts" setup>
import componentUI from "./componet.vue";


// 全局资源库
import {} from '@/utils/index';
import {} from '@/interface/index';
import {} from '@/constants/index';
import {} from '@/api/index';

// 局部资源库
import {} from './api';
import {} from './config';
import {} from './constant';
import {} from './interface';


/**
 * @当前业务
 * 具体逻辑实现代码
 */

// 子组件回调函数
function actionEvent(type = "", data = {}) {
  const {} = data || {};

  if (type === 'submit') {
    //
  }

  if (type === 'confirm') {
    //
  }

  if (type === 'cancel') {
    //
  }
}
</script>
引用文件
组件名称: componet.vue
<template></template>

<script lang="ts" setup>
// 第三方资源类库或插件
import {
  ref,
  reactive,
  getCurrentInstance,
  onMounted,
  nextTick,
  useSlots,
  useAttrs
} from 'vue'
import {
  useRouter,
  useRoute,
  onBeforeRouteLeave,
  onBeforeRouteUpdate
} from "vue-router";

// 全局资源库

// 局部资源库

/**
 * @当前业务
 * 具体逻辑实现代码
 */
const router = useRouter();
const route = useRoute();
const slots = useSlots();
const attrs = useAttrs();

// 非数组与对象
const xxx = ref();
const xxxXxx = ref();

// 数组
const xxxList = ref([]);

// 对象,命名: xxxConf
const xxxConf = reactive({
	value: '',
	actions: []
});

// 获取当前组件实例
const instance = getCurrentInstance();
const { proxy: { $nextTick, $forceUpdate, $slots }, parent, refs } = getCurrentInstance();

const props = defineProps({
  modelValue: {
		type: Boolean,
		default() {
			return false;
		}
	}
});

const props = defineProps({
	modelValue: {
		type: Boolean,
		default() {
			return false;
		}
	}
});

// 通过模板 ref 或者 $parent 链获取到的组件的公开实例,不会暴露任何在 <script setup> 中声明的绑定
defineExpose({
  /**
   * <El ref="ysunIntelCourseRef" />
   * const ysunIntelCourseRef = ref();
   * ysunIntelCourseRef.value?.open();
   */
  open() {}
});


/**
 * 声明emits,defineEmits 也接收 emits 选项相同的值
 */
const emit = defineEmits([
  'update:modelValue',
  'action:submit',
  'action:confirm',
  'action:cancel'
]);

// 限制重复提交
const submitLoading = ref(false);

const initValue = computed({
  get: () => props.modelValue,
  set: (val) => {
    emit('update:modelValue', val)
  }
});


// 初始化依赖数据
async function initDependFunc(data = {}) {
	emit('action:submit', 'submit', {});
  emit('action:confirm', 'confirm', {});
  emit('action:cancel', 'cancel', {});
};
initDependFunc();

// 路由导航
function switchPathFunc(path: string) => {
  router.push({ path });
};

onMounted(() => {
  $forceUpdate()
}

$nextTick(() => {
  //
});

onBeforeRouteLeave((to, from) => {
  return false;
});
</script>

<!--可选: 若不需要则删除-->
<!--全局引入,注意作用域污染问题-->
<style lang="scss">
  @use url('./style/index.scss');

  /** */
</style>

<!--可选: 若不需要则删除-->
<!--当前页面作用域-->
<style lang="scss" scoped>
  @use url('./style/index-scoped.scss');

  .page- {
    position: relative;
  }
</style>
参考模板
<template>
  <section class="page-"></section>
</template>


<script setup lang="ts">
// 第三方资源类库或插件
import { ref } from "vue";

// 全局资源库

// 局部资源库

/**
 * @当前业务
 * 具体逻辑实现代码
 */

async function initDependData() {
  //
}
initDependData();
</script>


<!--全局引入,注意作用域污染问题-->
<style lang="scss">
  @use url("");

  /** */
</style>

<style lang="scss" scoped>
  .page- {
    position: relative;
  }
</style>
组件回调函数
动画系统
示例一
<input type="text" v-model="number" />
<br />
<p>{{ tweened.number.toFixed(0) }}</p>


<script src="/public/source/Vue/vue3/vue.global.prod.js"></script>
<script src="/public/source/GSAP/gsap.min.js"></script>
<script type="text/javascript">
  const { createApp, ref, reactive, watch } = Vue;

  const app = createApp({
    setup() {
      const number = ref(0);
      const tweened = reactive({
        number: 0,
      });

      watch(number, (n) => {
        gsap.to(tweened, { duration: 0.5, number: Number(n) || 0 });
      });

      return {
        number,
        tweened,
      };
    },
  });

  app.mount("#app");
</script>
Vue插件扩展
插件是一种能为 Vue 增强生态功能体验的实现手段。
使用插件示例(Vue3.x)
以Vuex为示例
const app = Vue.createApp({});
const store = Vuex.createStore({});
app.use(store);
插件扩展四种类型
- 通过 app.component() 和 app.directive() 注册一到多个全局组件或自定义指令。
// 组件
app.component('MyComponent', {
  //
});

// 指令
app.directive('MyDirective', {
  //
});
- 通过 app.provide() 使一个资源可被注入进整个应用。
// 注入
app.provide('injectName', value);
- 向 app.config.globalProperties 中添加一些全局实例属性或方法。
- 一个可能上述三种都包含了的功能库 (例如 vue-router)。
vue-router
安装配置
> pnpm install vue-router@4
路由配置结构
- index.ts
// index.ts
import { createRouter, createWebHistory } from 'vue-router';

import routesList from './routes';

const router = createRouter({
  history: createWebHistory(import.meta.env.BASE_URL),
  scrollBehavior: () => ({ top: 0 }),
  routes: routesList
});

export default router;
- routes.ts
import type { RouteRecordRaw } from 'vue-router';

import { routerAccount } from './modules/account';

const routesList: RouteRecordRaw[] = [
  {
    path: '/',
    name: 'index',
    component: () => import('@/views/index.vue'),
    meta: {
      index: 0
    }
  },
  ...routerAccount(),
  {
    path: '/:catchAll(.*)',
    name: 'catchError',
    component: () => import('@/views/catch-error/error.vue'),
    meta: {
      index: 9999
    }
  }
];
- modules/account.ts
export function routerAccount() {
  const route = [
    {
      path: '/account',
      name: 'account',
      meta: {
        index: 200
      },
      children: [
        {
          path: 'enroll',
          name: 'accountEnroll',
          component: () => import('@/views/account/enroll.vue'),
          meta: {
            index: 210
          }
        }
      ]
    }
  ];

  return route;
}
API接口
// 第三方资源类库或插件
import {
  RouterLink,
  RouterView,
  START_LOCATION,
  createMemoryHistory,
  createRouter,
  createRouterMatcher,
  createWebHashHistory,
  createWebHistory,
  isNavigationFailure,
  matchedRouteKey,
  onBeforeRouteLeave,
  onBeforeRouteUpdate,
  parseQuery,
  routeLocationKey,
  routerKey,
  routerViewLocationKey,
  stringifyQuery,
  useLink,
  useRoute,
  useRouter,
  viewDepthKey,
} from 'vue-router';


/**
 * @当前业务
 * 具体逻辑实现代码
 */
const { proxy: { $nextTick, $forceUpdate, $slots } } = getCurrentInstance();

const router = useRouter(); // 返回路由器实例。相当于在模板中使用 $router。
const route = useRoute(); // 返回当前的路由地址。相当于在模板中使用 $route。

// 当前路由
console.log(route.path);

onMounted(() => {
  $forceUpdate()
}

$nextTick(() => {
  //
})

onBeforeRouteUpdate(async (to, from) => {

});

onBeforeRouteLeave(async (to, from) => {
  //
});

// 路由
const switchPath = (path: string) => {
  router.push({ path });
};
路由按需加载(懒加载)
当打包构建应用时,JavaScript 包会变得非常大,影响页面加载,把不同路由对应的组件分割成不同的代码块,然后当路由被访问的时候才加载对应组件,这样就会更加高效。
const routes: Array<RouteRecordRaw> = [
  {
    path: '/article',
    component: import(/* webpackChunkName: "index" */ '@/components/index.vue')
  }
];
动态路由
const routes: Array<RouteRecordRaw> = [
  {
    path: '/article/:id',
    component: Article
  }
];
完整的导航解析流程
- 导航被触发。
- 在失活的组件里调用 beforeRouteLeave 守卫。
- 调用全局的 beforeEach 守卫。
- 在重用的组件里调用 beforeRouteUpdate 守卫(2.2+)。
- 在路由配置里调用 beforeEnter。
- 解析异步路由组件。
- 在被激活的组件里调用 beforeRouteEnter。
- 调用全局的 beforeResolve 守卫(2.5+)。
- 导航被确认。
- 调用全局的 afterEach 钩子。
- 触发 DOM 更新。
- 调用 beforeRouteEnter 守卫中传给 next 的回调函数,创建好的组件实例会作为回调函数的参数传入。
beforeunload 事件
当浏览器窗口关闭或者刷新时,会触发 beforeunload 事件。当前页面不会直接关闭,可以点击确定按钮关闭或刷新,也可以取消关闭或刷新。
window.addEventListener('beforeunload', (event) => {
  // Cancel the event as stated by the standard.
  event.preventDefault();
  // Chrome requires returnValue to be set.
  event.returnValue = '';
});
路由转场动画
<template>
  <div class="com-frame component-container">
    <router-view v-slot="{ Component }" class="com-frame router-view">
      <keep-alive>
        <transition name="el-zoom-in-center" mode="out-in">
          <component :is="Component" />
        </transition>
      </keep-alive>
    </router-view>
  </div>
</template>

<script setup lang="ts">
// 第三方资源类库或插件
import { ref, watchEffect, watch } from "vue";
import { RouterView, useRouter, useRoute } from 'vue-router';

/**
 * @当前业务
 * 具体逻辑实现代码
 */
const router = useRouter();
const route = useRoute();


watch(router.currentRoute, (newValue, oldValue) => {
  console.info('路由: ', newValue, oldValue);
}, { deep: true });
</script>

<style lang="scss" scoped>
</style>
路由转场动画
路由进入与离开,前进与后退转场切换动画。
<template>
<div id="fujinhuo" class="com-frame com-flexh">
<!--旧语法-->
<transition :name="swipeAnimate">
<router-view class="router-view"></router-view>
</transition>
<!--Vue3语法-->
<router-view v-slot="{ Component }">
<transition :name="swipeAnimate">
<keep-alive>
<component :is="Component" />
</keep-alive>
</transition>
</router-view>
</div>
</template>
<script>
export default {
name: 'fujinhuo',
data() {
return {
routeList: [
{ route: '/message/index', icon: '', text: '消息', active: false, css: 'font-size:.17rem;'},
{ route: '/goods/index', icon: '', text: '购物', active: false, css: 'font-size:.18rem;'},
{ route: '/nearby/index', icon: '', text: '附近', active: false, css: 'font-size:.25rem;'},
{ route: '/activity/index', icon: '', text: '活动', active: false, css: 'font-size:.18rem;'},
{ route: '/account/index', icon: '', text: '我的', active: false, css: 'font-size:.18rem;'}
],
swipeAnimate: ""
}
},
components: {},
watch: {
$route(to, from) {
this.routeList.forEach((idx)=> {
idx.active = false;
if (to.path == idx.route) {
idx.active = true;
}
});
//路由转场动画
if (typeof to.meta.index !== 'number' || typeof from.meta.index !== 'number') {
return ;
}
if (to.meta.index > from.meta.index) {
this.swipeAnimate = "slide-left";
return;
}
this.swipeAnimate = "slide-right";
}
},
methods: {
changeItem(dx) {
this.$router.push({
path: dx.route
});
}
}
}
</script>
<style type="text/css">
@use "~@/assets/css/default.css";
@use "~@/assets/css/public.css";
.slide-right-enter-active, .slide-right-leave-active, .slide-left-enter-active, .slide-left-leave-active {
will-change: transform;
transition: all 200ms;
position: absolute;
}
.slide-right-enter {
opacity: 0;
transform: translate3d(-100%, 0, 0);
}
.slide-right-leave-active {
opacity: 0;
transform: translate3d(100%, 0, 0);
}
.slide-left-enter {
opacity: 0;
transform: translate3d(100%, 0, 0);
}
.slide-left-leave-active {
opacity: 0;
transform: translate3d(-100%, 0, 0);
}
</style>
Vuex
Vuex 是一个专为 Vue.js 应用程序开发的状态管理模式 + 库,借鉴了 Flux、Redux 和 The Elm Architecture。
代码示例
import { createStore, Store } from 'vuex';

const moduleA = {
  state: () => ({ ... }),
  mutations: { ... },
  actions: { ... },
  getters: { ... }
}

export const key: InjectionKey<Store<State>> = Symbol();

const store = createStore({
  modules: {
    a: moduleA,
  }
})

export default store;
- API接口
import {
  version,
  Store,
  storeKey,
  createStore,
  useStore,
  mapState,
  mapMutations,
  mapGetters,
  mapActions,
  createNamespacedHelpers,
  createLogger
} from 'vuex';

export default {
  setup () {
    const store = useStore()
  }
}
- Store 实例属性
- Store 实例方法
State与mapState辅助函数
computed: {
  ...mapState([
    'app',
    'moduleA'
  ])
},
Getter与mapGetters辅助函数
从 store 中的 state 中派生出一些状态。
getters: {
  doneTodos (state) {
    return state.todos.filter(todo => todo.done)
  }
}

computed: {
  ...mapGetters([
    'doneTodos'
  ])
}

// 通过属性访问
store.getters.doneTodos
Mutation与mapMutations辅助函数
更改 Vuex 的 store 中的状态的唯一方法是提交 mutation。
mutations: {
  increment (state, payload) {
    state.count++
  }
}

// 提交载荷(Payload)
store.commit('increment', {})
- 订阅Mutation
const unsubscribe = store.subscribe((mutation, state) => {
  console.log(mutation.type)
  console.log(mutation.payload)
})

// 停止订阅
unsubscribe()
Action与mapActions辅助函数
actions: {
  increment ({ commit }) {
    commit('increment')
  },
  async actionA ({ commit }, params) {
    commit('gotData', await getData())
  },
  async actionB ({ commit }, params) {
    return await getData();
  },
}

methods: {
  ...mapActions(['increment'])
}

// 派发
store.dispatch('increment', {})
store.dispatch('actionA').then(() => {
  // ...
})
- 订阅Action
const unsubscribe = store.subscribeAction((action, state) => {
  console.log(action.type)
  console.log(action.payload)
})

// 停止订阅
unsubscribe()
按需加载
Vuex状态管理,通过一次性注入业务逻辑,随着业务逻辑的增加,JS公共包体积就会膨胀变大,这严重影响了首次加载速度。
- 示例一,在main.js添加
Vue.use(function() {
  Vue.mixin({
    beforeCreate: function() {
      // $options是组件选项,包含组件.vue文件的 `export default` 的属性
      // 为了拿到在组件定义的是否按需加载的属性值 `isNeedVuex`
      if(this.$options.isNeedVuex) {
        // 需要设置.vue文件的name属性,跟单文件组件名字命名一样
        let name = this.$options.name;
        import("./store/modules/" + name).then((res) => {
          console.log(res);
          // res.default就是代表我们在store/modules文件夹下对应文件的export default对象
          // registerModule是vuex自带的方法,请自行搜索
          // 第一个参数是动态注入的模块名,第二个参数是模块导出对象
          this.$store.registerModule(name, res.default);
        });
      }
    }
  });
});
组合式函数
import { useStore } from 'vuex'

const store = useStore()
缓存页面数据
//在页面刷新时将vuex里的信息保存到sessionStorage里
window.addEventListener("beforeunload",()=>{
    sessionStorage.setItem("store", JSON.stringify(this.$store.state))
})
内置Logger插件
Vuex 自带一个日志插件用于一般的调试。
import { createLogger } from 'vuex';

const logger = createLogger({});
const store = createStore({
  plugins: [logger]
})
Pinia 状态管理库
Pinia 是 Vue 的存储库,它允许您跨组件/页面共享状态,
语法示例
- App.vue
import { createApp } from "vue";
import { createPinia } from "pinia";

import App from "./App.vue";
import router from "./router";

const app = createApp(App);

app.use(createPinia());
app.use(router);

app.mount("#app");
- stores/index.ts
import { reactive } from "vue";
import { defineStore } from "pinia";

import type { SCROLL_ROUTE_TYPE } from "@/constants/router";

export const storeMenu = defineStore("menu", () => {
  const menuList = reactive<SCROLL_ROUTE_TYPE[]>([]);

  const pushRoute = (item: SCROLL_ROUTE_TYPE) => {
    menuList.push(item);
  };

  const removeRoute = (index: number) => {
    menuList.splice(index, 1);
  };

  const clearRoute = () => {
    menuList.splice(0, menuList.length);
  };

  return { menuList, pushRoute, removeRoute, clearRoute };
});
- 代码示例
// stores/counter.js
import { defineStore } from 'pinia'

export const useCounterStore = defineStore('counter', {
  state: () => {
    return { count: 0 }
  },
  actions: {
    increment() {
      this.count++
    },
  },
})

// 读取
import { useCounterStore } from '@/stores/counter'
export default {
  setup() {
    const counter = useCounterStore()

    counter.count++
    counter.$patch({ count: counter.count + 1 })
    counter.increment()
  },
}
Nuxt.js与服务端渲染 (SSR)
Nuxt.js是一个服务端渲染的应用。
- Vue3资源文档
- Vue2资源文档
- Vue3安装配置
> 安装:pnpm dlx nuxi init [nuxt-app]
> 依赖:pnpm install --shamefully-hoist
> 开发环境:pnpm run dev
> 打包:pnpm run build
> 部署:pm2 start npm --name [nextapp] -- run build
注意事项
Nuxt.js兼容node版本:(^14.16.0 || ^16.11.0 || ^17.0.0 || ^18.0.0)
Vue2目录结构与相关功能
- .nuxt
- .output
- assets
- components
- content
- composables
- layouts
- middleware
- pages
- modules
- plugins
- public
- store
- server
- app.vue
- nuxt.config.js
工程化建设方案
vue工程化配置,即采用现代开发构建部署规范工具实现团队协作的高效率高质量开发流程标准规范。
构建工具 Build Tool
create-vue
rollup-plugin-vue
babel-plugin-jsx
vue-loader
Volar
推荐volar,删除Vetur,安装volar。官方的 VSCode Vue 工具扩展,包括语法高亮,代码片段(snippet),Lint 校验,代码格式化等特性。
awesome-vue
这是一个关于Vue.js生态技术体系全面介绍的资源文档。
Vue-Cli webpack
- vue.config.js
const path = require('path');
const { defineConfig } = require('@vue/cli-service');

function resolve(dir) {
  return path.join(__dirname, dir)
}

module.exports = defineConfig({
  transpileDependencies: true,

  // 配置别名alias
  chainWebpack: (config)=> {
    config.resolve.alias
      .set('@', resolve('src'))
      .set('assets', resolve('src/assets'))
  },
})
- babel.config.js
module.exports = {
  presets: [
    '@vue/cli-plugin-babel/preset'
  ]
}
Vue-Cli vite
Typescript
> yarn add typescript
- package.json
{
  "scripts": {
    "dev": "tsc --noEmit && vite",
  }
}
- vue-tsc
> npm i vue-tsc -D
- package.json
{
  "scripts": {
		"dev": "vue-tsc --noEmit && vite --mode serve-dev --host",
		"test": "vite --mode serve-test --host",
		"build:test": "vue-tsc --noEmit && vite build --mode  build-test",
		"build": "vue-tsc --noEmit && vite build --mode build",
		"preview": "vite preview ",
		"lint": "eslint --ext .js,.jsx,.vue,.ts,.tsx src --fix",
		"prepare": "husky install",
		"view": "rollup-plugin-visualizer --help"
  }
}
ESLint
vue add @vue/eslint
eslint-plugin-vue
- 官网: https://eslint.vuejs.org/
- GitHub: https://github.com/vuejs/eslint-plugin-vue
- 规则列表: https://eslint.vuejs.org/rules/
安装配置
npm install --save-dev eslint eslint-plugin-vue # npm
yarn add -D eslint eslint-plugin-vue # yarn
推荐配置
.eslintrc.js
module.exports = {
  extends: [],
  rules: {}
};
配置文档
.eslintrc.js
StyleLint
LESS
- 安装配置
> npm i less-loader less -D
- 配置示例
module: {
    rules: [
      //  此处省略无数行,已有的的其他的规则
      {
        test: /\.less$/,
        loader: "style-loader!css-loader!less-loader",
      }
    ]
  }
}
// 在.vue中标签设置
<style lang="less" scoped></style>
SASS
module: {
    rules: [
      //  此处省略无数行,已有的的其他的规则
      {
        test: /\.less$/,
        loader: "style-loader!css-loader!less-loader",
      }
    ]
  }
}
// 在.vue中标签设置
<style lang="less" scoped></style>
Jest单元测试
安装:vue add @vue/unit-jest
Test Utils
vue-jest
PWA
在vue-cli项目中执行vue add pwa添加PWA。
GitHub:https://github.com/vuejs/vue-cli/tree/dev/packages/%40vue/cli-plugin-pwa
配置vue.config.js
module.exports = {
  pwa: {
    name: 'My App',
    themeColor: '#4DBA87',
    msTileColor: '#000000',
    appleMobileWebAppCapable: 'yes',
    appleMobileWebAppStatusBarStyle: 'black',

    // 配置 workbox 插件
    workboxPluginMode: 'GenerateSW', // 也可以定义为‘InjectManifest’模式。但是需自己写SW.js文件进行配置

    workboxOptions: {
      skipWaiting: true, // 安装完SW不等待直接接管网站
      clientsClaim: true,
      navigateFallback: '/index.html',
      exclude: [/\.(?:png|jpg|jpeg|svg)$/], //在预缓存中排除图片

      // 定义运行时缓存
      runtimeCaching: [
        {
          urlPattern: new RegExp('^https://cdn'),
          handler: 'NetworkFirst',
          options: {
            networkTimeoutSeconds: 20,
            cacheName: 'cdn-cache',
            cacheableResponse: {
              statuses: [200]
            }
          }
        }
      ]
    }
  }
}
Commitlint
Vue CLI
Vue CLI 是一个基于 Vue.js 进行快速开发的完整系统。
@vue/cli-service源码分析
性能调优最佳实践
充分运用Vue相关语法中关于缓存实现的特性,以及避开运行时重复执行的逻辑问题,还有多次调度相关函数的问题,最终在构建、打包、编译与运行时各个阶段实现代码体积和执行耗时的最佳实践。
工程实战示例
工程实战示例基于Vue3.x、Vite、TS等技术栈体系。
工程结构目录
├─ dist             # 构建打包后存储文件夹
├─ public           # 不参与构建的静态资源文件夹
├─ src              # 项目资源文件夹
| ├─ declare        # 声明文件
│ │ ├─ env.d.ts
│ │ ├─ index.d.ts
│ │ └─ vue-shim.d.ts
| ├─ api            # 公共API
| ├─ assets         # 需要参与构建静态资源
| ├─ components     # 组件
│ │ ├─ common       # 公共组件,最小单元组件,即内部不包含任何内嵌组件,具有独立性与非依赖性
| ├─ constants      # 常量
│ │ ├─ common       # 项目全局常量,例如版本号
│ │ ├─ config       # 项目配置常量,例如
│ │ ├─ permission   # 权限常量
| ├─ router         # Vue-router路由文件
| ├─ store          # Store状态文件
| ├─ utils          # 工具纯函数
| ├─ core           # 核心库
| ├─ views          # 页面文件夹,存储页面级文件
│ │ ├─ module       # 页面示例
│ │ │ ├─ api.ts     # 当前页面API文件
│ │ │ ├─ style.less # 当前页面样式文件
│ │ │ ├─ config.ts  # 当前页面配置文件
│ │ │ ├─ index.ts   # 当前页面业务逻辑文件
│ │ │ ├─ index.vue  # 当前页面视图文件
| ├─ App.vue        # 页面入口
| └─ main.js        # 工程入口
├─ vite.config.ts   # vite配置
├─ package.json     # 依赖包配置
├─ tsconfig.json
├─ prettier.config.js
├─ stylelint.config.js
├─ commitlint.config.js
└─ README.md:       # 说明文档
相关配置文件
- vite.config.ts
import { defineConfig } from 'vite';
import vue from '@vitejs/plugin-vue';


// https://vitejs.dev/config/
export default defineConfig((params) => {
  const configOptions: Record<string, any> = {
    envDir: './env/',
    server: {
      host: "0.0.0.0"
    },
    resolve: {
      alias: [
        {
          find: '@',
          replacement: path.resolve(__dirname, './src'),
        },
      ]
    },
  };

  configOptions.plugins = [vue()];

  return configOptions;
});
- main.ts
import { createApp } from 'vue'
import router from './router';
import store from './store';
import App from './App.vue'

const app = createApp(App);
app.use(router);
app.use(store);
app.mount('#app');
- App.vue
<template>
  <router-view class="router-view"></router-view>
</template>

<script lang="ts">
  export default {
    data() {
      return {}
    }
  }
</script>

<style lang="less">
  @use '@/assets/styles/default.css';
  @use '@/assets/styles/public.css';
</style>
核心业务代码
类名: component-name | page-name
- module.vue
<template>
  <div class="page-module"></div>
</template>


<script setup>
  //
</script>

<style lang="scss" scoped>
</style>
- module.ts
// <script src=""></script>
- module.js
- module.less
//
- module.sass
常见问题与释疑
- vue3加ts出现 --找不到模块“@/views/HomeView.vue”或其相应的类型声明。
ts只支持导出导入模块,但是vue不是模块,需要申明一下vue是个模块。在项目根目录创建文件env.d.ts
declare module '*.vue' {
  import { ComponentOptions } from 'vue'
  const componentOptions: ComponentOptions
  export default componentOptions
}

declare module '*.vue' {
  import { DefineComponent } from 'vue'
  // eslint-disable-next-line
  const component: DefineComponent<{}, {}, any>
  export default component
}
- error TS6504: File '/home/meta/List/vue3-vite-ts/src/views/shop.vue.js' is a JavaScript file. Did you mean to enable the 'allowJs' option?
两种方法,一种是在.vue文件中
<script setup lang="ts"></script>,另一种是配置同时支持ts与js
Cannot find module '@/components/bases/Dialogs/index.vue' or its corresponding type declarations.
Cannot find module 'vue-router'. Did you mean to set the 'moduleResolution' option to 'node', or to add aliases to the 'paths' option?ts(2792)
- 升级VSCode编辑器到最新版,因为VSCode内置TS版本太低,不兼容新的TS语法。
File '/views/index.vue' is not listed within the file list of project '/tsconfig.app.json'. Projects must list all files or use an 'include' pattern.ts(6307)
error: Parsing error: Unexpected token < at src\components\HelloWorld.vue:1:1:
配置.eslintrc.js
module.exports = {
  rules: {
    'no-console': 'off',
    "parser": "vue-eslint-parser"
  },
}
核心功能实现方案
Vue生态系统
Element-Plus
核心优势
核心功能
当前缺陷
ant-design-vue
- antdv:https://www.antdv.com/docs/vue/introduce-cn/
- GitHub:https://github.com/ant-design-vue/antv/blob/c02c815a48d2a6437ea651f9df39e44448b228b8/README-zh_CN.md
核心优势
核心功能
当前缺陷
BootStrapVue
Cube UI
- 文档:https://didi.github.io/cube-ui/#/zh-CN/docs/introduction
- 演示:https://didi.github.io/cube-ui/example/#/
iView
- 官网:http://v1.iviewui.com/
- 后台管理系统:http://admin.iviewui.com/home
- 后台管理系统-演示:https://github.com/iview/iview-admin
- 后台管理系统-文档:https://lison16.github.io/iview-admin-doc/#/
- https://vben.vvbin.cn/
- https://github.com/vbenjs/vue-vben-admin
- https://github.com/vbenjs/vite-plugin-svg-icons
ja-ui-vue
mintUI
radon-ui
vue-class-component
Vue 类组件是一个库,可让您以类样式语法制作 Vue 组件。
- 安装:npm install --save vue vue-class-component
- 代码示例
import Vue from 'vue'
import Component from 'vue-class-component'

@Component
export default class Counter extends Vue {
  //
}
vue-property-decorator
Vue 属性装饰器
- 安装:npm i -S vue-property-decorator
- 代码示例
import { Vue, Component, Prop } from 'vue-property-decorator'
@Component
export default class YourComponent extends Vue {
  @Prop(Number) readonly propA: number | undefined
  @Prop({ default: 'default value' }) readonly propB!: string
  @Prop([String, Boolean]) readonly propC: string | boolean | undefined
}
vuex-module-decorators
vuex 模块装饰器
- 安装:npm install -D vuex-module-decorators
- 配置vue.config.js
module.exports = {
  transpileDependencies: ['vuex-module-decorators']
}
- 代码示例
import { Module, VuexModule, Mutation, Action } from 'vuex-module-decorators'

@Module
export default class Counter2 extends VuexModule {
  @Mutation
  increment(delta: number) {
    this.count += delta
  }
  @Mutation
  decrement(delta: number) {
    this.count -= delta
  }
}
vueuse
vue-demi
kim-vue-touch
kim-vue-touch提供了点击、长按、左滑、右滑、上滑、下滑等事件。
- 安装:pnpm install kim-vue-touch
- 代码示例
import vueTouch from 'kim-vue-touch';
Vue.use(vueTouch);

<template>
  <div class="box"
    v-tap="(e)=>vueTouch('点击',e)"
    v-longtap="(e)=>vueTouch('长按',e)"
    v-swipeleft="(e)=>vueTouch('左滑',e)"
    v-swiperight="(e)=>vueTouch('右滑',e)"
    v-swipeup="(e)=>vueTouch('上滑',e)"
    v-swipedown="(e)=>vueTouch('下滑',e)"
  ></div>
</template>
Vue I18n
Vue I18n 是 Vue.js 的国际化插件。
vue-cropper
常见问题
- Failed to mount component: template or render function not defined.
致因:新版本导出方式有所改变
// 解决方案:改变引入方式
import { VueCropper } from 'vue-cropper';
vue-manage-system
- GitHub:https://github.com/lin-xin/vue-manage-system
- 示例:https://lin-xin.gitee.io/example/work/#/login
Vue-Quill-Editor
- 官网:https://quilljs.com/docs/quickstart/
- https://github.surmon.me/vue-quill-editor/